In this article
Table of Contents maxLevel 3 absoluteUrl true
Overview
You can create a Scheduled Task after you have created a Pipeline in SnapLogic Designer. When you create a Scheduled Task in Designer, the Pipeline is pre-selected when you open the Create Task dialog window window. You also have the option to create a Task in Manager. When you create a Scheduled Task in Manager, you must select a Pipeline to associate with the Scheduled Task. You can choose from a variety of scheduling options to schedule executions of that Pipeline. If you create the Scheduled Task with the default scheduling settings intact, the Pipeline is scheduled to execute five minutes from the time you open the dialog window.
Creating a Task includes the following tasks and topics:
Creating a Scheduled Task
- Open the Create Task dialog window using one of the following methods:
- In Designer, click
 to expand the toolbar, click
  to display the drop-down menu, and then select Task > Scheduled Task to display the Create Task dialog window:
- In Manager, navigate to the target Project, click
 to display the drop-down menu, and then select Task > Scheduled Task to display the dialog window.
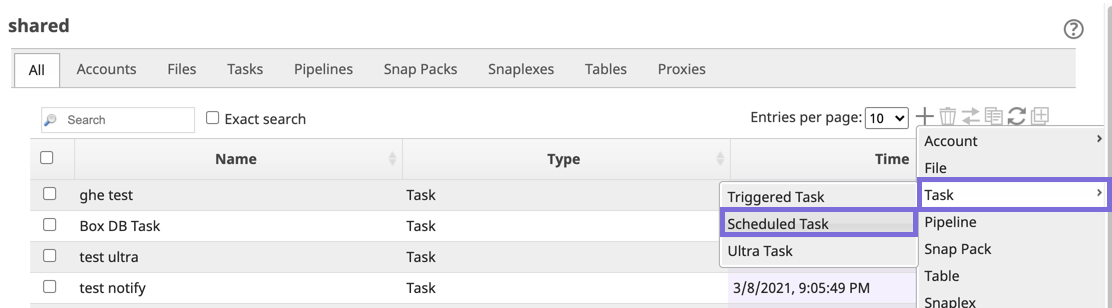
- In Designer, click
- In the Create Task dialog window, make the following required options:
Name: Enter a name for the scheduled Pipeline Task.
This name is used in the URL when the Pipeline has unconnected inputs/outputs.Note Unless otherwise noted, the names of any asset or project is limited to UTF-8 alphanumeric characters and these punctuation characters !"#$%&'()*+,-.:;<=>?@[\]^_`{|}~.
Pipeline: Select the Pipeline associated with the Scheduled Task from the Pipeline drop-down menu.
This Pipeline is triggered when the Scheduled Task is activated.- Snaplex: Select the Snaplex on which to run the Pipeline from the Snaplex drop-down menu.
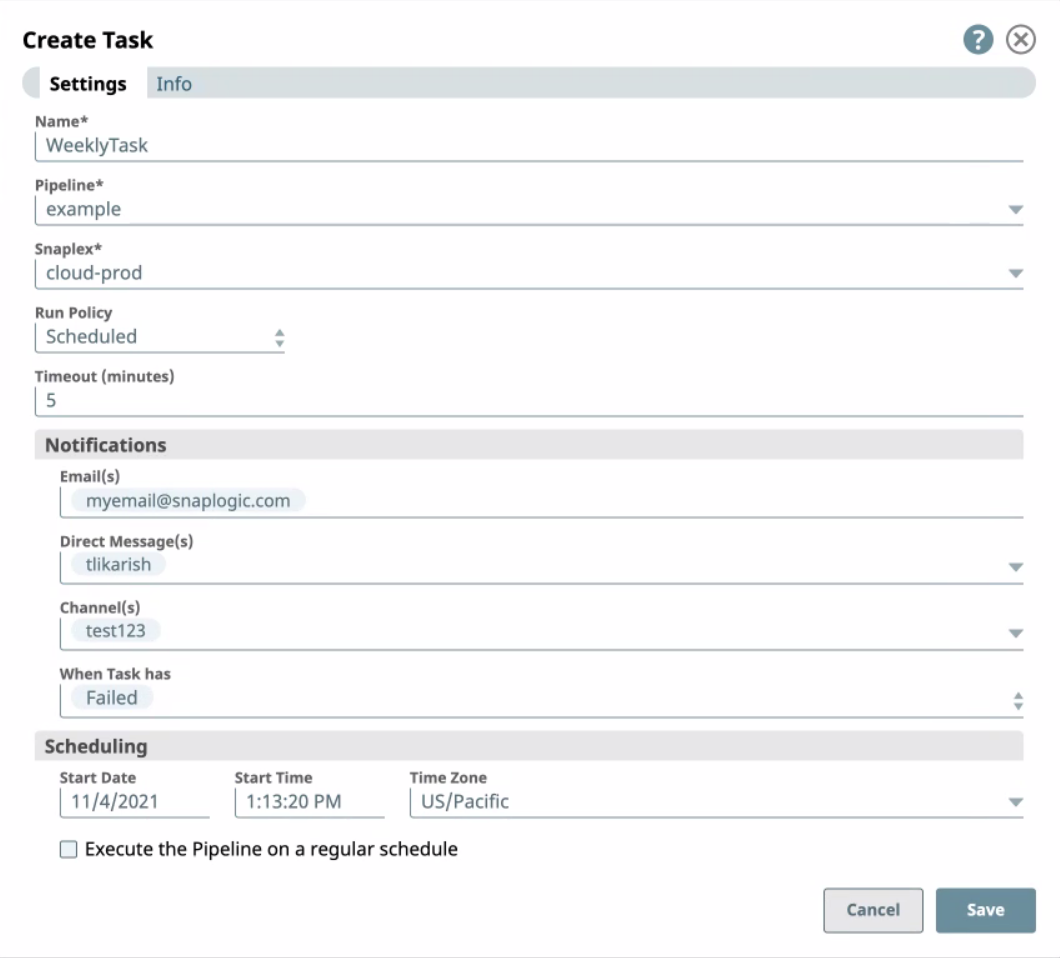
- Configure the schedule for this Task.
- Enter a Start Day/Time, and edit the Time Zone setting if required. Proceed to Step 4 if this Scheduled Task is a one-time execution.
- Select the Repeat Execute the pipeline on a regular schedule box to view the Scheduling Options for specifying how often the associated Pipeline should be run.
- If applicable, modify the Configuration Options in the dialog window, and click Save.
Viewing Task Details
After you create and enable a Scheduled Task, you can view details about the Task.
- Open the Task Details page for your Scheduled Task by clicking View Details.

- On the Task Details page, view Pipeline execution information for any scheduled instance by clicking Run Details.
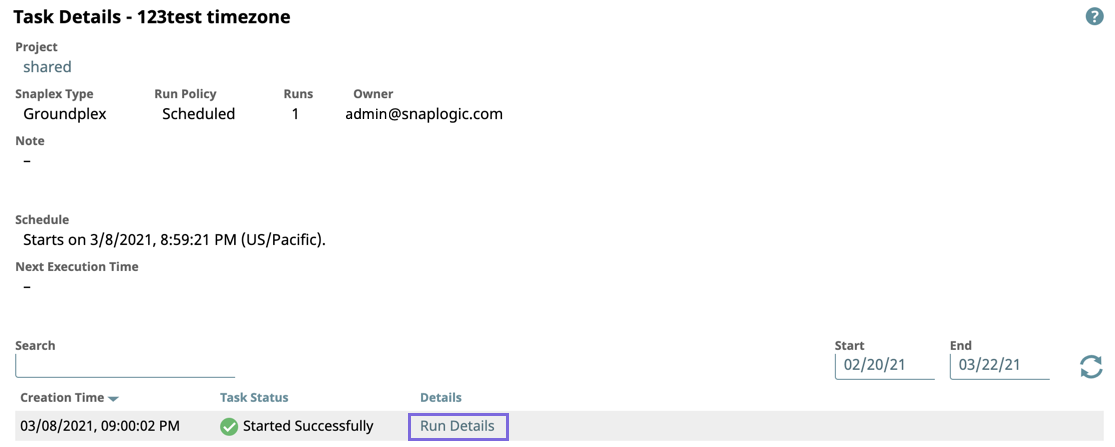
- Navigate to the Dashboard Pipeline Wall to monitor the scheduled execution of the Task.
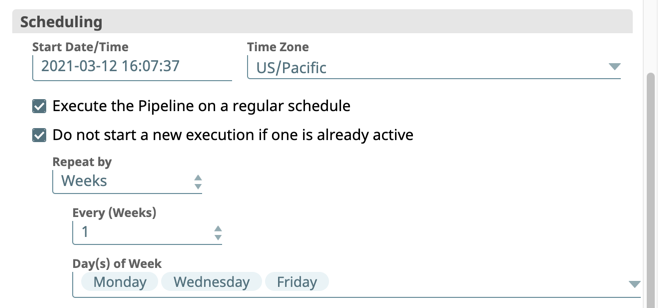
Scheduling Options
You can run a Pipeline repeatedly by configuring scheduling options that cover frequency, scheduling pattern, and exclusions (blackout dates). Pipeline runtimes are based on the Time zone that you set for the Scheduled Task.
Sequential Execution
You can prevent a Pipeline from running again if a previous execution of that Pipeline is already running. The Do not start a new execution if one is already active option forces the sequential execution of the scheduled Pipeline.
A three-month limit is placed on the Do not start a new execution if one is already active option. A second instance of that Pipeline is able to execute after the three-month period.
| Note | ||
|---|---|---|
| Multiexcerpt macro | ||
| ||
If a Task fails to start with the same reason for multiple times in a row, then subsequent skips are not displayed on the Task details page. |
Location Time Changes (Standard Time/Daylight Time)
For recurring Scheduled Tasks, runtimes and blackout dates are based on the Time zone that you set for the task. On the day when the locale time moves ahead by one hour, Scheduled Tasks that are scheduled to run during the time change window are automatically started one hour later.
This behavior prevents a task from being skipped that day. On the following day, these Scheduled Tasks resume their normal schedule. For example, on the day when Pacific Daylight Time (PDT) begins and the time changes from 2:00 AM to 3:00 AM, any task that is scheduled to start between 2:00 am and 3:00 AM is automatically started one hour later.
| Note | ||
|---|---|---|
| ||
We recommend using caution when scheduling Scheduled Tasks between midnight and 3:00 AM and take into consideration Daylight Savings. Because Scheduled Tasks can trigger Pipeline executions based on the time of day, the Daylight Savings time shift can cause the Task executions scheduled during this window of time to be skipped or to be executed more than once. Similarly, if you create a Scheduled Task to execute every 15 minutes of every hour, every day, then on the day when Daylight Savings time ends, there is a window of time during which the Task does not execute: because at 2:00 AM Standard Time, when the clock reverts to 1:00 AM, those Scheduled Task executions between 1:00 AM and 2:00 AM would have already occurred, resulting in an hour without any Scheduled Task executions. |
Pattern and Frequency
You can define the pattern and frequency of your Pipeline execution schedule. Use the Repeat By setting to select when to execute the Pipeline.
- Minutes: Select how often the Pipeline should be executed in minutes (1–59) from the Every (Minutes) drop-down list. For example, you can run a Scheduled Task every 13 minutes.
- Days: Select how often the Pipeline should be executed in days (1–90) from the Every (Days) drop-down list. For example, you can run a Scheduled Task every 45 days.
- Weeks: Select how often the Pipeline should be executed in weeks (1–52) from the Every (Weeks) drop-down list.
- Days of the Week: You can also specify which days of the week your Scheduled Task executes.
- Months: Select how often the Pipeline should be executed in months (1–6) from the Every (Months) drop-down list.
- Days of the Month: You can also specify the days of the month on which your Scheduled Task executes. This includes the following options:
- Dates of the month. For example, you can run a Scheduled Task on the 12th and 24th of every month.
- Days of the month (1st, 2nd, 3rd, 4th, 5th, Last). For example, you can schedule a task to run every third Wednesday of the month.
- Days of the Month: You can also specify the days of the month on which your Scheduled Task executes. This includes the following options:
- Years: Select how often the Pipeline should be executed in years (1-4) from the Every (Years) drop-down list.
- Cron: Select how often the Pipeline should be executed in a Cron schedule. See Cron Schedule for details.
Example Schedule
End of Schedule
You can specify the lifespan of your Scheduled Task.
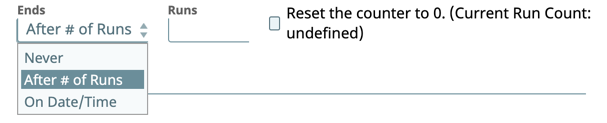
Select one of the following options for ending your Schedule Task:
- Never. Select to schedule Task executions for an indeterminate time. Task executions never stop as long as the Snaplex where the Pipeline runs remains online.
- After # of Runs. Select to specify the number of Scheduled Task executions. You can enter the number of Scheduled Task executions before the schedule ends in the Runs field. When the limit is reached, click the Reset the counter to 0 checkbox to re-activate scheduled executions.
- On Date/Time. Select the date and time when the Scheduled Task executions should end from the selector.
Blackout Dates
For repeat, Scheduled Tasks, you can set Blackout dates for times when you do not want the task to run. Click ![]() to add one or more blackout dates. Blackout dates are based on the Time zone that you set for the task.
to add one or more blackout dates. Blackout dates are based on the Time zone that you set for the task.
Cron Schedule
You can schedule Task executions to repeat on a regular time-based schedule by selecting Cron. A Cron schedule provides more granularity. The following example illustrates the various scheduling options.
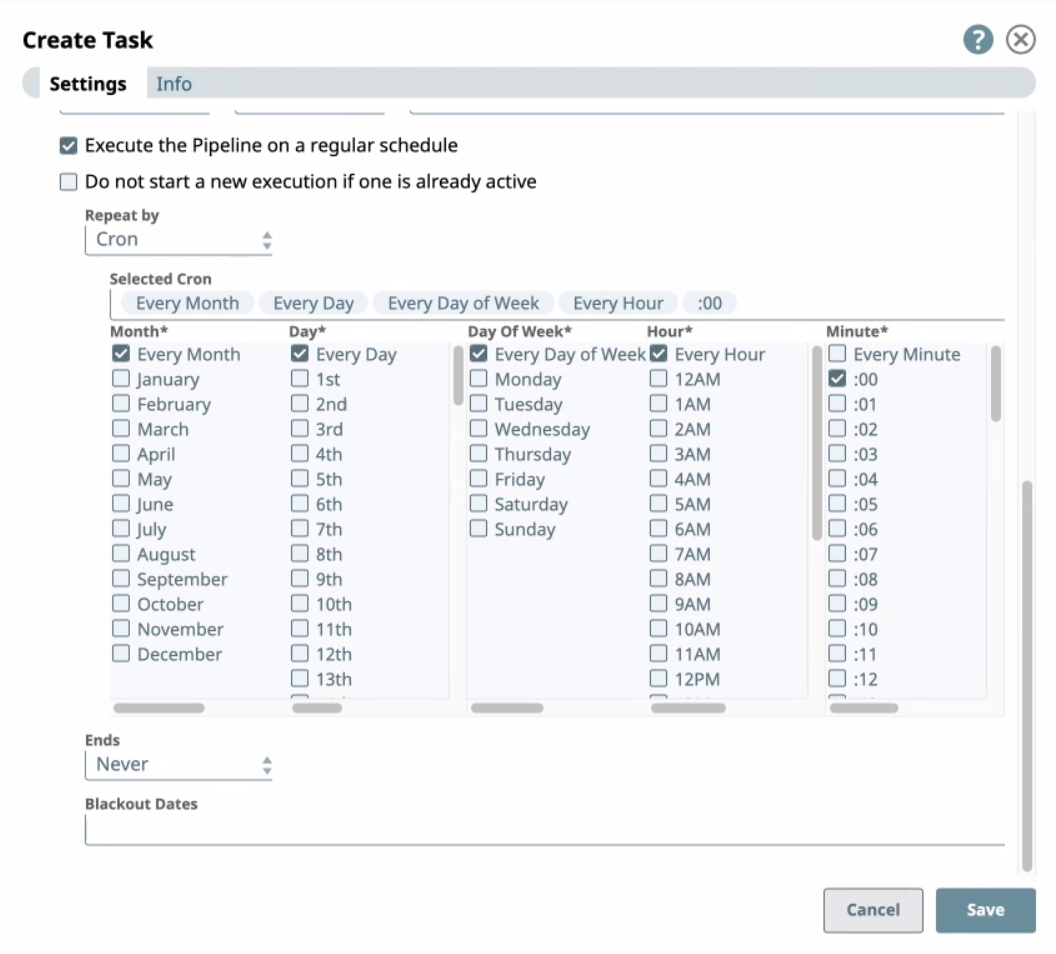
Guidelines
- Selecting Every in a column overrides the specific periods selected.
If you select values for both Day and Day of Week, then the target day must meet both criteria. For example, 1st and Monday means on the month where the 1st day of that month is a Monday.
If you need different Pipeline run schedules based on the day of the week, create multiple Scheduled tasks (Regular or Cron).
If you need to run the Pipeline every 30 minutes, click Every for Month, Every for Day, Every for Day of Week, Every for Hour, then press CTRL/COMMAND (depending on your Operating System) and click :00 and :30.
Info title CRON Schedule Increments The Cron scheduler requires to set a point of reference when selecting increments of minutes, so that :00 is always a required starting point to make selections of less than one hour.
If you select Minute, then the job runs at the target minute on every hour. Example: selecting :02 minutes sets the schedule at every hour after 2 minutes. The job does not run every 2 minutes within that hour.
- To make multiple selections with a column, press CTRL/COMMAND, then click on the target entries in the column.
- To run the Task in increments of 6 minutes every hour, then select Any for Hour, then specify each period of 6 minutes (:00, :06, :12, :18, [...] :54) within that hour.
Example Cron Schedule by Settings
| Example | Month | Day | Day of Week | Hour | Minute |
|---|---|---|---|---|---|
Every day at 12:01 AM | Every | Every | Every | 12AM | :01 |
| Every weekday at 9 PM | Every | Every | Monday, Tuesday, Wednesday, Thursday, Friday | 9PM | :00 |
| Every 5 minutes but only in the morning of Friday & Saturday | Every | Every | Friday & Saturday | 12AM, 1AM, [...], 10AM, 11AM | :00, :05, :10, [...], :50, :55 |
Configuration Options
You can configure Timeouts and Notifications for your Scheduled Tasks. You can also change the run policy, though doing so changes how the Pipeline is invoked.
Timeouts
You can add Pipeline timeouts to Scheduled Task executions that occur frequently in a short period of time. To configure the maximum duration that a Pipeline is allowed to run, enter the number of minutes in the Timeout field. The Scheduled Task stops executing after the specified timeout duration is reached. The minimum timeout duration for a Pipeline is one minute. If you leave the field empty, the timeout is zero, which is equivalent to no timeout.
Notifications
You can create email notifications based on the status of the Scheduled Task. If your Org supports Slack notifications, you can add Slack channels or recipients.
To add recipients for Task notifications:
- In Notifications, enter each recipient's email address, separated by commas.
- If Slack notifications are configured for your Org, then the following fields support dropdown lists containing your Slack channels and users. For each field, you can also type to invoke suggested recipients in the field.
- Direct Message(s). Select Slack recipients from the dropdown list.
- Channels. Select Slack channels as recipients from the dropdown list.
- Select the status event for which Notifications are sent from the When Task has selector:
- Started. The Task is activated.
- Completed. The Task is completed.
- Failed. The associated Pipeline did not execute.
- Stopped. The associated Pipeline has stopped abruptly and the Task is no longer running.
- Suspended. Select if you want to receive a Notification if the Task is based on a Resumable Pipeline that is in a Suspended state.
Recipients receive notifications based on the selections in the When Task has field.
Change the Run Policy
When you create a Scheduled Task, Scheduled is the chosen Run Policy by default.
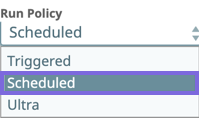
If you change the Run Policy of a Scheduled Task to Triggered or Ultra, the underlying Task type is modified. In such cases, you must re-configure the Task.
Stopping a Scheduled Task
To stop a Scheduled Task:
- Navigate to the target project folder with the Scheduled Task.
- In the Assets view, click Tasks on the Assets toolbar menu
- Select the target Scheduled Task, and then click Disable.
- Verify that the Task executions stopped:
- Place the cursor on the Task in the assets view, and click
 to display the menu.
 - Select View Details and view Task Status.
- Place the cursor on the Task in the assets view, and click
Editing a Scheduled Task
To edit the Scheduled Task:
- In Manager, select Scheduled Tasks from the Settings menu on the right.
- Click the Scheduled Task name to display the Update Task dialog window.
- Modify the configuration options, and click Update.
| Info |
|---|
A Scheduled Task can take up to 10 minutes past the scheduled time to execute. If it misses that window, the Task does not execute. |