On this Page
| Table of Contents | ||||
|---|---|---|---|---|
|
Overview
Snap type: | Write | |||||||||||||
|---|---|---|---|---|---|---|---|---|---|---|---|---|---|---|
Description: | This Snap executes a Snowflake bulk load, writing data into an Amazon S3 bucket or a Microsoft Azure Storage Blob.
| |||||||||||||
Prerequisites: |
Security Prerequisites: You should have the following permissions in your Snowflake account to execute this Snap:
The following commands enable minimum privileges in the Snowflake Console:
For more information on Snowflake privileges, refer to Access Control Privileges. The below are mandatory when using an external staging location: When using an Amazon S3 bucket for storage:
When using a Microsoft Azure storage blob:
| |||||||||||||
| Internal SQL Commands | This Snap uses the following Snowflake commands internally: | |||||||||||||
| Support and limitations: |
| |||||||||||||
| Account: | This Snap uses account references created on the Accounts page of SnapLogic Manager to handle access to this endpoint. See Snowflake Account for information on setting up this type of account. | |||||||||||||
| Views: |
| |||||||||||||
Settings | ||||||||||||||
Label* | Specify the name for the instance. You can modify this to be more specific, especially if you have more than one of the same Snap in your pipeline. | |||||||||||||
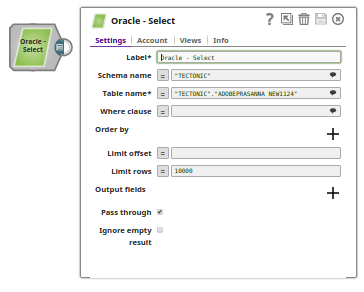
Schema name* | Specify the database schema name. In case it is not defined, then the suggestion for the Table Name retrieves all tables names of all schemas. The property is suggestible and will retrieve available database schemas during suggest values.
Default value: None | |||||||||||||
| Table name* | Specify the name of the table to execute bulk load operation on.
Default value: None | |||||||||||||
Create table if not present | Select this check box to indicate enable the Snap to automatically create a table if a table should be automatically created if not already presentdoes not exist. Default value: Not selected
| |||||||||||||
Data source | Specify the source from where the data should load. The available options are Input view and Staged files.
Default value: Input view | |||||||||||||
| Preserve case sensitivity | Select this check box to preserve the case sensitivity of the column names. Default value: Not selected | |||||||||||||
| Load empty strings | Select this check box to load empty string values in the input documents as empty strings to the string-type fields. Else, empty string values in the input documents are loaded as null. Null values are loaded as null regardless. Default value: Not selected | |||||||||||||
Staging Location | Select the type of staging location that is to be used for data loading. The available options are:
Default value: Internal | |||||||||||||
Target | Specify an internal or external location to load the data. If you select External for Staging Location, a staging area is created in S3 or Azure as required; else a staging area is created in Snowflake's internal location. The staging field accepts the following input:
Format: @<Schema>.<StageName>[/path]
Format: @~/[path]
Format: s3://[path]
Default value: None | |||||||||||||
| Storage Integration | Specify the pre-defined storage integration which is used to authenticate the external stages.
Default value: None | |||||||||||||
Staged file list | Specify the list of the staged file(s) to load to the target file. | |||||||||||||
File name pattern | Specify a regular expression pattern string, enclosed in single quotes with the file names and /or path to match. Default value: None | |||||||||||||
File format object | Specify an existing file format object to use for loading data into the table. The specified file format object determines the format type such as CSV, JSON, XML and AVRO, or other format options for data files. Default value: None | |||||||||||||
File Format type | Specify a predefined file format object to use for loading data into the table. The available file formats include CSV, JSON, XML and AVRO. | |||||||||||||
File Format option | Specify the file format option. Separate multiple options by using blank spaces and commas.
Example: BINARY_FORMAT=UTF-8 Default value: [None]
| |||||||||||||
| Table Columns | Conditional. Specify the table columns to use in the Snowflake COPY INTO query. This only applies when the Data source is 'Staged files'. This configuration is useful when the staged files contain a subset of the columns in the Snowflake table. For example, if the Snowflake table contains columns A, B, C and D and the staged files contain columns A and D then the Table Columns field would be have two entries with values A and D. The order of the entries should match the order of the data in the staged files. Default value: None
| |||||||||||||
| Select Query | Activates when you select Staged files in the Data source field. Specify the The SELECT statement transform option enables querying the staged data files by either reordering the columns or loading a subset of table data from a staged file. For example, (OR)
Default value: None | |||||||||||||
| Encryption type | Specify the type of encryption to be used on the data. The available encryption options are:
Default value: None.
| |||||||||||||
| KMS key | Specify the KMS key that you want to use for S3 encryption. For more information about the KMS key, see AWS KMS Overview and Using Server Side Encryption. Default value: No default value.
| |||||||||||||
Additional Options | ||||||||||||||
| Buffer size (MB) | Specify the data in MB to be loaded into the S3 bucket at a time. This property is required when bulk loading to Snowflake using AWS S3 as the external staging area. Minimum value: 5 MB Maximum value: 5000 MB Default value: 10 MB
| |||||||||||||
| Manage Queued Queries | Select this property to determine whether the Snap should continue or cancel the execution of the queued Snowflake Execute SQL queries when you stop the pipeline.
Default value: Continue to execute queued queries when pipeline is stopped or if it fails | |||||||||||||
On Error | Select an action to perform when errors are encountered in a file. The available actions are:
Default value: ABORT_STATEMENT | |||||||||||||
Error Limit | Specify the error limit to skip file. When the number of errors in the file exceeds the specified error limit or when SKIP_FILE_number is selected for On Error. Default value: 0 | |||||||||||||
Error percentage limit | Specify the percentage of errors to skip file. If the file exceeds the specified percentage when SKIP_FILE_number% is selected for On Error. Default value: 0 | |||||||||||||
Size limit | Specify the maximum size (in bytes) of data to be loaded.
Default value: 0 | |||||||||||||
Purge | Specify whether to purge the data files from the location automatically after the data is successfully loaded. Default value: Not Selected | |||||||||||||
Return Failed Only | Specify whether to return only files that have failed to load while loading. Default value: Not Selected | |||||||||||||
Force | Specify if you want to load all files, regardless of whether they have been loaded previously and have not changed since they were loaded. Default value: Not Selected | |||||||||||||
Validation mode | Select the validation mode for visually verifying the data before unloading it. The available options are:
Default value: None | |||||||||||||
Rows to return | Specify the number of rows not loaded into the corresponding table. Instead, the data is validated to be loaded and returns results based on the validation option specified. It can be one of the following values: RETURN_n_ROWS | RETURN_ERRORS | RETURN_ALL_ERRORS Default value: 0 | |||||||||||||
|
| |||||||||||||

| Note |
|---|
Instead of building multiple Snaps with inter dependent DML queries, we recommend you to use the Stored Procedure or the Multi Execute Snap. For example, when performing a create, insert and a delete function sequentially on a Pipeline using a Script Snap helps in creating a delay between the insert and delete function. Else, it may turn out that the delete function is triggered even before inserting the records on the table. |
Examples
Loading Binary Data Into Snowflake
The following example Pipeline demonstrates how you can convert the staged data into binary data using the binary file format before loading it into Snowflake database.
To begin with, we configure the Snowflake Execute Snap with this query: select * from "PUBLIC"."EMP2" limit 25——this query reads 25 records from the Emp2 table.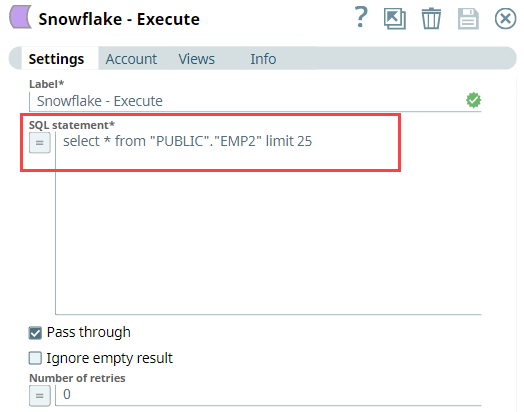
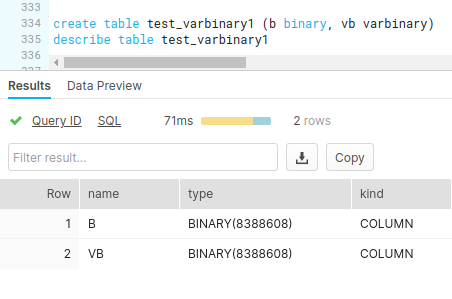
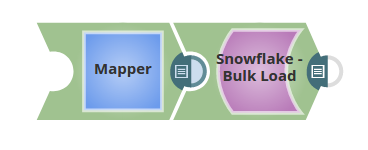
Next, we configure the Mapper Snap with the output from the upstream Snap by mapping the employee details to the columns in the target table. Note that the Bio column is the binary data type and the Text column is varbinary data type. Upon validation, the Mapper Snap passes the output with the given mappings (employee details) in the table.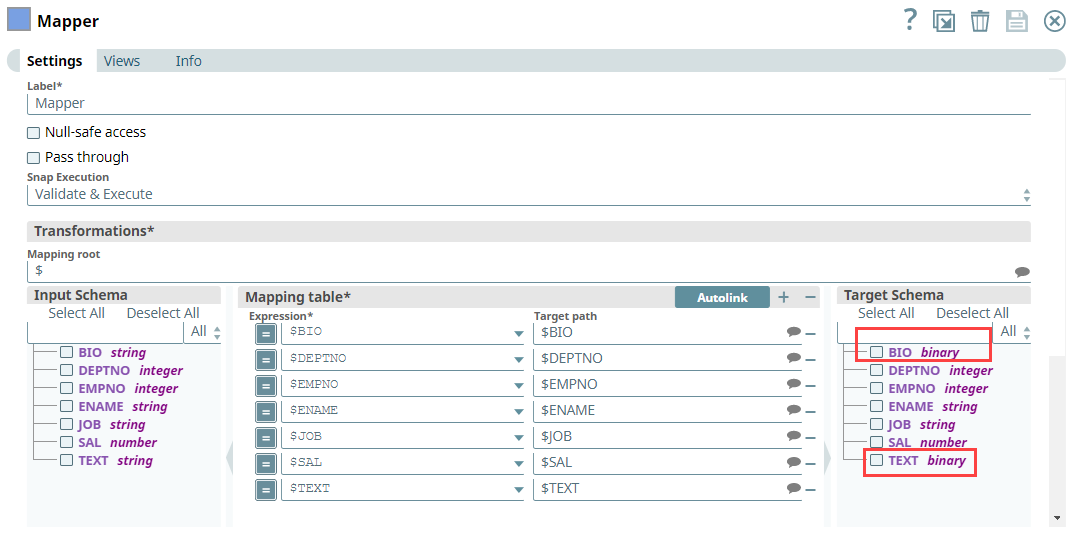
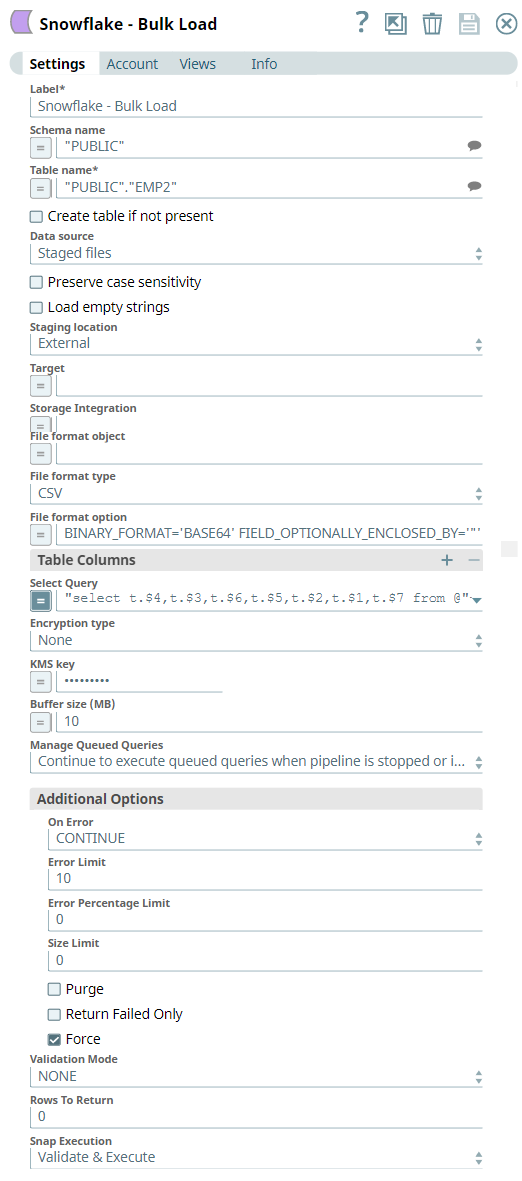
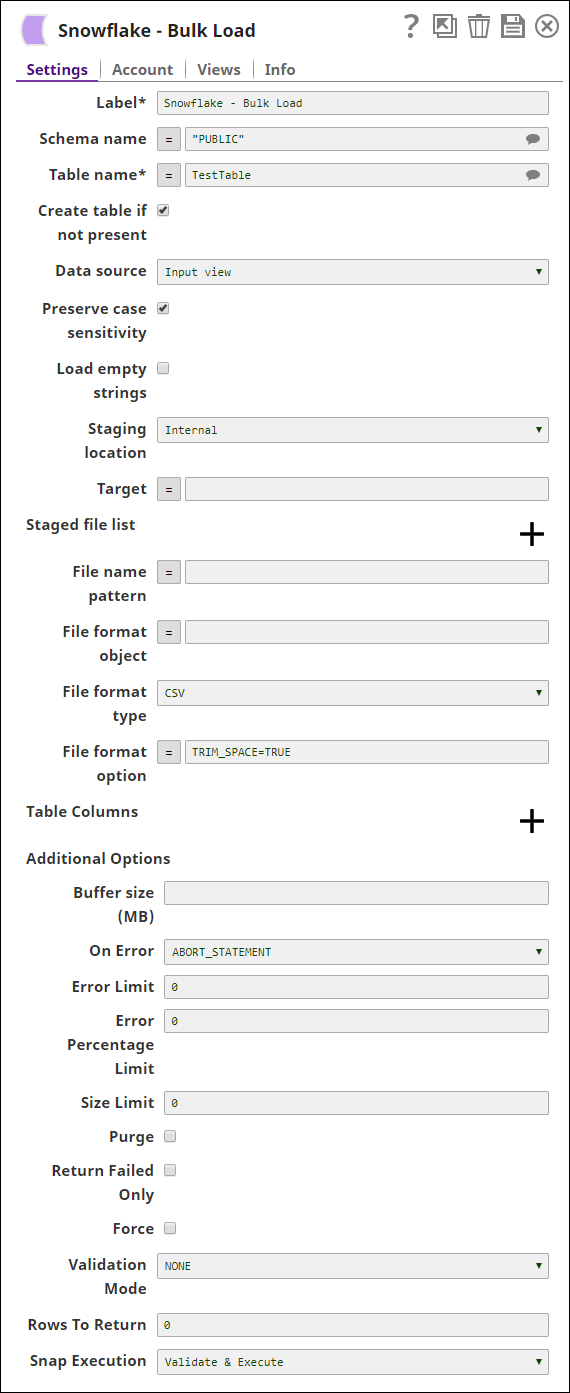
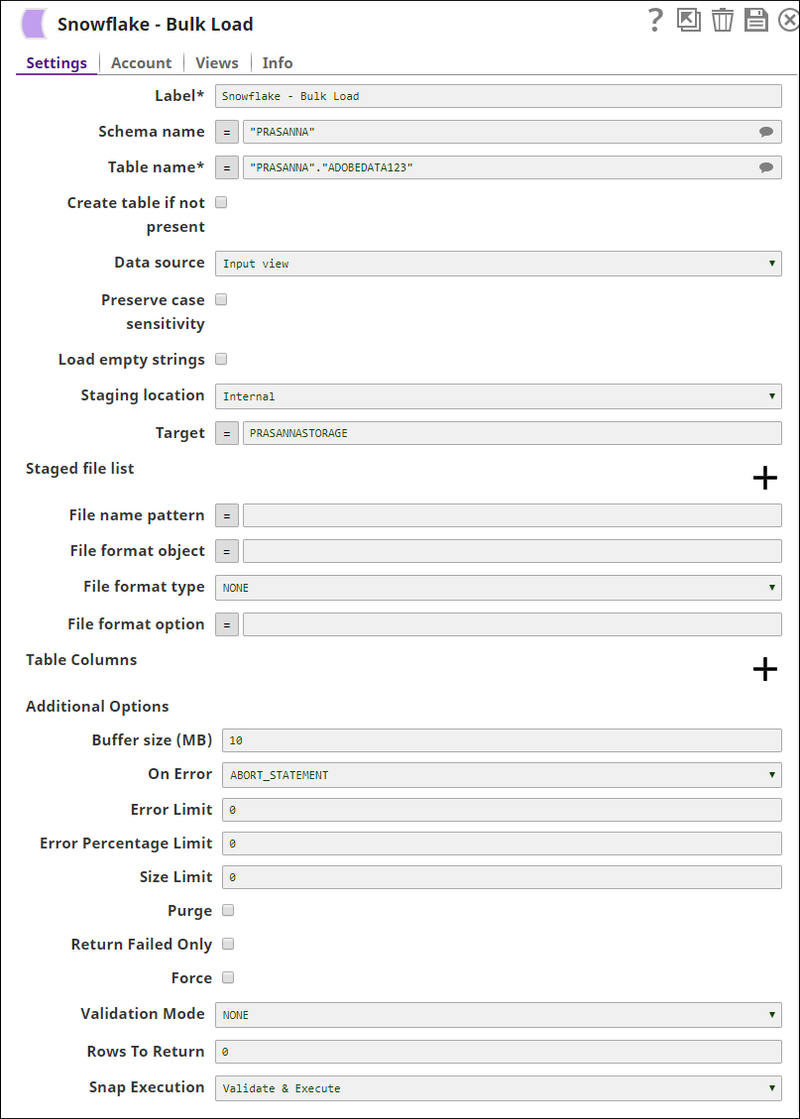
Next, we configure the Snowflake - Bulk Load Snap to load the records into Snowflake. We set the File format option as BINARY_FORMAT=UTF-8 to enable the Snap to encode the binary data before loading.
Upon validation, the Snap loads the database with 25 employee records.
| Output Preview | Data in Snowflake |
|---|---|
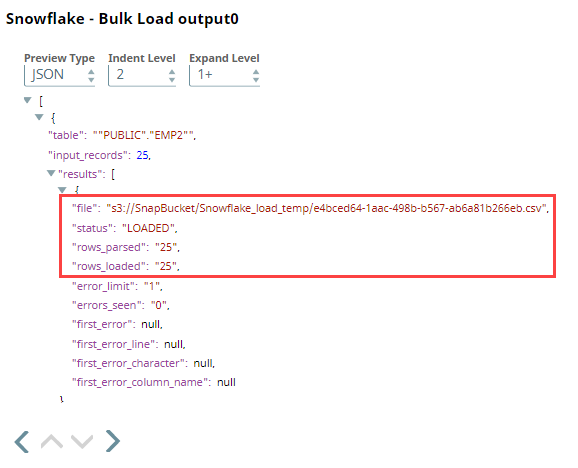 |
|
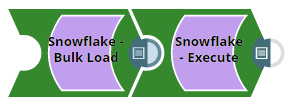
Finally, we connect the JSON Formatter Snap to the Snowflake - Bulk Load Snap to transform the binary data to JSON format, and finally write this output in S3 using the File Writer Snap.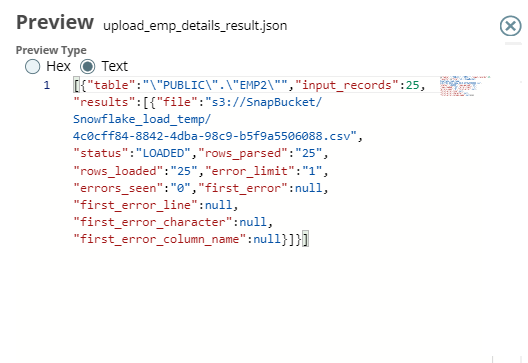
Transforming Data Using Select Query Before Loading Into Snowflake
The following example Pipeline demonstrates how you can reorder the columns using the SELECT statement transform option before loading data into Snowflake database. We use the Snowflake - Bulk Load Snap to accomplish this task.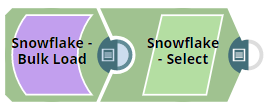
Prerequisite: You must create an internal or external stage in Snowflake before you transform your data. This stage is used for loading data from source files into the tables of Snowflake database.
To begin with, we create a stage using a query in the following format. Snowflake supports both internal (Snowflake) and external (Microsoft Azure and AWS S3) stages for this transformation.
"CREATE STAGE IF NOT EXISTS "+_stageName+" url='"+_s3Location+"' CREDENTIALS = (AWS_KEY_ID='string' AWS_SECRET_KEY='string') "
This query creates an external stage in Snowflake pointing to S3 location with AWS credentials (Key ID and Secrete Key).
| Note |
|---|
We recommend you not to use a temporary stage to prevent issues while loading and transforming your data. |
Now, we add the Snowflake - Bulk Load Snap to the canvas and configure it to transform the data in the staged file SNAP7517_EXT_CSV.csv by providing the following query in the Select Query field:
"select t.$1,t.$4,t.$3,t.$4,t.$5,t.$6,t.$7 from @"+_stageName+" t"
| Note |
|---|
You must provide the stage name along with schema name in the Select Query, else the Snap displays an error. For instance, |
![]()
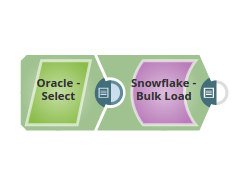
Next, we connect a Snowflake Select Snap with the Snowflake - Bulk Load Snap to select the data from the Snowflake database. Upon validation we can view the transformed data in the output view.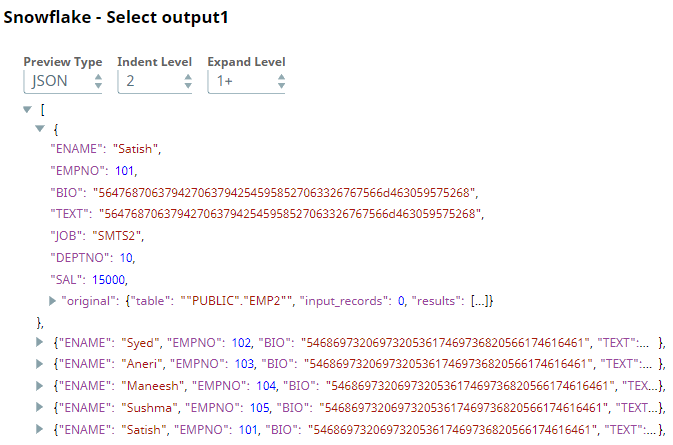
| Expand | ||||||||||||||||||||||||||
|---|---|---|---|---|---|---|---|---|---|---|---|---|---|---|---|---|---|---|---|---|---|---|---|---|---|---|
| ||||||||||||||||||||||||||
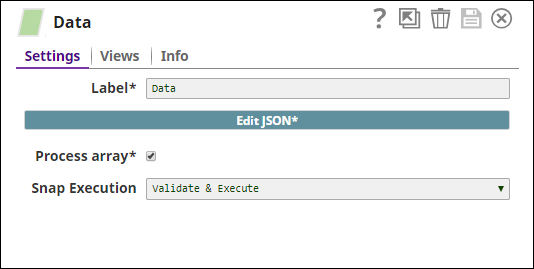
You can remove empty spaces from input documents. When you select Input view as Data Source, enter
Download this pipeline. In this example, the Pipeline uses the following Snaps:
Anchor |
|

| Anchor | ||||
|---|---|---|---|---|
|
Input:
| Note |
|---|
Notice that the File Format Option is TRIM_SPACE=TRUE. |
Output:
| Anchor | ||||
|---|---|---|---|---|
|
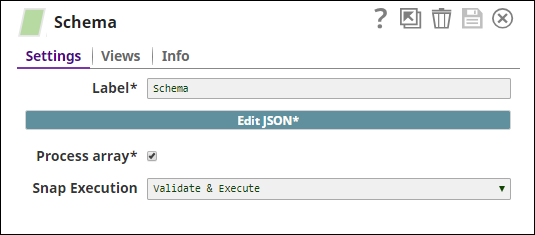
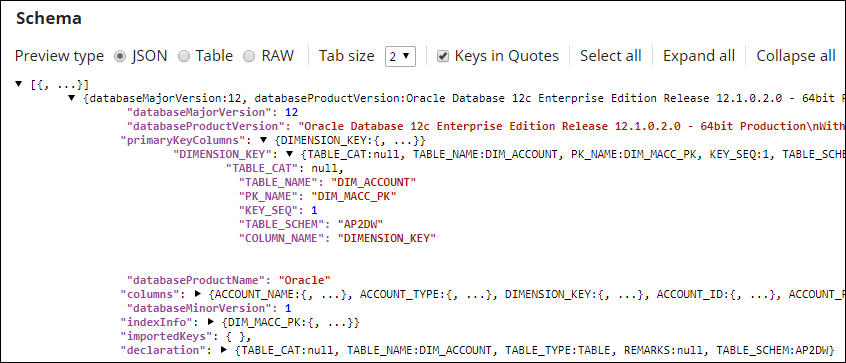
Table schema is taken from your database source, and you do not necessarily need a Schema Snap to provide the table schema. In this example, however, we use the JSON Generator Snap to provide the table schema.
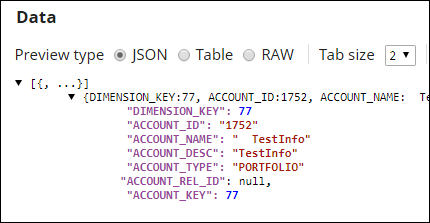
Input:
Output:
| Anchor | ||||
|---|---|---|---|---|
|
Input:
Output:

As you can see, the data no longer contains any spaces.
| Expand | |||||
|---|---|---|---|---|---|
| |||||
In this pipeline, the Snowflake Bulk Load Snap loads the records from a staged file 'employee.csv content' on to a table on Snowflake.
The staged file 'employee.csv content' is passed via the Upstream Snap:
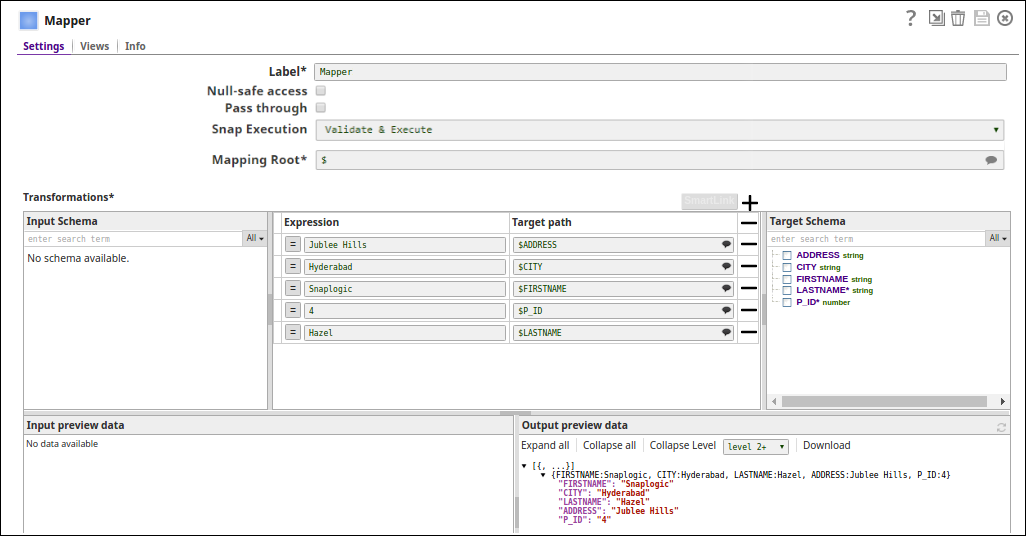
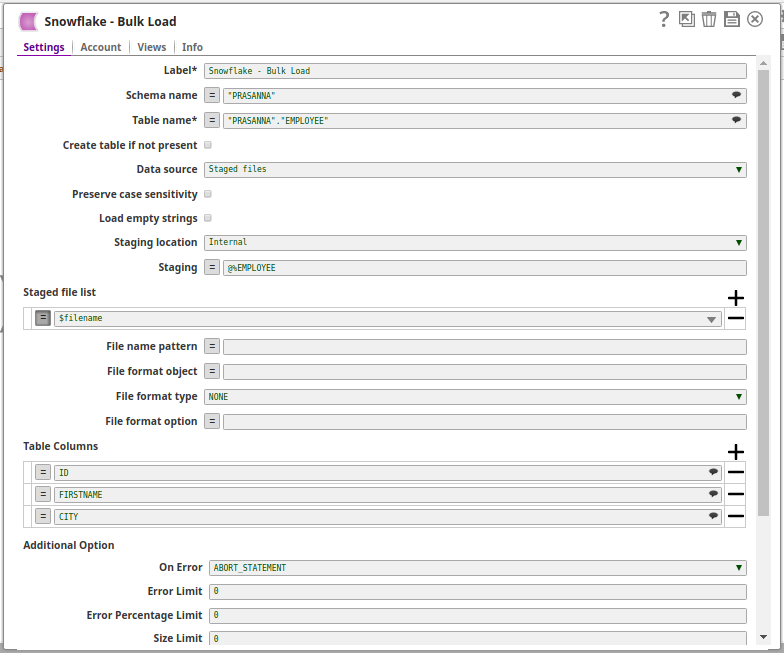
The Snowflake Bulk Load Snap is configured with Data source as Staged files and the Table Columns added as ID, FIRSTNAME, CITY, to be loaded into a table "PRASANNA"."EMPLOYEE" on Snowflake.
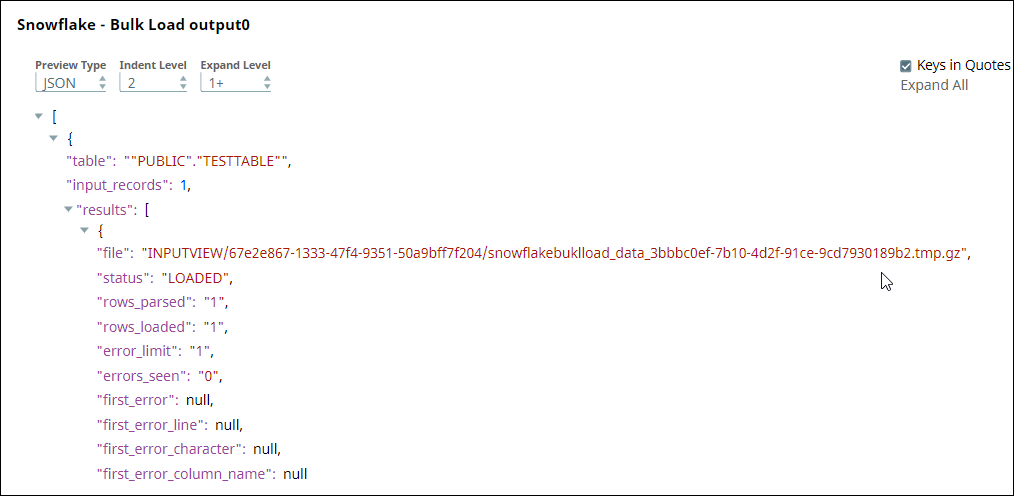
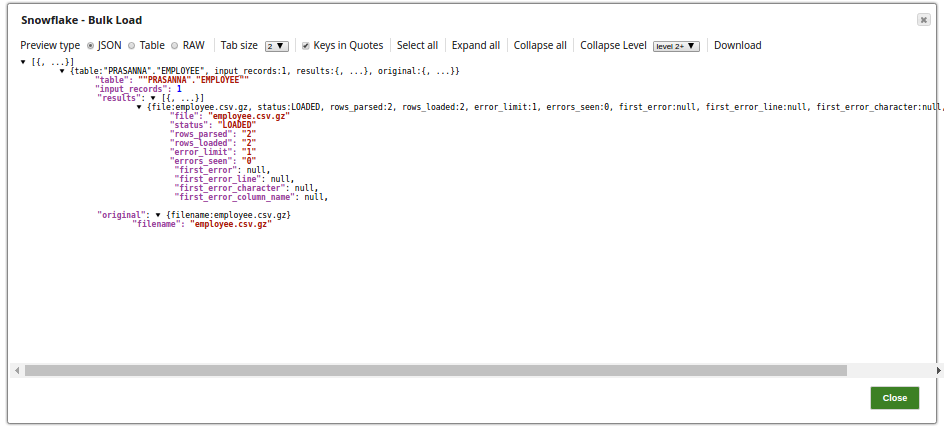
The successful execution of the pipeline displays the below output preview:
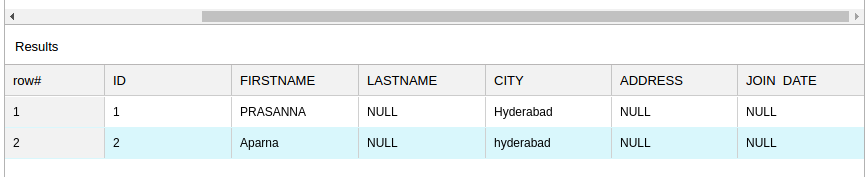
If the 'employee.csv content' (Staged file)has the below details: 1,PRASANNA,Hyderabad Table Columns added are: then the table, "PRASANNA"."EMPLOYEE" on Snowflake is as below:
Note the columns ID, FIRSTNAME and CITY are populated as provided and the LASTNAME, ADDRESS and JOIN DATE are null.
|
| Expand | ||
|---|---|---|
| ||
In this pipeline, the Snowflake Bulk Load Snap loads the input document with empty string values as empty strings to the string-type fields. The values to be updated are passed via the upstream Mapper Snap and the Snowflake Execute Snap displays the output view of the table records.
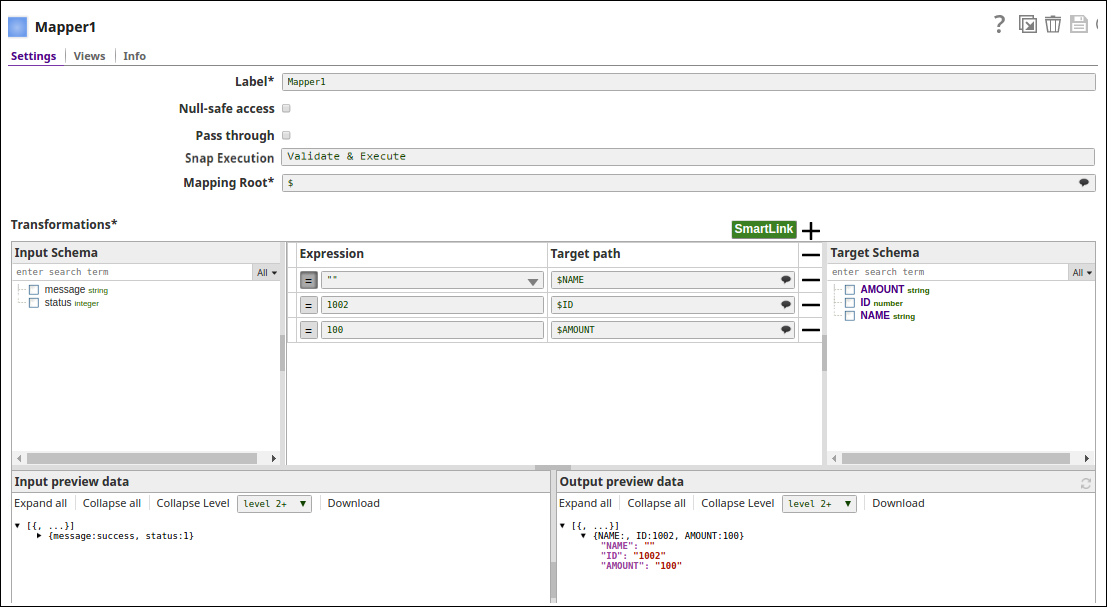
The Mapper Snap passes the values to be updated to the table on Snowflake:
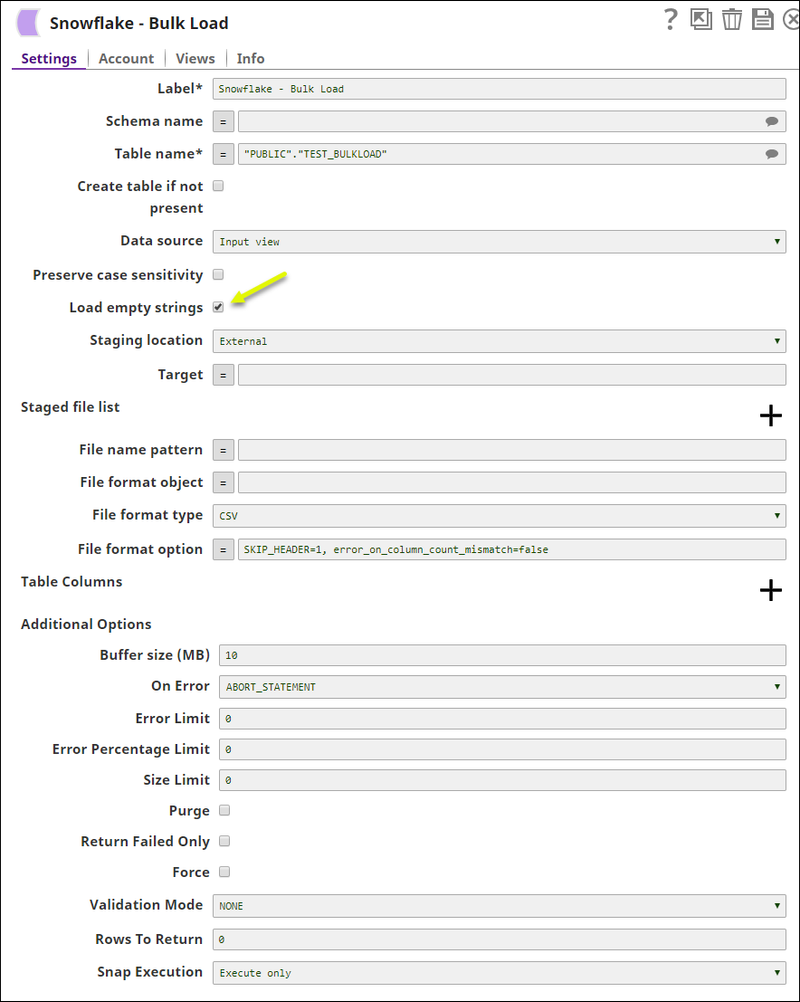
The Snowflake Bulk Load Snap with Load empty strings property selected:
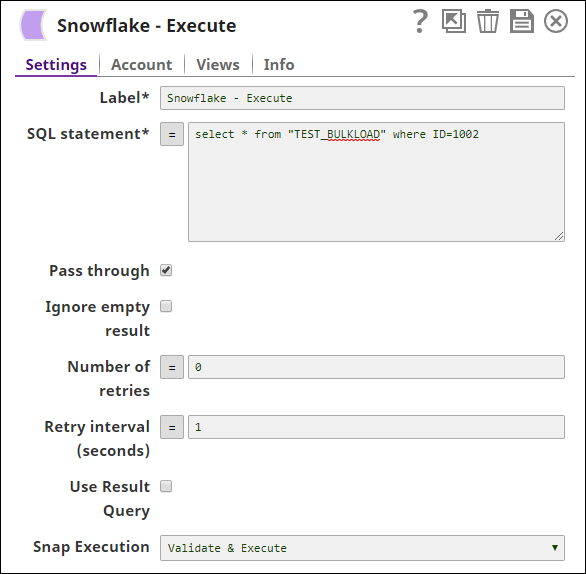
The Snowflake Execute Snap runs the query to select the table 'TEST BULKLOAD' for the 'ID=1002':
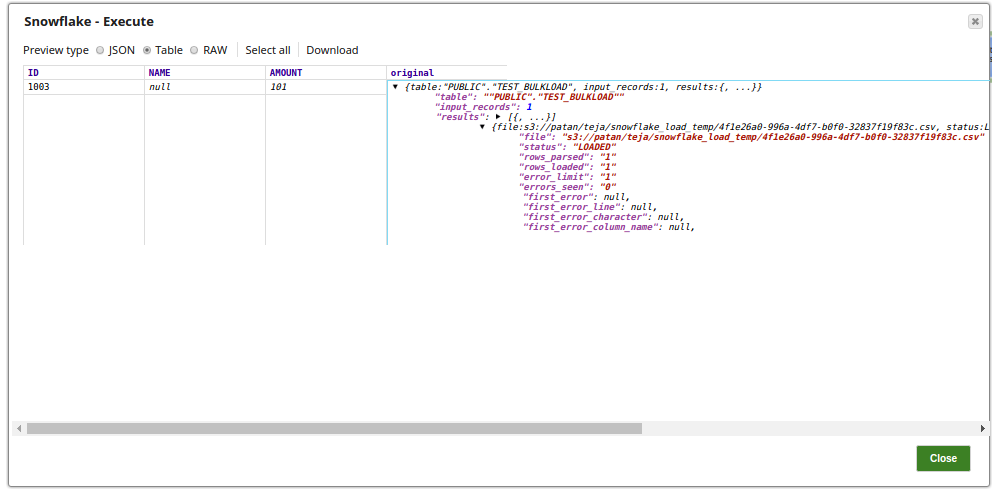
The successful execution of the pipeline displays the below output preview:
The below screenshot displays the output preview (on a table with an ID=1003), wherein the Load empty strings property is not selected, and the the Name field has a value 'Null' in it:
|


| Expand | ||
|---|---|---|
| ||
This example demonstrates how you can use the Snowflake Bulk Snap to load files from an external staging location such as S3. It further shows the configuration required when loading numeric data.
Download this Pipeline.
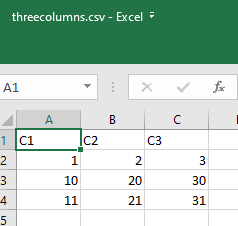
Data is to be loaded from the staged file threecolumns.csv present in a S3 folder into the table "EXTR_PERF_01_SC"."THREECOLUMNS". Below is a screenshot of the data in threecolumns.csv:
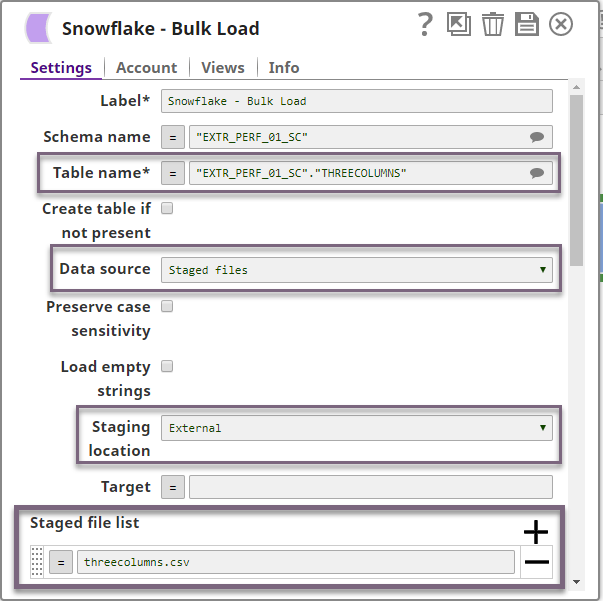
The Snowflake Bulk Load Snap is configured accordingly as follows:
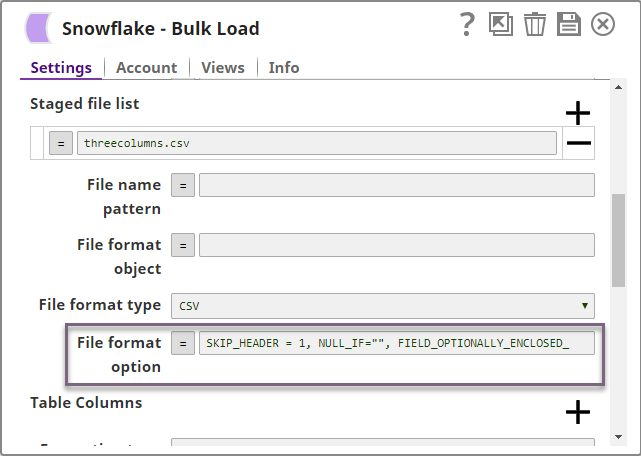
Furthermore, since this data has numeric values, the Snowflake Bulk Load Snap is configured with the following file format options to handle any string/NULL values that may be present in the dataset:
See Format Type Options for a detailed explanation of the above file format options.
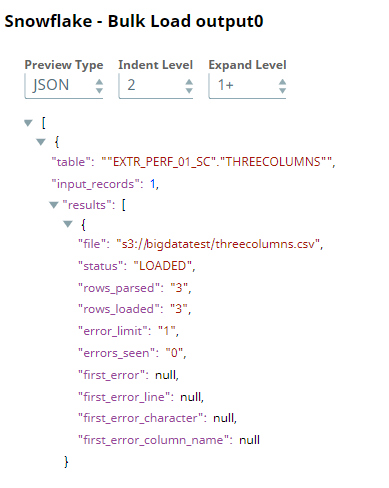
Upon execution, the Snowflake Bulk Load Snap loads three rows:
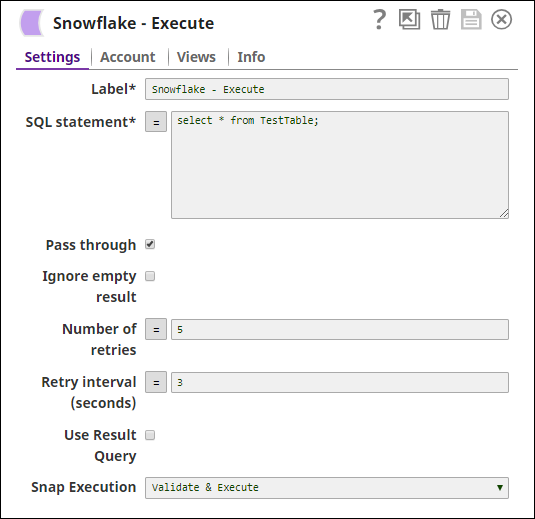
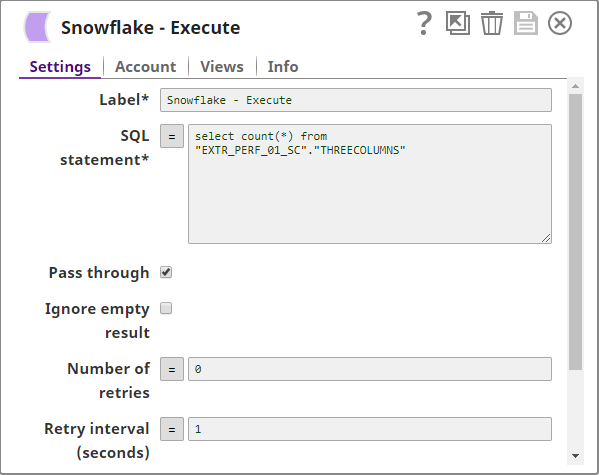
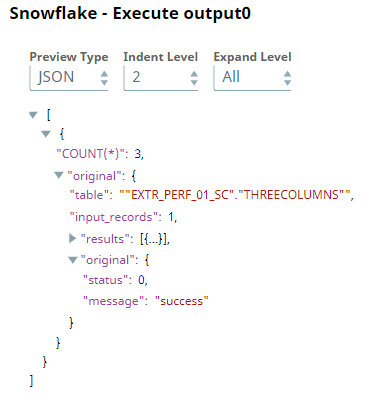
To confirm that three rows were loaded, we use a Snowflake Execute Snap configured to count the number of rows in the target table:
Below is a preview of the output from the Snowflake Execute Snap.
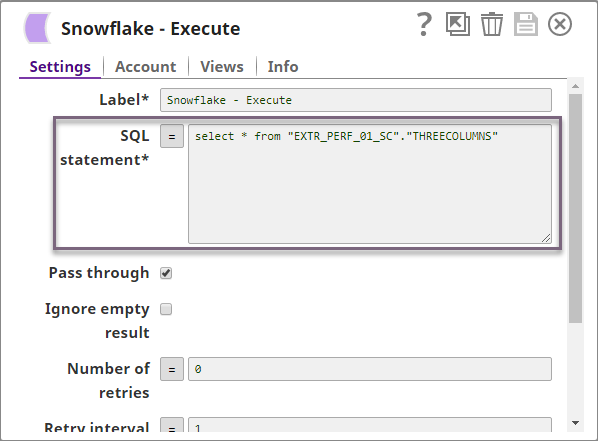
We can see that the count is 3, thereby confirming a successful bulk load. You can also modify the SELECT query in the Snowflake Execute Snap to read the data in the table and thus verify the data loaded into the target table.
|

Downloads
| Attachments | ||
|---|---|---|
|
| Insert excerpt | ||||||
|---|---|---|---|---|---|---|
|