In this article
| Table of Contents | ||||
|---|---|---|---|---|
|
Overview
You can use the REST Post Snap to to execute the HTTP Post method on a REST API service endpoint to create business object resources. The Snap also assigns a new URI to every business object that it creates. and returns this URI in the output view.
Prerequisites
None.
Supported Features
Works in Ultra Pipelines. We recommend you to set the batch size to 1.
Limitations and Known Issues
None.
Snap Views
| Type | Format | Number of Views | Examples of Upstream and Downstream Snaps | Description |
|---|---|---|---|---|
| Input | Document |
|
| Each input document offers details associated with the data that must be posted to the target RESTful server. |
| Output | Document |
|
| Each output document contains details associated with the outcome of the Post request. |
| Error | If the Snap fails during the operation, the Snap sends an error document to the error view containing the fields error, reason, resolution, and stacktrace. For this to happen, however, the error view must be enabled. Learn more, Handling Errors with an Error Pipeline. | |||
Snap Settings
| Field Name | Field Type | Description | ||||||||||||||||||
|---|---|---|---|---|---|---|---|---|---|---|---|---|---|---|---|---|---|---|---|---|
| Label* | String |
Default Value: REST Post Example: Upload New Files | ||||||||||||||||||
| Service URL* | String/Expression |
| ||||||||||||||||||
| HTTP Entity | String/Expression |
Default Value: $ (the HTTP entity data is at the root of the input Map data) | ||||||||||||||||||
| Batch size | String |
Default Value: N/A Example: 20 | ||||||||||||||||||
| Show all headers | Checkbox |
Default Value: Deselected Example: N/A | ||||||||||||||||||
| Single file upload: File | String/Expression |
Default Value: N/A | ||||||||||||||||||
Single file upload: File key | String/Expression |
Default Value: file | ||||||||||||||||||
| Single file upload: Filename to be used | String/Expression |
Default Value: N/A | ||||||||||||||||||
| Upload transfer request type | Dropdown list | The type of encoding that you want to use to safely transfer the entity to the user. The available options are:
If Chunked transfer encoding is selected, the header "Transfer-Encoding:chunked" will be added to the POST request, and the Snap uploads the given file in chunked transfer encoding. If Calculate content length is selected, the file size will be calculated and passed with header "Content-Length" in the POST request.
Default Value: Chunked transfer encoding | ||||||||||||||||||
| Upload body type | Dropdown list | Select the content-type processing for the entity body from the options available:
Default Value: Multipart from-data | ||||||||||||||||||
| Single file Upload: Multipart Content-Type | String/Suggestion |
Default Value: application/octet-stream | ||||||||||||||||||
| Form Upload |
| |||||||||||||||||||
| Multipart Type | Dropdown list | Choose the type of multipart upload that you want to initiate. The available options are:
Default Value: FILE | ||||||||||||||||||
Multipart Key | String/Expression | Specify the key required for the multi-part to upload a file or text as required. HTTP POST uses multi-part entity to achieve the form upload. The form data of its multi-part entity contains key-value pairs.Multipart Key can be anything and it depends on the service endpoint.
Default Value: file | ||||||||||||||||||
Multipart Value | String/Expression | Specify the the file or text to be uploaded. If Multipart Type is FILE, the following are applicable:
If Multipart Type is a TEXT, then
Default Value: N/A Example:
| ||||||||||||||||||
| HTTP Entity | String/Expression | Specify the HTTP entity of the file that you want to upload. Default Value: N/A | ||||||||||||||||||
| Filename to be used | String/Expression |
Default Value: N/A | ||||||||||||||||||
| Multipart Content-Type | String/Suggestion | Select the content type headers for the data in the body of the multipart HTTP request. The available options are:
Default Value: N/A | ||||||||||||||||||
| Trust all certificates | N/A |
Default Value: Deselected | ||||||||||||||||||
| Follow redirects | N/A |
Default Value: Selected | ||||||||||||||||||
| Query parameters |
| |||||||||||||||||||
Query parameter | N/A | Specify the name (or key) of the query parameter. Default Value: N/A | ||||||||||||||||||
Query parameter value | N/A | Specify the value associated with the query parameter. Default Value: N/A | ||||||||||||||||||
| HTTP Header |
| |||||||||||||||||||
Key | String/Expression | Specify the name of the HTTP header. Default Value: N/A | ||||||||||||||||||
Value | String/Expression | Specify the value of the HTTP header. Default Value: N/A | ||||||||||||||||||
| Response entity type | Dropdown list |
Default Value: DEFAULT Example: TEXT | ||||||||||||||||||
| Read timeout | Integer |
Default Value: 900 | ||||||||||||||||||
| Connection timeout | Integer |
Default Value: 30 | ||||||||||||||||||
| Maximum request attempts | Integer |
Default Value: 5 | ||||||||||||||||||
| Retry request interval | Integer |
Default Value: 3 | ||||||||||||||||||
| Retry Policy | Dropdown list |
Default Value: Connection errors | ||||||||||||||||||
| Normalize URL | Checkbox |
Default Value: Selected | ||||||||||||||||||
| Snap Execution | Dropdown list | Select one of the three modes in which the Snap executes. Available options are:
Default Value: Execute only Example: Validate & Execute | ||||||||||||||||||
Troubleshooting
| Error | Reason | Resolution | |||||
|---|---|---|---|---|---|---|---|
| Failed to execute HTTP request | The Service URL must have a protocol, such as http://, https://. | Please check the Snap properties. Specifically, check your entry in the Service URL field. | |||||
| <Service_URL>: Name or service not known. This basically means that the service URL you entered is not accessible. | |||||||
Failure: Validation errors: property_map.settings.serviceUrl.value: Could not compile expression: <Service_URL> | The snap settings are not correct. Encountered extraneous input ':' at line 1:5; expecting={<EOF>, '||', '&&', '^', '==', '!=', '>', '<', '>=', '<=', '+', '-', '*', '/', '%', '?', 'instanceof', 'in', 'matches', '[', '(', '.', PropertyRef}. This means that you have turned expressions on ( | Please fix the snap configuration and try the execution again. Please check expression syntax. Specifically, ensure that your service URL is a proper expression; or turn off the expression control (
| |||||
| HTTP entity: <string_in_HTTP entity field> is undefined. Perhaps you meant: <List of variables received from the upstream Snap>. | Either there is an error in the value in the HTTP entity field, or you have used string input while having expressions enabled. | Check the spelling of the variable. Also, check whether your HTTP entity entry requires expressions. Update Snap settings as appropriate. | |||||
REST API service endpoint returned error result: status code = 400 | Reason phrase = BAD REQUEST, refer to the error_entity field in the error view document for more details. You typically see this message when:
| Please check the values of Snap properties. Specifically:
| |||||
File not found: <File URL> | File not found on <server URL> at <complete address of file to be uploaded> | Please address the reported issue. Check the location of the file to be uploaded. | |||||
Single file upload: <Name of field>: <name of file> is undefined. Perhaps you meant: <options based on your input> | null | Check the spelling of the variable. Specifically, check whether the expressions toggle is turned on even though it is not required. | |||||
| REST API service endpoint returned error result: status code = 409 | CONFLICT, refer to the error_entity field in the error view document for more details. This happens when you already have the resource that you want to create in the target endpoint. | Please check the values of Snap properties. | |||||
| URL Parse Exception - 403 | The Service URL path might be containing any of the following special characters: !, =, %, #, $, ^&()_¢äâêîôûñç¡¿ÉÙËǨ°¸ðø©¢¾A+²½µ®§÷¶þ | To escape the special characters, use the global function encodeURIComponent on any variables that might contain special characters so that they are encoded properly. | |||||
Too many Requests - 429 | There are too many requests to REST endpoint. | Wait for the retry to succeed. Rest related Snaps extract the response header and automatically retry when they encounter status 429. By default, the retry interval (Retry-After) is specified in the HTTP response header. If no value is available for Retry-After, then the Snap’s Retry Interval value is used. |
Examples
Creating a Jira Issue Using REST Post
This example Pipeline demonstrates how to create a Jira issue using the REST Post Snap.

Initially, we configure the JSON Generator Snap to pass the input. The following JSON data is the input document to the Snap:
| Paste code macro | ||
|---|---|---|
| ||
{
        "fields": { "project": { "key": "JIRASNAP" }, "summary": "Test JIRA Snaps (create/update/delete a Jira issue)", "description": "Create, update and delete JIRA issues using the JIRA Create, Put and Delete Snaps", "issuetype": { "name": "New Feature" } } }


The following JSON data is the output document provided by the Snap:
{
    "response": { "headers": { "strict-transport-security": "max-age=315360000;includeSubdomains", "x-content-type-options": "nosniff", "x-seraph-loginreason": "OK", "connection": "keep-alive", "set-cookie": "atlassian.xsrf.token=BWCK-SR48-JN93-ESFC|27aeead347f4dc9cd2e8cf01a8137852db40893c|lin; Path=/; Secure", "transfer-encoding": "chunked", "content-type": "application/json;charset=UTF-8", "date": "Thu, 15 Jan 2015 18:48:57 GMT", "x-arequestid": "648x1342x1", "x-asen": "SEN-2848532", "x-asessionid": "17vnxvp", "cache-control": "no-cache, no-store, no-transform", "x-ausername": "admin", "server": "nginx" }, "statusLine": { "reasonPhrase": "Created", "statusCode": 201, "protoVersion": "HTTP/1.1" }, "entity": { "id": "17392", "key": "JIRASNAP-4312", "self": "https://Snaplogic.atlassian.net/rest/api/2/issue/17392" } },
"original": { "fields": { "project": { "key": "JIRASNAP" }, "summary": "Test JIRA Snaps (create/update/delete a Jira issue)", "description": "Create, update and delete JIRA issues using the JIRA Create, Put and Delete Snaps", "issuetype": { "name": "New Feature" } } } } |
The REST Post Snap in this example Pipeline creates a JIRA issue.
Reading a MySQL Table and Writing its Contents to a File Using REST Post
In this example, we use the REST Post Snap to read a table in MySQL and write the contents to a file. It is designed to run against the MySQL sample database sakila, but can be easily adapted to work against any database. This example consists of two Pipelines available in the Download section below:
- REST_MySql_to_file_1_of_2
- REST_MySql_to_file_2_of_2
To run the demo:
- Download both Pipelines, decompress them, and upload them both into one project in SnapLogic.
- Change the MySQL user account in Pipeline 2.
- Create a task for Pipeline 2.
- Paste the task into the JSON document Snaplex attribute.
- Run Pipeline 1. It will create a file in the local project.
This example illustrates the following topics:
- How to use a REST Post Snap to invoke a "remote service"
- How to pass document parameters in a REST Post Snap
- How to convert a pipeline parameter to a document parameter for use in a MySQL where clause
- How to convert a pipeline parameter from a string to a integer
- How to use a function to populate a column in a database with the current datetime
- How to convert a JSON document to a flat csv file.
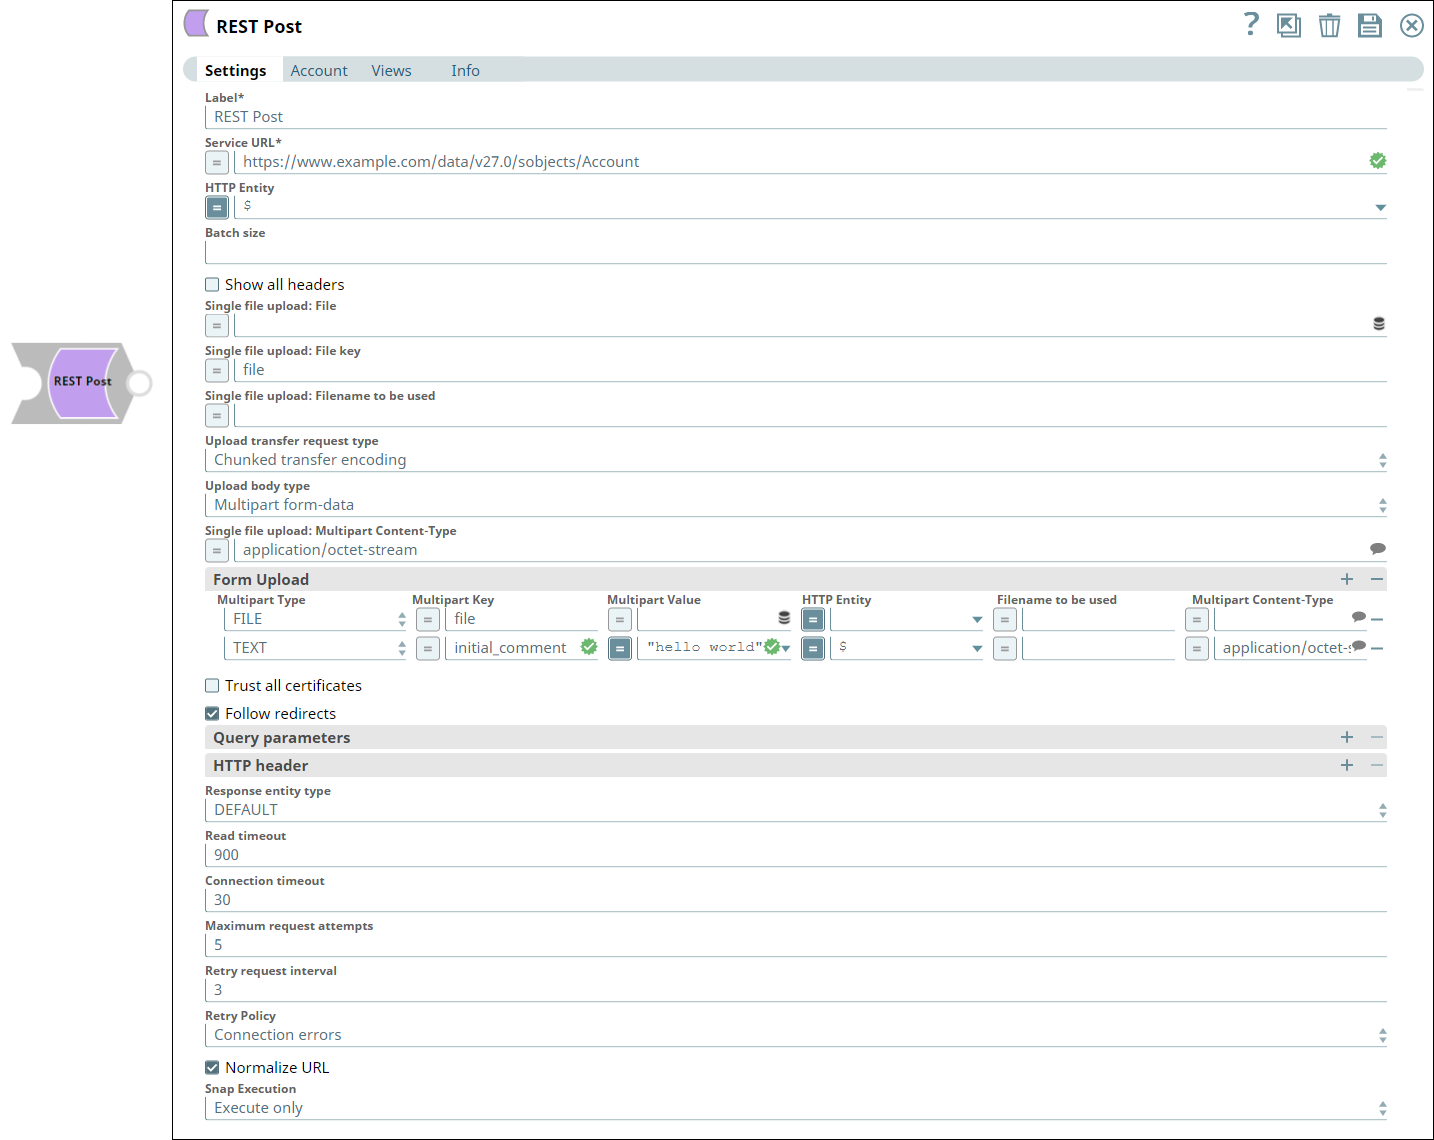
Uploading Multiple Files Using the REST Post Snap
This example demonstrates how we can upload multiple files using the REST Post Snap.
Add a REST Post Snap to your pipeline with settings configured as shown below:
To upload multiple files using the REST Post Snap, you need to specify at least the following settings:
- Service URL: This is the service endpoint URL of the REST API associated with your account.
- Upload File(s)
- Upload File Key: Enter file here to specify that you want to upload a file. For uploading messages, you could use the key seed.
- Upload file: Enter here the location and name of the file you want to upload. In this example, we have uploaded two files, test_data.csv and Dynamics_365 For Sales Read.json.
- Filename to be used: Enter here the new name of the file. This is the name that will be given to the new file created in the destination directory. In this example, we have named our new files test_data.csv and sales_read.json, respectively.
- Multipart Content-Type: Enter here the type of the data you want to create. In our example, the first file is text/csv, and the second file is application/json.
- Click the + button in the HTTP Header fieldset. This adds a row of fields, which you can use to add authorization information required for your request. You can also provide Basic Auth account details instead of using these fields. In this example, we have used HTTP headers.
- Key: Enter Authorization here. This tells the Snap that the string in the Value field is to be used for authorizing the transaction.
- Value: Enter the authorization string provided for your account.
- Select the Execute during preview check box to instruct the Snap to run the pipeline during preview. For a successful execution, the following success message appears:

Click here to download this Pipeline. You can also downloaded this pipeline from the Downloads section below.
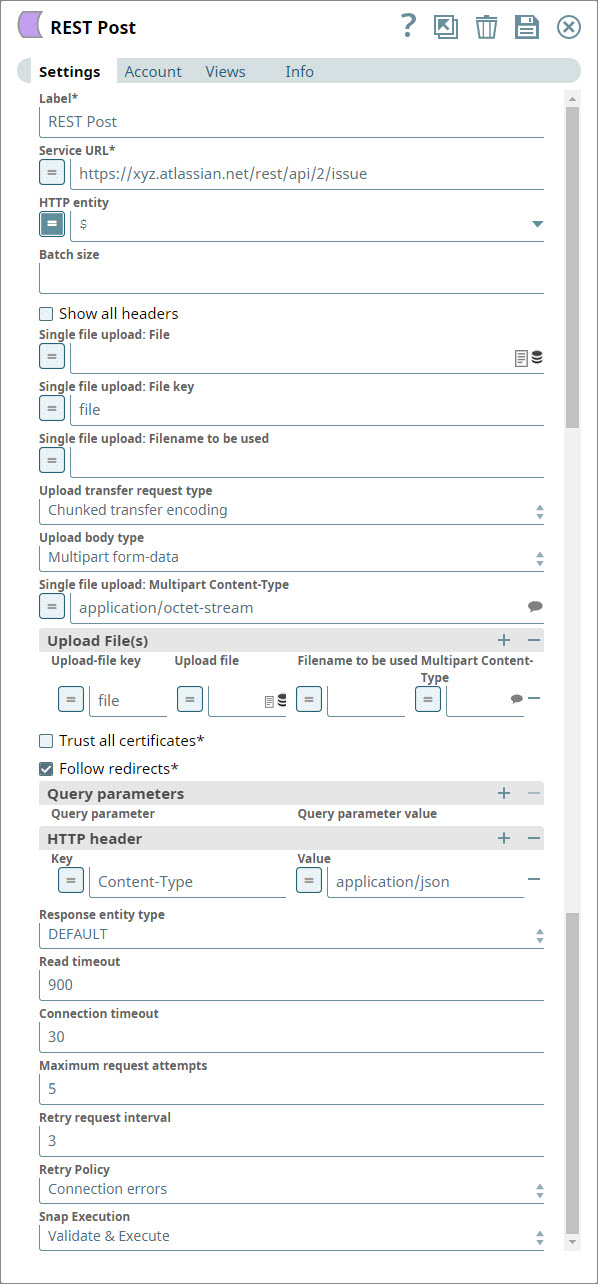
Using the REST Post Snap to Add Attachments to Jira Issues
In this example, we use a REST Post Snap to add attachments to a Jira issue.

Download this Pipeline.
You design the Pipeline as shown above. This Pipeline contains the following Snaps:
- Creating the Jira Ticket
- File Reader: Reads a file containing the details required to create a ticket in Jira.
- JSON Parser: Structures the data received from the File Reader Snap as a JSON document.
- Mapper: Creates a document containing the data needed to create a Jira ticket, by extracting and mapping data from the incoming document.
- JIRA Create: Creates a Jira ticket using the details provided by the Mapper Snap.
- Updating the Jira Ticket
- Mapper: Creates a document containing the key associated with the record that you want to update.
- REST Post: Updates the ticket with the specified attachments.
You configure these Snaps as explained in the sections below:
Creating the Jira Ticket
File Reader
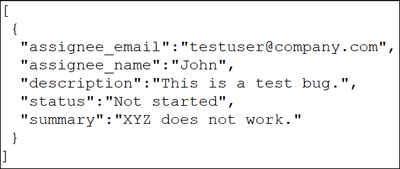
You configure the File Reader Snap to read a JSON file from the SnapLogic File System:
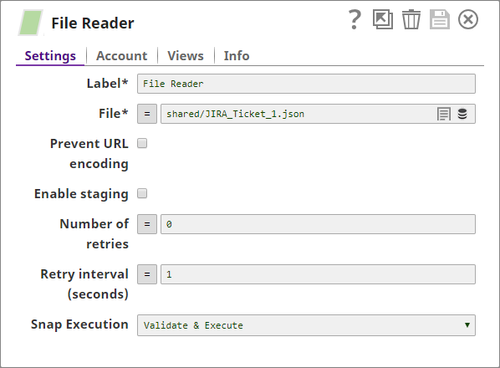
Once the Pipeline is validated, you can view the output of the File Reader:
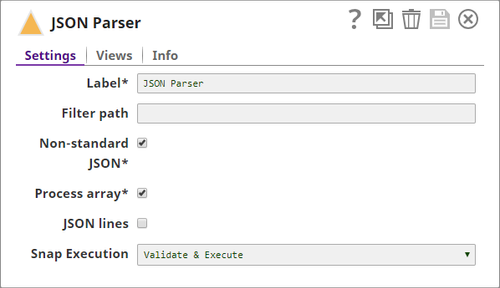
JSON Parser
You use the JSON Parser Snap to read the structure of the JSON file:
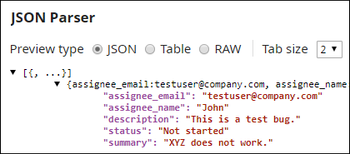
Once the Pipeline validates successfully, you can view the output of the JSON Parser Snap:
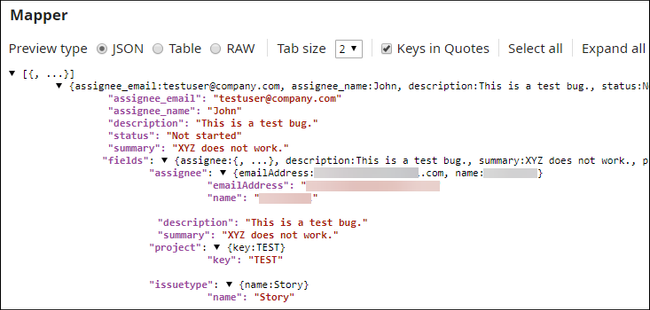
You now need to add the details required to specify where the ticket must be created, and to whom it must be assigned. You do this using the Mapper Snap. The Mapper Snap maps the schema of the source document (the JSON Parser Snap's output) with the schema of the target document (the schema of a Jira ticket as propagated backward by the JIRA Create Snap).
Mapper
You configure the Mapper Snap as shown below:
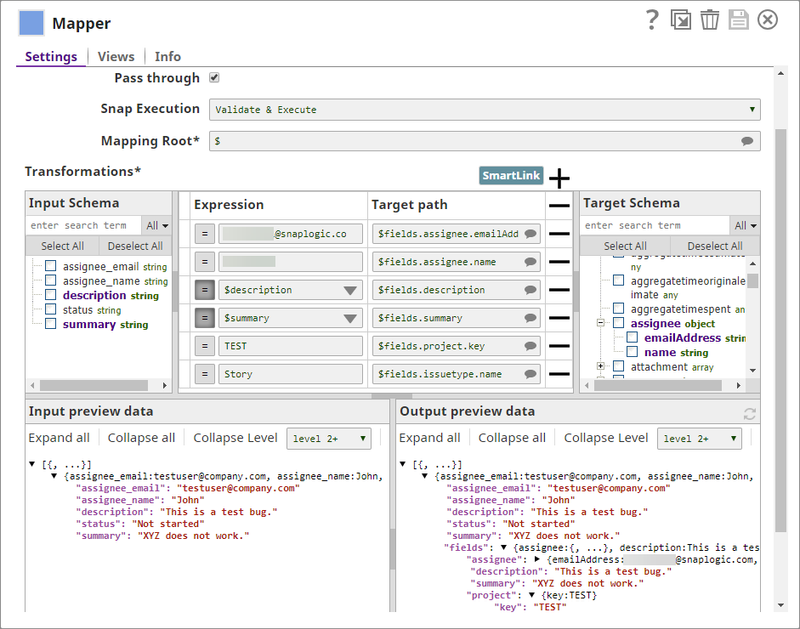
Once fields from the input document are mapped to fields in the Jira ticket schema and the Pipeline is validated, you can view a preview of the output:
JIRA Create
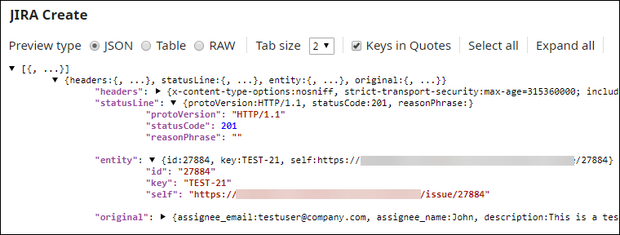
You now have a document containing all the details that you need to create a Jira ticket, and you use the JIRA Create Snap to create the ticket:
Once the ticket is created successfully, you can view the output in the preview:
Updating the Jira Ticket
You just created a Jira ticket, and you can see the ticket ID displayed against the "$key" field in the output preview of the JIRA Create Snap. You can now add attachments to this ticket. You decide to add two images. To do so, you decide to use the Mapper and REST Post Snaps.
Mapper
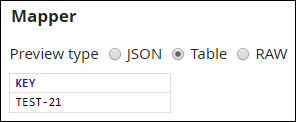
You configure the Mapper Snap to isolate the Jira ticket number from the output of the JIRA Create Snap:
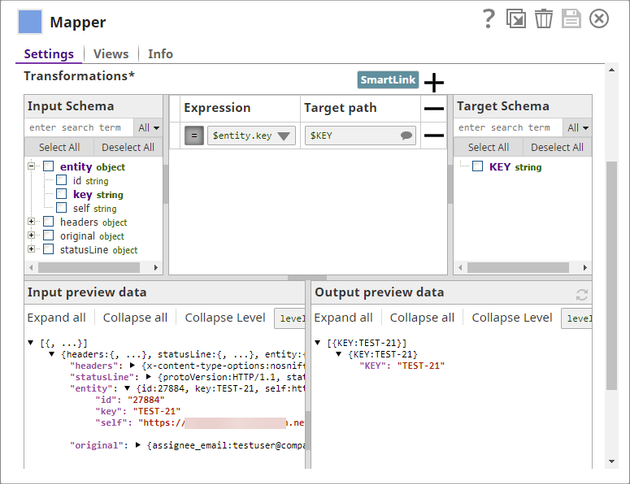
Once you validate the Pipeline with your latest changes, you can see the output preview of the Mapper Snap, and you can see that only the ticket ID is retained:
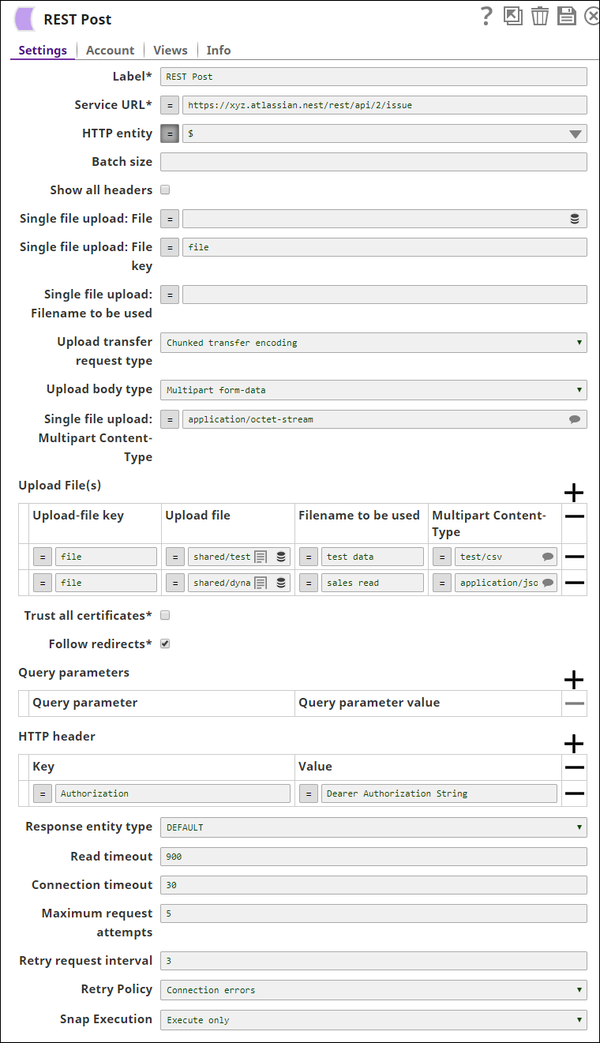
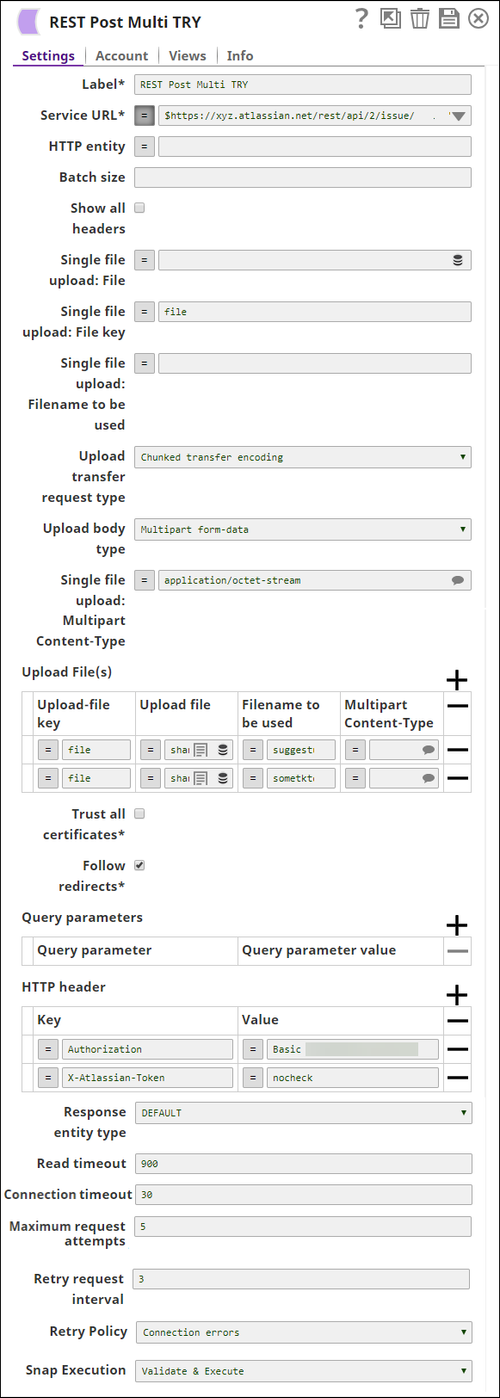
REST Post
You configure the REST Post Snap to upload two images as attachments to the identified Jira ticket, accessible through a Service URL:
For a successful upload, the REST Post Snap displays a status code of 200:
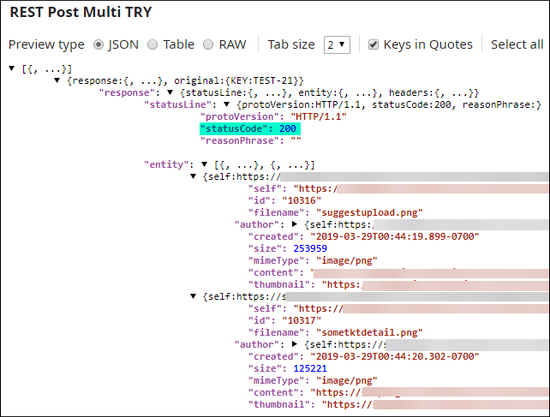
You have now successfully created a Jira ticket and added attachments to the ticket.
Download this Pipeline.
Downloads
| Multiexcerpt include macro | ||||
|---|---|---|---|---|
|
| Attachments | ||
|---|---|---|
|
| Insert excerpt | ||||||
|---|---|---|---|---|---|---|
|