Here are some settings required for working with the following popular endpoints: | Expand |
|---|
| title | How to configure JMS for ActiveMQ without SSL |
|---|
| Configuring JMS for ActiveMQProperty Name | Property Value |
|---|
java.naming.factory.initial | org.apache.activemq.jndi.ActiveMQInitialContextFactory | java.naming.provider.url | tcp://localhost:61616
| topic.jms/topic/dataTopic | TOPIC.DATATOPIC | topic.jms/topic/controlTopic | TOPIC.CONTROLTOPIC | queue.jms/queue/dataQueue | QUEUE.DATAQUEUE | queue.jms/queue/controlQueue | QUEUE.CONTROLQUEUE | connectionFactoryNames | connFact |
| Note |
|---|
| jms/topic/dataTopic is the JNDI name for the data topic while TOPIC.DATATOPIC is the physical name. They must be taken from Tomcat configuration file. |
|
| Expand |
|---|
| title | How to Configure JMS for Connecting to ActiveMQ via SSL |
|---|
| Configuring JMS for Connecting to Active MQ via SSL- Add Active MQ server's certificate to plex's trust store.
Attach the .bindings file that is created by the Active MQ SME and is provided with the server's certificate.
The Connection Factory property fetches the value from the .bindings file.
| Note |
|---|
Each client has unique .bindings, and the Active MQ SME of the customer creates the .bindings file. An Active MQ SME provides the following JNDI properties: - Multiple queueManager hostnames separated by commas, which are resolvable by the Groundplex.
- The value for JNDI URL property, java.naming.provider.url, which is the path of the folder on the Groundplex where the .bindings file is stored.
The file must be called .bindings, and the Groundplex user (snap user) must have read permission to access it.
|
Provide all the necessary JAR files belonging to the Active MQ client, or it might fail to validate.
Each version of the Active MQ client uses different JRE levels. If the version of Active MQ is 5.15.10, use the 5.15.10 JRE files.
Include the following JAR files while configuring the account:
| Panel |
|---|
- activemq-all-5.15.10.jar
- commons-logging-1.2.jar
- commons-codec-1.9.jar
- httpclient-4.5.2.jar
- httpcore-4.4.4.jar
- xtream-1.4.11.1.jar
|
- Upload these libraries(JAR files) to the Shared project for the JMS account.
Configure the following JVM options, and then start the JCC. | Note |
|---|
Each client has unique .xml, and the Active MQ SME of the customer creates the .xml file. An Active MQ SME provides the following JNDI properties: jcc.jvm_options = -Djavax props-Djavax.net.ssl.trustStore=/path/to/broker.ts -Djavax.net.ssl.trustStorePassword=changeitACTIVEMQ_SSL_OPTS = -Djavax.net.ssl.keyStore=/path/to/broker.ks -Djavax.net.ssl.keyStorePassword=password
|
| Property Name | Property Value |
|---|
| java.naming.factory.initial | org.apache.activemq.jndi.ActiveMQInitialContextFactory | | java.naming.provider.url | https://<machine_name>:8443 |
|
| Expand |
|---|
| title | How to configure JMS for ApolloMQ |
|---|
| Configuring JMS for ApolloMQProperty Name | Property Value |
|---|
java.naming.factory.initial | org.apache.activemq.jndi.ActiveMQInitialContextFactory | java.naming.provider.url | tcp://localhost:61613
| topic.jms/topic/dataTopic | topic.dataTopic | topic.jms/topic/controlTopic | topic.controlTopic | queue.jms/queue/dataQueue | queue.dataQueue | queue.jms/queue/controlQueue | queue.controlQueue | connectionFactoryNames | connFact |
Note: ApolloMQ is REST based. It can be configured using Web Console. While creating a topic/queue, we must provide just name. This name is used both as the property name and property value. |
| Expand |
|---|
| title | How to set up JMS for JBoss HornetQ without SSL |
|---|
| Configuring JMS for JBoss HornetQ| Note |
|---|
Before you start configuring your HornetQ account in SnapLogic, you must first unzip the HornetQ Setup ZIP file and install HornetQ on the server that you want to use with SnapLogic. Details required in the Account Settings popup for HornetQ will require information that will become available to you only after you install HornetQ. |
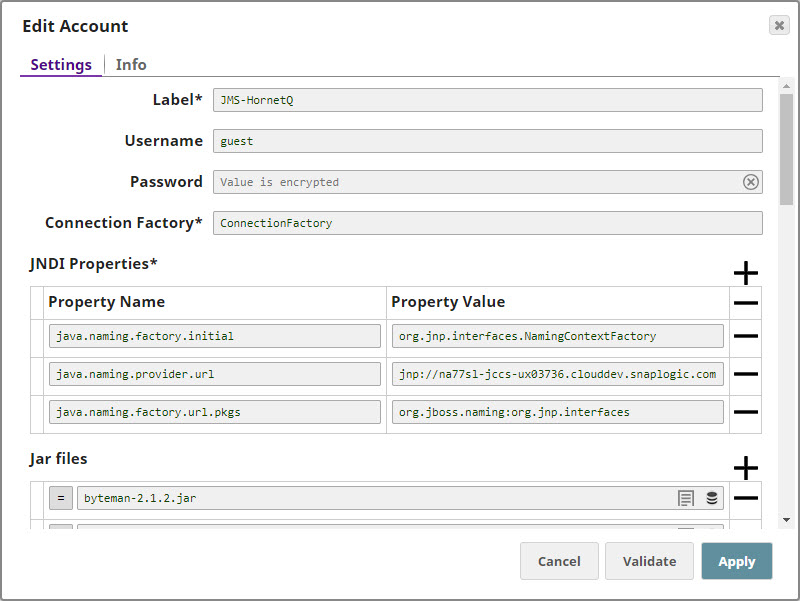
Configuring the HornetQ AccountUpdate the Account popup with the following settings: | Label | Required. Enter a label for the new account. Default value: None. |
|---|
| Username | Enter the username associated with your HornetQ account. Default value: None. |
|---|
| Password | Enter the password associated with the username entered in the Username field. Default value: None. |
|---|
| Connection Factory | Required. This is the Java Naming and Directory Interface (JNDI) name for the JMS connection factory. you can find this information in the configuration file associated with the HornetQ installation.
Default value: None. |
|---|
| JNDI Properties | Required. Enable you to specify details, such as the JNDI server name, which will enable SnapLogic to connect to HornetQ. You need to configure these are pairs of Property Name and Property Value. These properties and values must be configured as shown below: | Paste code macro |
|---|
java.naming.factory.initial=org.jnp.interfaces.NamingContextFactory
java.naming.provider.url=jnp://<server_address>:1099
java.naming.factory.url.pkgs=org.jboss.naming:org.jnp.interfaces |
|
|---|
| Property Name | Required. This is the name of the JNDI property required for JNDI to work. These names can be picked up from the JNDI configuration file. Default value: None. |
|---|
| Property Value | Required. This is the location of the package that contains information related to this property. Default value: None. |
|---|
| Jar files | Required. These are the JAR files that must be present; else HornetQ will not work. Default value: None. The typical list of JAR files associated with HornetQ are as follows. These files are available once HornetQ is installed on your server. You need to navigate to the directory where you installed HornetQ and upload these files to SLDB: | Paste code macro |
|---|
byteman-2.1.2.jar
byteman-submit-2.1.2.jar
hornetq-commons-2.4.0.Final.jar
hornetq-core-client-2.4.0.Final.jar
hornetq-jms-client-2.4.0.Final.jar
hornetq-jms-server-2.4.0.Final.jar
hornetq-journal-2.4.0.Final.jar
hornetq-native-2.4.0.Final.jar
hornetq-server-2.4.0.Final.jar
javax.inject-1.jar
jboss-as-build-config-7.1.2.Final.jar
jboss-common-core-2.2.10.GA.jar
jboss-connector-api_1.5_spec-1.0.0.Final.jar
jboss-ejb-api-3.0.0.CR2.jar
jboss-ejb-client-1.0.0.Final.jar
jboss-jaxrpc-1.0.4.GA.jar
jboss-jms-api-1.1.0.GA.jar
jbossjts-jacorb-4.17.13.Final.jar
jboss-logging-3.3.2.Final.jar
jboss-logmanager-1.2.2.GA.jar
jboss-marshalling-1.3.14.GA.jar
jboss-marshalling-river-1.3.14.GA.jar
jboss-remote-naming-1.0.3.Final.jar
jboss-remoting-3.2.7.GA.jar
jboss-sasl-1.0.1.Final.jar
jboss-transaction-api-1.0.1.CR2.jar
jcommon-1.0.12.jar jfreechart-1.0.9.jar
jgroups-3.3.4.Final.jar
jnpserver-5.0.3.GA.jar
netty-3.6.2.Final.jar
netty-all-4.0.13.Final.jar
xnio-api-3.0.3.GA.jar
xnio-nio-3.0.3.GA.jar |
|
|---|
|
| Expand |
|---|
| title | How to set up JMS for JBoss HornetQ via SSL |
|---|
| Configuring JMS for Connecting to HornetQ via SSL- Import HornetQ server's certificate to plex's trust store by using the following command:
-import -file ~/client.cer -keystore broker.ts1 -storepass
- Attach the hornetq-configuration.xml file that is created by the HornetQ SME and is provided with the server's certificate.
Edit the hornetq-configuration.xml file that you imported from the server.
Edit connectors. | Paste code macro |
|---|
<connector name="netty-ssl-connector">
        <factory-class>org.hornetq.core.remoting.impl.netty.NettyConnectorFactory</factory-class>
        <param key="host" value="192.168.30.131" />
        <param key="port" value="5500" />
        <param key="ssl-enabled" value="true" />
        <param key="key-store-path" value="/home/test/artifacts/Apps/hornetq-2.4.0.Final/ssl/broker.ks" />
        <param key="key-store-password" value="hornetqexample" />
</connector> |
Edit acceptors. | Paste code macro |
|---|
<acceptor name="netty-ssl-acceptor">***
        <factory-class>org.hornetq.core.remoting.impl.netty.NettyAcceptorFactory</factory-class>
        <param key="host" value="192.168.30.131" />
        <param key="port" value="5500" />
        <param key="ssl-enabled" value="true" />
        <param key="key-store-path" value="/home/test/artifacts/Apps/hornetq-2.4.0.Final/ssl/broker.ks" />
        <param key="key-store-password" value="hornetqexample" />
        <param key="trust-store-path" value="/home/test/artifacts/Apps/hornetq-2.4.0.Final/ssl/broker.ts1" />
        <param key="trust-store-password" value="hornetqexample" />
</acceptor> |
In the JMS.xml file, add one Connection Factory. | Paste code macro |
|---|
<connection-factory name="NettySslConnectionFactory">***
     <xa>false</xa>
     <connectors>
        <connector-ref connector-name="netty-ssl-connector"/>***
     </connectors>
     <entries>
        <entry name="/ConnectionFactorySsl"/>
     </entries>
</connection-factory> |
The Connection Factory property fetches the value from the JMS.xml file. | Note |
|---|
Each client has unique .xml, and the HornetQ SME of the customer creates the .xml file. A HornetQ SME provides the following JNDI properties: jcc.jvm_options = -Djavax propsDjavax.net.ssl.trustStore=/usr/lib/jvm/java-1.8.0-openjdk.x86_64/jre/lib/security/cacerts -Djavax.net.ssl.trustStorePassword=changeit
|
- Optionally, create a simple pipeline with a File Reader Snap to verify that you can access the .xml file.
Provide all the necessary JAR files belonging to the HornetQ client, or it might fail to validate. Each version of the HornetQ client uses different JRE levels. If the version of HornetQ is 1.8, use the 1.8 JRE files.
The typical list of JAR files associated with HornetQ are as follows. These files are available once you install HornetQ on your server. You need to navigate to the directory where you installed HornetQ and upload these files to SLDB: | Paste code macro |
|---|
byteman-2.1.2.jar
byteman-submit-2.1.2.jar
hornetq-commons-2.4.0.Final.jar
hornetq-core-client-2.4.0.Final.jar
hornetq-jms-client-2.4.0.Final.jar
hornetq-jms-server-2.4.0.Final.jar
hornetq-journal-2.4.0.Final.jar
hornetq-native-2.4.0.Final.jar
hornetq-server-2.4.0.Final.jar
javax.inject-1.jar
jboss-as-build-config-7.1.2.Final.jar
jboss-common-core-2.2.10.GA.jar
jboss-connector-api_1.5_spec-1.0.0.Final.jar
jboss-ejb-api-3.0.0.CR2.jar
jboss-ejb-client-1.0.0.Final.jar
jboss-jaxrpc-1.0.4.GA.jar
jboss-jms-api-1.1.0.GA.jar
jbossjts-jacorb-4.17.13.Final.jar
jboss-logging-3.3.2.Final.jar
jboss-logmanager-1.2.2.GA.jar
jboss-marshalling-1.3.14.GA.jar
jboss-marshalling-river-1.3.14.GA.jar
jboss-remote-naming-1.0.3.Final.jar
jboss-remoting-3.2.7.GA.jar
jboss-sasl-1.0.1.Final.jar
jboss-transaction-api-1.0.1.CR2.jar
jcommon-1.0.12.jar jfreechart-1.0.9.jar
jgroups-3.3.4.Final.jar
jnpserver-5.0.3.GA.jar
netty-3.6.2.Final.jar
netty-all-4.0.13.Final.jar
xnio-api-3.0.3.GA.jar
xnio-nio-3.0.3.GA.jar |
- Upload these libraries(JAR files) to the Shared project for the JMS account.
|
| Expand |
|---|
| title | How to set up a JMS account for IBM WebSphere MQ without SSL |
|---|
| Configuring JMS for IBM WebSphere MQ
Property Name | Property Value |
|---|
java.naming.factory.initial | com.sun.jndi.fscontext.RefFSContextFactory | java.naming.provider.url | file:///home/ubuntu/JNDI-Directory | | java.naming.security.authentication | none | | hostname | 127.0.0.1 | port | 1414 | queueManager | qManager | channel | mqCientConnChannel | transportType | 1 | | clientReconnectTimeout | 2 | | clientReconnectOptions | 0 |
Jar FilesInclude the following JAR files while configuring the account: - com.ibm.mq.defaultconfig.jar
- com.ibm.mq.postcard.jar
- providerutil.jar
- fscontext.jar
- com.ibm.mq.traceControl.jar
- com.ibm.mqjms.jar
- com.ibm.mq.jmqi.jar
- com.ibm.mq.pcf.jar
- com.ibm.mq.headers.jar
- bcpkix-jdk15on.jar
- bcprov-jdk15on.jar
- com.ibm.mq.tools.ras.jar
- com.ibm.mq.commonservices.jar
- com.ibm.mq.jar
- com.ibm.mq.allclient.jar
|
| Expand |
|---|
| title | How to set up a JMS account for IBM WebSphere MQ via SSL |
|---|
| Configuring JMS for Connecting to IBM WebSphere MQ via SSL- Add IBM MQ server's certificate in plex's trust store.
Attach the .bindings file that iscreated by the WebSphere MQ SME and is provided with theserver's certificate.
The Connection Factory property fetches the value from the .bindings file.
| Note |
|---|
Each client has unique .bindings, and the WebSphere MQ SME of the customer creates the .bindings file. A WebSphere MQ SME provides the following JNDI properties: - Multiple queueManager hostnames separated by commas, which are resolvable by the Groundplex.
- The value for JNDI URL property, java.naming.provider.url, which is the path of the folder on the Groundplex where the .bindings file is stored.
The file must be called .bindings, and the Groundplex user (snap user) must have read permission to access it.
|
- Optionally, create a simple pipeline with a File Reader Snap to verify that you can access the .bindings file.
Provide all the necessary JAR files belonging to the WebSphere MQ client, or it might fail to validate.
Each version of the WebSphere MQ client uses different JRE levels. If the version of WebSphere MQ is 1.8, use the 1.8 JRE files.
The typical list of JAR files associated with WebSphere MQ are as follows. These files are available once you install WebSphere MQ on your server. Navigate to IBMMQ/MQServer/lap/jre/ibm-java-x86_64-80/jre/lib, where you installed WebSphere MQ, and upload these files to SLDB:
| Paste code macro |
|---|
com.ibm.mq.defaultconfig.jar
com.ibm.mq.postcard.jar
providerutil.jar
fscontext.jar
com.ibm.mq.traceControl.jar
com.ibm.mqjms.jar
com.ibm.mq.jmqi.jar
com.ibm.mq.pcf.jar
com.ibm.mq.headers.jar
bcpkix-jdk15on.jar
bcprov-jdk15on.jar
com.ibm.mq.tools.ras.jar
com.ibm.mq.commonservices.jar
com.ibm.mq.jar
com.ibm.mq.allclient.jar |
- Upload these libraries(JAR files) to the Shared project for the JMS account.
- Configure the following JVM options, and then start the JCC.
com.ibm.mq.cfg.useIBMCipherMappings: false
javax.net.ssl.trustStore: <Path of the truststore containing the server certificate>
javax.net.ssl.trustStorePassword - <truststore password>
Property Name | Property Value |
|---|
java.naming.factory.initial | com.sun.jndi.fscontext.RefFSContextFactory | java.naming.provider.url | file:///home/ubuntu/JNDI-Directory | | java.naming.security.authentication | none | | hostname | 127.0.0.1 | port | 1414 | queueManager | qManager | channel | mqCientConnChannel | transportType | 1 | | clientReconnectTimeout | 2 | | clientReconnectOptions | 0 |
|
|
> Account > JMS, followed by the appropriate account type. The Create Account dialog associated with the selected account type is displayed.