In this Article
| Table of Contents | ||
|---|---|---|
|
Overview
SnapLogic supports Kubernetes orchestration on your Groundplex instances. You can deploy Snaplex nodes in your Kubernetes environment by setting up a Helm Chart that defines the node configuration for discoverability in the Kubernetes environment. This article explains how you can deploy and configure SnapLogic Snaplex nodes in a Kubernetes environment without support for Elastic Scaling and contains an attached Helm Chart zip file you can use.
Workflow

Prerequisites
- You must be an Org-level Admin.
- You are familiar with the SnapLogic Snaplex installation process.
Downloading the Configuration File from SnapLogic Manager
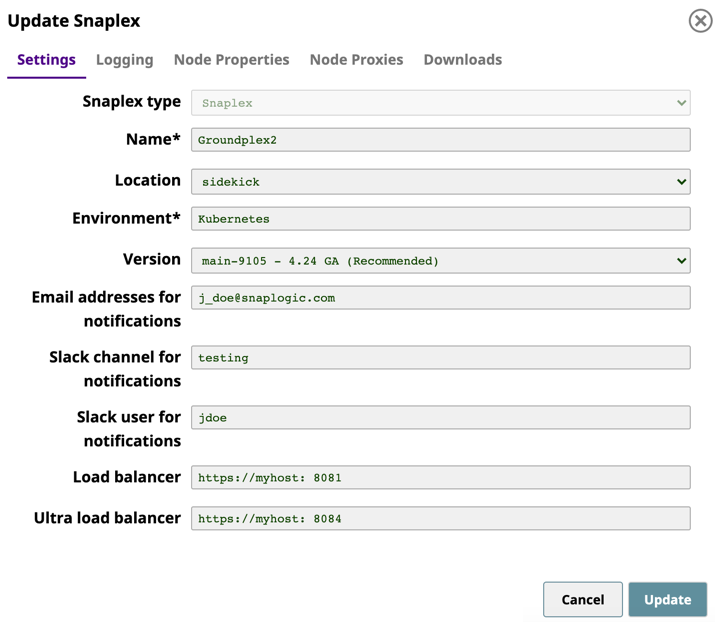
Open an existing Snaplex in the Org:
Navigate to the target Snaplex in Manager.
- Click on the Snaplex name to display the Update Snaplex dialog.
Alternatively, if none exists, Create a Snaplex.
On the Downloads tab, click
 to copy the Configuration link. Paste this link into your Helm Chart in the next procedure.
Click Cancel to exit the dialog.
Since the the configuration link has an expiration, to ensure that the Kubernetes pods continue to run:
Delete all query string parameters from the Configuration Link URL:
Panel title Example: Query String in Red Set the parameter
snaplogic_secretin the Helm chart YAML file to the name of the Kubernetes secret you create, as described in the next section.
Running the Snaplex with Org Credentials
You can associate Org admin credentials with the SnapLogic secret created when enabling enhanced encryption. Doing so makes it easier to share the Snaplex service with the users in your Org. Both the credentials for the SnapLogic Org admin and the enhanced encryption secret are in JSON format as key/value pairs.
Generate a key and encode it for each value.
Note title Encoding Use base64 to encrypt the values.
To create the SnapLogic secret:
Create the YAML file with the following two keys: username and password.
Code Block title Example YAML File apiVersion: v1 kind: Secret metadata: name: mysecret type: Opaque data: username: <base64 username> password: <base64 password>
Run the following command:
$ kubectl apply -f snaplogic_secret.yaml
Note title Optional Run the following command to encode your username/password into text of the secret:
$ echo -n "snaplogic_username" | base64(Optional) If Enhanced Encryption is enabled for your Org, create the Enhanced Encryption secret:
Create the YAML file with the following keys:
keystore_pass
keystore_jks
Run the following command:
$ kubectl apply -f enhanced_encryption_secret.yaml
$ echo -n "snaplogic_username" | base64After the secret is created, delete the YAML file, which is no longer needed.
| Info |
|---|
See the Kubernetes documentation regarding the management of the secret. |
You can now deploy the Helm Chart, as described in the next section.
Deploying the Helm Chart
Configure the following parameters in the Helm Chart and name the file values.yaml:
Regular nodes count. Specify the number of JCC Nodes to deploy.
FeedMaster nodes count. Specify the number of FeedMaster nodes to deploy.
Docker image of SnapLogic Snaplex image. Specify the repository where the image resides and the tag indicating the version of the image. While you can specify a version of your Snaplex, we recommend that you enter the latest version for the most recently released SnapLogic build.
SnapLogic configuration link. Specify the link to the SnapLogic JCC configuration file (also known as .slpropz).
SnapLogic Org admin credential. Specify the secret (an encoded username and password) to authenticate the deployment.
Enhanced encryption secret. Specify the secret (an additional encoded username and password) to authenticate the deployment, available to the user only.
CPU and memory limits for the nodes. Specify the upper limits for the CPU and memory resources. You can set these values for upper limits
only; the lower limits are system-defined and cannot be modified.Code Block title Example Helm Chart # Default values for snaplogic-snaplex. # This is a YAML-formatted file. # Declare variables to be passed into your templates. # Regular nodes count jccCount: 1 # Feedmaster nodes count feedmasterCount: 1 # Docker image of SnapLogic snaplex image: repository: snaplogic/snaplex tag: latest # SnapLogic configuration link snaplogic_config_link: https://elastic.snaplogic.com/api/1/rest/plex/config/testing_org/shared/my_project # SnapLogic Org admin credential #snaplogic_secret: snaplogic # Enhanced encryption secret #enhanced_encrypt_secret: Y395cIOwUGapMTr8QTk= # CPU and memory limits for the nodes limits: memory: 8Gi cpu: 2000m
In the Helm Chart console, run the following command:
$ helm install --name snaplogic <helm_chart_folder>Where <helm_chart_folder> is the Helm Chart zip file, which you can download from this document.Run the
helm listcommand to determine the status of deployment.
The following sample output shows a successful deployment:
Note If you deploy the Snaplex JCC nodes but resources in the Kubernetes environment are not available to fulfill the Helm Chart, then your deployment goes into a pending state until sufficient resources are available.
The following sample output shows the pending status of resources:

Once you deploy your Helm Chart, you can deploy a load balancer, as described in the next section.
Deploying a Load Balancer
| Note |
|---|
Use base64 to encrypt the values. |
To add load balancers to your JCC and FeedMaster nodes:
In the Helm console, run the
helm listcommand to list the services.In SnapLogic Manager, navigate to the target Project folder, then click the target Snaplex; the Update Snaplex dialog appears.
On the Settings tab of the Update Snaplex dialog, enter the corresponding values in the following fields:
Load balancer. Enter the protocol and port number of the Snaplex JCC node. See PORT(s) associated with
snaplogic-snaplex-regular.Ultra load balancer. Enter the the protocol and port number of the FeedMaster node. See PORT(s) associated with
snaplogic-snaplex-feed.
Review the information, then click Update.
Once your Snaplex and FeedMaster nodes are deployed, you can start designing and running Pipelines and Tasks.
Downloads
Download and extract the following files, using the values.yaml file as the basis for your Helm Chart.
| Attachments | ||
|---|---|---|
|