In this article
Install a Snaplex on Linux
This article describes the procedures for installing an on-premise Snaplex in a Linux environment. An on-premise Snaplex is also known as a Groundplex. This document uses the term Groundplex to distinguish this type of Snaplex (on-premise) from other types, such as a Cloudplex or an eXtremeplex. However, in command syntax and references to the UI, the generic term Snaplex is used.
Groundplex installation covers the following tasks:
For prerequisites, see Requirements for On-premises Snaplex.
Groundplex Installation
The Linux installer comes bundled with the JRE necessary for this Snaplex. We recommend you use the patch version of Java 11 that is bundled with the installer for your Linux environment. To update your Snaplex to the Java 11, see Upgrading Your Groundplex to Java 11.
Setting up a Groundplex
- Log into SnapLogic Manager as an Org admin.
- Navigate to the project where you want to create your Groundplex, then do one of the following:
- Click the Snaplex tab, then click
 to display the Snaplex dialog.
OR
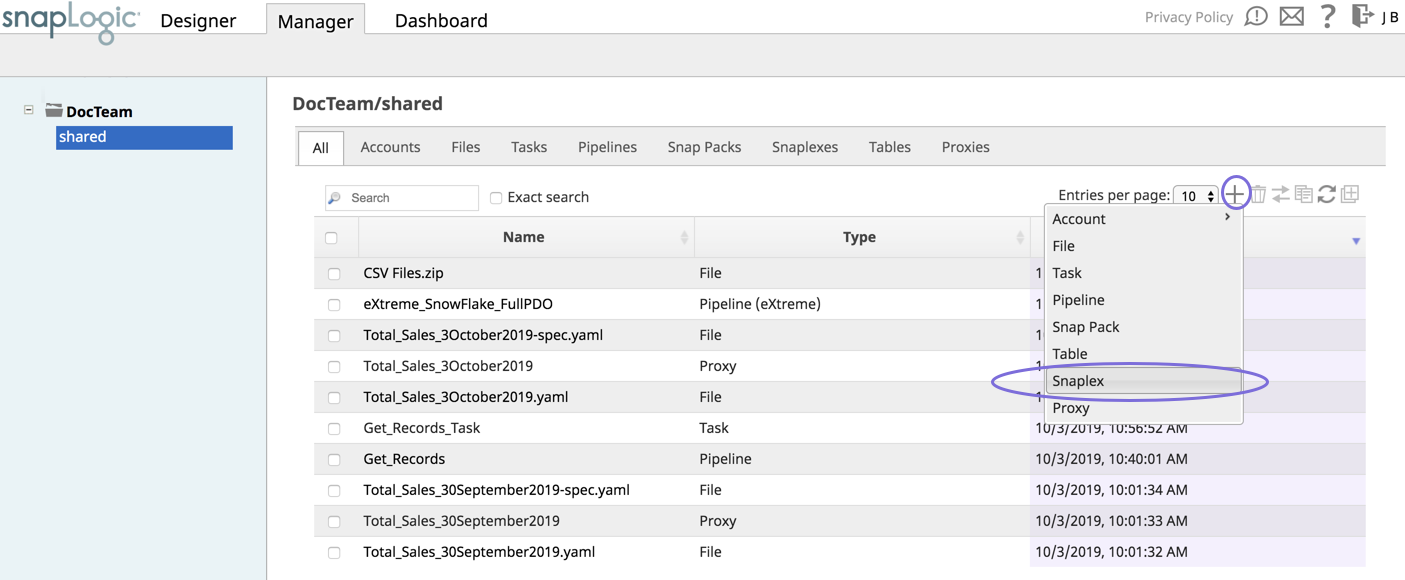
- Click to display the Assets drop-down list, then select Snaplex; the Snaplex dialog appears.
- Click the Snaplex tab, then click
- Enter the required information on the Create Snaplex form. Once completed, the Downloads tab on the Snaplex popup appears. The Downloads tab has links to the installer and configuration files.
- Download the RPM/DEB and the configuration file onto a Linux machine:
For CentOS (or Redhat) 6.3 or newer, run the following command:
$ sudo rpm -i <filename>.rpmFor Ubuntu 14.04 or newer, run the following command:
$ sudo dpkg -i <filename>.deb
Where <filename> is the name of the current installer file.
After the software is installed, place the downloaded configuration file in the
/opt/snaplogic/etcdirectory and make sure the file name ends with.slpropz. Change the .slpropzfile so that snapuser owns it by running the following commands:$ sudo chown snapuser:snapuser /opt/snaplogic/etc/myplex.slpropz $ sudo chmod 600 /opt/snaplogic/etc/myplex.slpropz
- To start the Snaplex service, run:
$ sudo /opt/snaplogic/bin/jcc.sh start - To verify the Snaplex has started, visit https://elastic.snaplogic.com/sl/dashboard.html#Health. The newly installed Snaplex node should appear in the list of nodes for the Snaplex.
Disable noexec Setting
Some Snaps, such as the SQL Bulk Load Snaps, require write and execute permissions to the /tmp directory. Make sure you disable the noexec setting in the mount used for the /tmp directory. Else, the Snap execution could fail with an error like Failed to map segment from shared object: Operation not permitted. You can also specify a different location as the temporary folder.
FeedMaster Installation
Ultra Pipelines require that you set up a FeedMaster along with the JCC (Java Component Container) nodes in your Groundplex. For details, see Deploying a FeedMaster Node.
Importing a Certificate to SnapLogic JCC nodes
To generate and import a self-signed certificate on all the JCC nodes in the Snaplex:
- Obtain the certificate (.pem) file by using SSH.
Import the file by using the following command in the JCC node:
This example is an excerpt from 1.8.0_45; the directory path might vary based on the Java installation directory.
- Restart the JCC node process to confirm the import.
Run the following command to list certificates from the CAcerts file:
The steps to import the certificate to the JCC node can vary based on the certificate format and the OS.
Invalid Self-signed certificate
While configuring accounts for various Snap Packs, you might encounter the following error message:
Failed to validate account: Invalid credentials Cause: Could not send Message. (Reason: unable to find valid certification path to requested target; Resolution: Please provide valid credentials.)
If this error occurs, update the CAcert trust store in the SnapLogic JCC nodes to enable a successful TLS (SSL) handshake to the target endpoint.
Find the trust store at /opt/snaplogic/pkgs/java version/lib/security/cacerts, and confirm that every node in the Groundplex has the certificate imported.
Automatically Start and Stop a Groundplex on Linux
You can use either the systemd or init.d utility to start and stop the Snaplex. Procedures for both are included below. The procedures vary depending on which Linux distribution is installed on the Snaplex host.
Starting and Stopping the Groundplex by Using the Linux Systems Call
Use this procedure for Red Hat-like Linux distributions such as Red Hat, Fedora CoreOS, CentOS, and SuSE.
To add the Snaplex as a Service:
- Login to the host as a root or sudo user.
Create the startup service file:
touch /etc/systemd/system/snaplogic.service
Change the permissions on the file:
chmod 664 /etc/systemd/system/snaplogic.service
This change provides read and write permissions for the owner and group, and read permission for others.
Open the file with a text editor. For example, the using a vim editor:
vim /etc/systemd/system/snaplogic.service
Add the following text to the file:
- Save and exit the file.
Enable the service by running the following command:
systemctl enable snaplogic.service
The service will start automatically when the host reboots.
Start the service:
systemctl start snaplogic.service
To stop the Snaplex as a service, run the following command:
systemctl disable snaplogic.service
Starting and Stopping the Groundplex by Using the init.d Utility
Use this procedure for Red Hat-like Linux distributions such as Red Hat, Fedora CoreOS, CentOS, and SuSE.
To add the Snaplex as a service:
- Login to the Linux machine as root.
Change directories:
cd /etc/init.d/
Create a softlink to the
jcc.shfile:ln -s /opt/snaplogic/bin/jcc.sh snaplex
Add the softlink to
chkconfigmanagement:chkconfig --add snaplex
We recommend that you reboot the machine to verify if the Snaplex service is restarting automatically on machine reboot. Under some conditions, the symlink resolution might fail when the machine is starting up. In this case, you can change the Snaplex startup script to be a file instead of a symlink. Run the following commands a root user:
rm /etc/init.d/snaplex
cp /opt/snaplogic/bin/jcc.sh /etc/init.d/snaplex
echo "export SL_ROOT=/opt/snaplogic" >> /etc/sysconfig/jcc
To delete the Snaplex as a service, remove the service from the chkconfig management:
chkconfig --del snaplex
Debian-like Distribution (Debian and Ubuntu)
To add the Snaplex as a Service:
- Log in to the Linux machine as root.
Change directories:
cd /etc/init.d/
Create a soft-link to the
jcc.shfile:ln -s /opt/snaplogic/bin/jcc.sh snaplex
Install the service using
update-rc.d. For example:sudo update-rc.d snaplex defaults 98 02
Troubleshooting if the machine reboot fails
We recommend that you reboot the machine to verify whether the Snaplex service is restarting automatically on machine reboot. Under some conditions, the symlink resolution might fail when the machine is starting up. In this case, you can change the Snaplex startup script to be a file instead of a symlink. Run the following commands a root user:
rm /etc/init.d/snaplex
cp /opt/snaplogic/bin/jcc.sh /etc/init.d/snaplex
echo "export SL_ROOT=/opt/snaplogic" >> /etc/sysconfig/jcc
On a Debian system, the
/etc/sysconfigdirectory would need to be created if not already present.To stop the Snaplex as a Service, remove the service from
update-rc.dmanagement:update-rc.d -f snaplex remove
Configure Java 11 on Linux
To update your JCC nodes to OpenJDK Java 11:
- Stop the existing JCC node by running the following command:
$ sudo /opt/snaplogic/bin/jcc.sh stop - Download the new Snaplex installer and install the Groundplex, running the RPM, DEB, or Docker installers as appropriate.
- For RPM systems, run the following command:
$rpm -U snaplogic-snaplex.rpm - For DEB systems, run the following command:
$dpkg -i snaplogic-snaplex.deb - For Docker, stop the existing container and start a new container using the latest image.
- For RPM systems, run the following command:
- Add the following entry to the
/etc/sysconfig/jccdirectory. You must create this directory and file if neither are present.export SL_JAVA_HOME=/opt/snaplogic/pkgs/openjdk-11.0.5+10-jre/ - Start the JCC node by running the following command:
$ sudo /opt/snaplogic/bin/jcc.sh start.
Change the Installation Folder
If you want to use the/myopt/myroot instead of the /opt/snaplogic as the installation folder and myuser instead of snapuser, do the following steps:
- Run the following commands after installing the RPM/DEB package:
$ sudo mv /opt/snaplogic /myopt/myroot$ sudo chown -R myuser /myopt/myroot
- Add the following properties in the
/etc/sysconfig/jccfile. If this file does not exist, create it.export SL_USER=myuserexport SL_ROOT=/myopt/myroot
- Restart the service with the following command:
$ sudo /myopt/myroot/bin/jcc.sh restart - To make a service using init.d, make the
/etc/init.d/snaplexfile a symlink to the/myopt/myroot/bin/jcc.shfile.
System Limits
Some Linux installations have system ulimit settings that are set to lower values. This low setting can cause errors when running higher Pipeline loads on the Groundplex JCC node, such as, java.lang.OutOfMemoryError: unable to create new native thread.
To fix this issue, you need to increase the system limits for the Snapuser user. You can add the following in the /etc/security/limits.conf folder to increase the file and process limits.
The JCC process needs to be restarted after the limits are updated.
snapuser soft nproc 8192
snapuser hard nproc 65536
snapuser soft nofile 8192
snapuser hard nofile 65536
Setting limits for Docker Containers
For Docker deployments, you may not be able to set these limits because of permissions issues with the su – user user. Instead you can set the ulimits using the --ulimit parameter when running the docker run command. The limits described above also apply to the Docker container ulimits.
See Also
Video: Installing a Groundplex through a Debian-based Linux Distribution