In this article
Overview
All SnapLogic endpoints use the Standard Encryption setting by default. As an Org admin using Groundplex instances to run your Pipelines, you can encrypt Account credentials that access endpoints from SnapLogic using data/server keys.
Make Backup Copies of Your Data Keys
We strongly recommend that you make backup copies of your data keys. Otherwise, if the data keys to your account become corrupted or are unrecoverable, then all sensitive fields in the accounts would have to be manually re-entered to recover the accounts.
Best Practice
- You cannot use a Cloudplex for this configuration. Before enabling this feature, you need to work with SnapLogic support to turn off and remove Cloudplex instances from your Org or convert them into Groundplex instances. You can, however, use Enhanced Encryption in an eXtremeplex.
- We do not recommend moving an Org from Enhanced Encryption to Standard Encryption. However, if the Org with Enhanced Encryption is moved to Standard Encryption, any OAuth 2.0 accounts created before do not function and therefore need to be re-created after the move.
Enabling Enhanced Account Encryption
Prerequisites
- Google Chrome version 37 and later.
- A Groundplex. Windows and Linux machines are supported, but if you plan to host your Snaplex instances in an mixed ecosystem (Windows and Linux OS), the server and data keys must be encrypted on a Linux machine to be used on a Linux-based Snaplex.
- If you are using Linux, make sure you have the latest install of the RPM/DEB on each Groundplex node.
- A Java 11 environment.
Preparing Groundplex Nodes for Enhanced Encryption
SnapLogic Enhanced Encryption makes use of key sizes that are not supported in the standard installation. After restarting the service, a new key pair is generated automatically and saved to disk, per JCC node. You must copy the generated data keys files (jcc-datakeys.jks and jcc-datakeys.pass) from one node to all of the others in the Groundplex.
Server Keys
Server keys (jcc-serverkeys.jks and jcc-serverkeys.pass) must be unique per JCC node. Do not copy server keys across all nodes.
Using a Linux machine
- On Linux, find the keys in the
/etc/snaplogicfolder. - After you copy the files to the other nodes, restart the service on each node.
- During startup, the nodes upload their public keys to the SnapLogic cloud. You can view the keys displayed in the Encryption Settings dialog.
Using a Windows machine
Recommendation
Data keys are the same across JCC nodes; however, the server keys are unique for each JCC node. You should generate the data keys on a Linux machine and copy them to the SL_KEY_DIR folder on the Windows machine. Only the security administrators and users that run the Groundplex service must have access to the directory.
- On Windows-based Groundplex instances:
- Copy the keys to a secure folder.
- Ensure that the keys have the following names:
jcc-datakeys.jksjcc-datakeys.pass
- Copy the keys to a secure folder.
- Add the location of the key directory as a Java property in the Snaplex configuration with the name SL_KEY_DIR.
- Navigate to the target Snaplex in Manager, and then click to open it.
Click the Node Properties tab, and under Global Properties, click
 to enter the key-value pair.
Add the following in the Snaplex property:

- In the Create Snaplex dialog window, click Create. If you are updating an existing Snaplex, click Update.
- Restart the Windows service on all of the Groundplex nodes with the updated slpropz configuration.
Applying Enhanced Account Encryption to your Org
To configure Enhanced Account Encryption on a Groundplex for your SnapLogic Org:
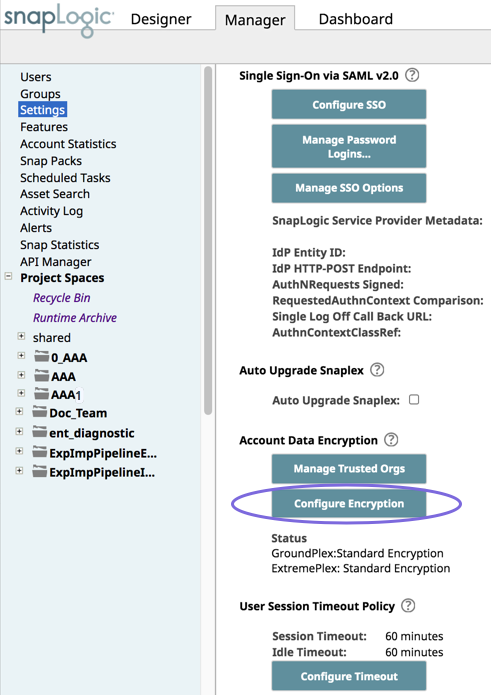
- Log in as an Org admin and navigate to Manager > Settings, then click Configure Encryption.
On the Encryption Settings dialog, click the Groundplex tab (default), then select Enhanced encryption.
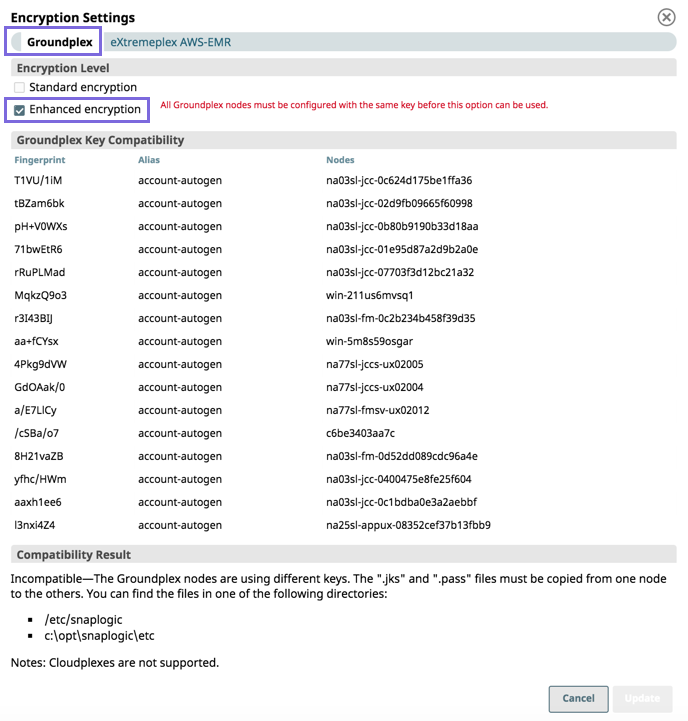
Verify that the same key is used on all nodes of the Groundplex; otherwise, you cannot configure the Org with Enhanced Encryption because all keys used across an Org must be consistent
Select the level of sensitivity based on the following:
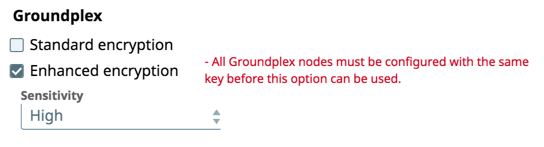
- High. Encrypts passwords and secret keys
- Medium and High. Encrypts usernames, passwords, and secret keys
Low, Medium, and High. Encrypts host name, database names, database URL properties, usernames, passwords, and secret keys.
Accounts for Snap Packs
To learn about which fields are encrypted for an Account, see the sensitivity level definition in the Account’s documentation for that Snap Pack.
- High. Encrypts passwords and secret keys
To set a key for the entire Org, select the target key. Only those keys that are available on all nodes are displayed.
- Confirm the new key. This configuration causes all accounts to be decrypted using the existing keys and then re-encrypted with the newly selected Org-level key.
- Click Update to apply enhanced encryption.
When you view the Org Settings, the new Status displays under Configure Encryption: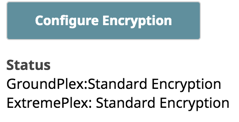
Scope and Limitations
- Once Enhanced Account Encryption is enabled, you are not be able to see or edit the existing values for the encrypted data types.
![]()
However, you are able to enter a new value in that field and save it.
- If you change your sensitivity level from Low, Medium, High to High, existing accounts remain at the previous level unless you update them; going in the other direction causes account data to be encrypted. All new accounts follow the new sensitivity encryption level.
- If you revert to standard encryption, the encrypted data is not automatically decrypted. As long as the server key is still in the node, the encrypted values continue to work.
Key Rotation
To change the enhanced encryption key (key rotation) for an organization, perform the following steps:
- Install the latest Groundplex RPM/DEB on one of the Groundplex nodes which is already running with enhanced encryption. This step is required to get the new addDataKey option in the
jcc.shscript. As root user, run the following command:
/opt/snaplogic/bin/jcc.sh addDataKey keyFeb2020
This command generate a new key pair and append it to the keystore in/etc/snaplogicfolder with the specified alias (keyFeb2020).- You must copy the generated data keys files (
jcc-datakeys.jksandjcc-datakeys.pass) from this node to all the others in the Org, similar to when originally setting up the enhanced encryption feature. - Restart the nodes in the Org. This step is required to pick up the updated key pair. Each node can be restarted one at a time from the dashboard in order to do an online restart.
Once all the nodes are running with the new key pair loaded, the Enhanced Encryption settings display the drop-down list allowing the Org admin to change to the new key.
After you enable Enhanced Encryption on your Groundplex nodes:
- Currently running Pipelines continue when the key is being rotated.
Accounts in the organization are sent to the Groundplex to be decrypted with the old key and then encrypted with the new key.
- Accounts that were exported when the Org ran with the old key have the Sensitivity fields encrypted with the old key. When the account information is imported into the Org after the key is rotated, the account is imported with the old key. To convert these imported accounts to the new key, go to Manager and redo the key rotation with the new key.
- The updates to the key store using the script are supported only on a Linux-based Groundplex machine. The updated key store can be copied to the Windows-based Groundplex machine to ensure that the rotated key is applied on the Windows machine as well. If using a Groundplex on Windows only, you can install the Linux RPM on a stand-alone machine for the purpose of updating the key store using the
jcc.shscript.
Adding Groundplex Nodes
When adding new nodes to a Groundplex, you must ensure that the new nodes have the same key as the other nodes. If a node does not have a matching key, it is ignored until the keys are synchronized. You can redo the configuration through the Enhanced Encryption Settings dialog in the Manager > Settings > Configure Encryption by checking the current key compatibility status.
Updating Windows Groundplex Instances to Use an Encrypted Keystore
To enable Enhanced Encryption on Windows Groundplex instances, the recommended procedure is to generate the keys on a Linux machine and then copy them onto the Windows node. The advantage is that the generated keystore is encrypted, and the same keystore can be used on both Windows and Linux nodes.
If there are existing Windows installations with Enhanced Encryption where the key was not initially generated in Linux, adding new Linux-based nodes require these additional steps, because, in such cases, there would be a datakeys.jks file under the etc folder, with no .pass file.
- Copy the keystore
datakeys.jksfrom the Windows machine to the Linux machine and place it in /etc/snaplogic/jcc-datakeys.jks. Perform the following steps as the
rootuser.You might have to change the JRE version based on the environment first if you are not using Java 11.
The keystore is now in a format suitable for use on Linux machines. You can now copy the same jcc-datakeys.jks and jcc-datakeys.pass files to other Linux-based nodes without having to repeat the prior steps.
We also recommend that you update the original Windows node to run with this encrypted keystore by setting the SL_KEY_DIR property described in Using a Windows Machine.