Insert Records into Salesforce Object
On this Page
Scenario
I want to insert records into the Salesforce object through SnapLogic.
Requirements
Snaps Used
For this scenario, the following Snaps are used:
- File Read
- JSON Parser
- Mapper
- Salesforce Create
- (Optional) JSON Formatter
- (Optional) File Writer
Other Requirements
- A Salesforce account configured in SnapLogic Manager. See Accounts for more information on configuring an account.
Configuration
This simplified pipeline reads a file from the SnapLogic Database, creates a base-64 encoded ASCII string of the file and attaches it using the Salesforce Create Snap.
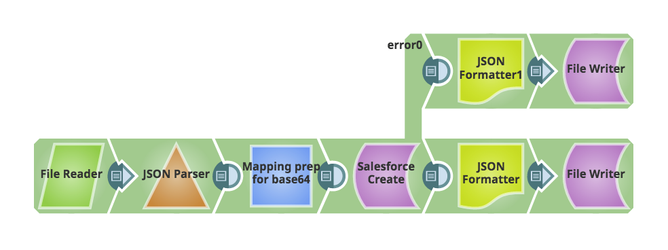
Add a File Reader Snap to read the file you want to attach. In this case, the file we are using is a JSON file with the following format:
[
  {
    "nodes": {},
    "org": "org_name",
    "SnapPacks": [...],
    "Subscriptions": null,
    "SF_ID": ""
  },
...
]
where SF_ID corresponds to the Salesforce ID associated with a customer.
- A JSON Parser is added to parse the JSON for use within SnapLogic.
- Add a Mapper Snap to base-64 encode the file and supply required fields to Salesforce. Configure the following Expression/Target path pairs:
- Expression: (with expression toggle on) Base64.encode(JSON.stringify($))
Target path: $Body
This encodes the file. - Expression: (with expression toggle on) $SF_ID
Target path: $ParentID
This identifies the Salesforce ID where to attach the file. - Expression: (with expression toggle on) $org + "_Integrations"
Target path: $Name
The provides the name to the file. An expression was used to generate the name based on the $org value supplied. - Expression: (with expression toggle off) application/json
Target path: $ContentType
- Expression: (with expression toggle on) Base64.encode(JSON.stringify($))
- Add a Salesforce Create.
- Verify that the correct Service version is configured.
- Set the Object type to Attachment.
- Set Salesforce API to REST API.
- Set the error view to route error data to error view.
The pipeline could end here. In this example, we added a JSON Formatter and File Writer to both the output and error views to capture what is written out and save it to a file for troubleshooting purposes.
Have feedback? Email documentation@snaplogic.com | Ask a question in the SnapLogic Community
© 2017-2024 SnapLogic, Inc.