Application Configuration in Azure Portal for OAuth2 Account to use in OneDrive
In this article
Overview
Snaps in this Snap Pack use the Microsoft OneDrive OAuth2 accounts to access the Azure Active Directory. For the OAuth2 accounts to function without any issue, ensure to (create and) configure an application corresponding to the account as explained in the steps below. These steps also contain information required to create/define a new OAuth2 account for using with this Snap Pack.
Create/Access your Azure Portal Application
- Log into the Microsoft Azure Portal.
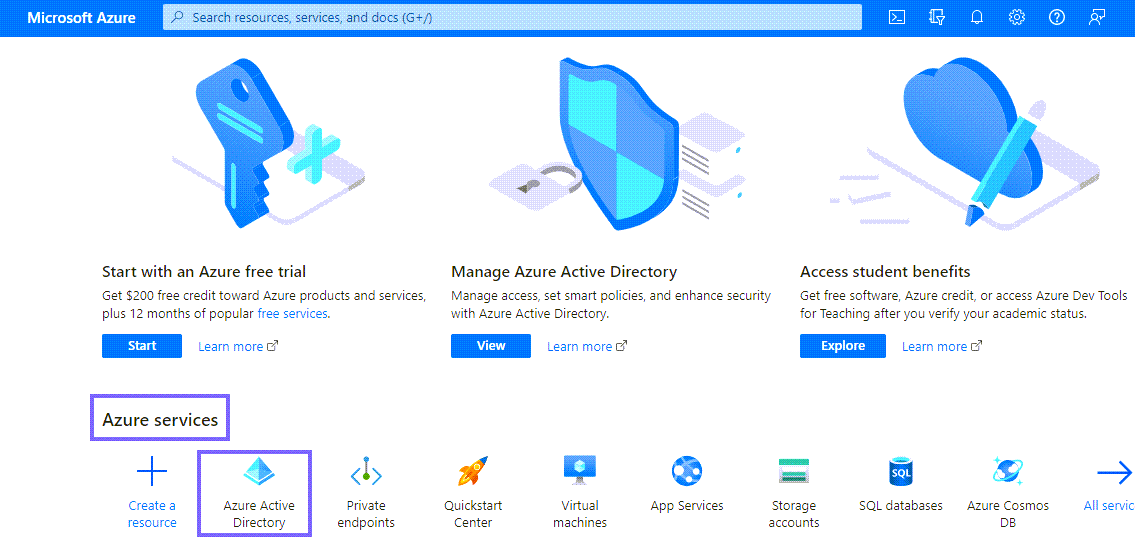
- To create a new application, click Azure Active Directory under Azure Services.
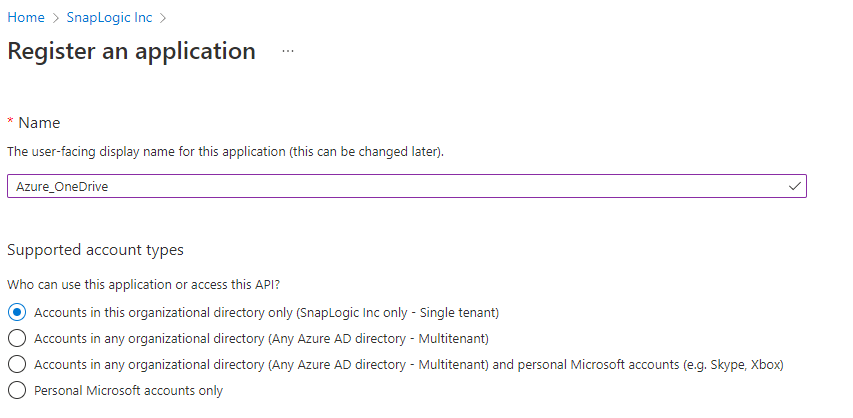
- Click Add → App Registrations.
On the Register an Application page, enter the Name and Redirect URL Name and Redirect URL for the new app registration. Redirect URL is the URL of your SnapLogic server that uses this account.
To use an existing application, select the application from the list in the App Registrations → All Applications and type the name of the application you want to open.
- Click Register.
Locate Information Required to Create your OAuth2 Account
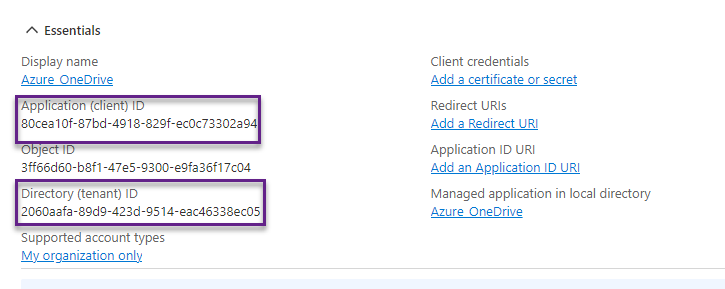
- Under Essentials, make a note of Application(client) ID and Tenant ID.
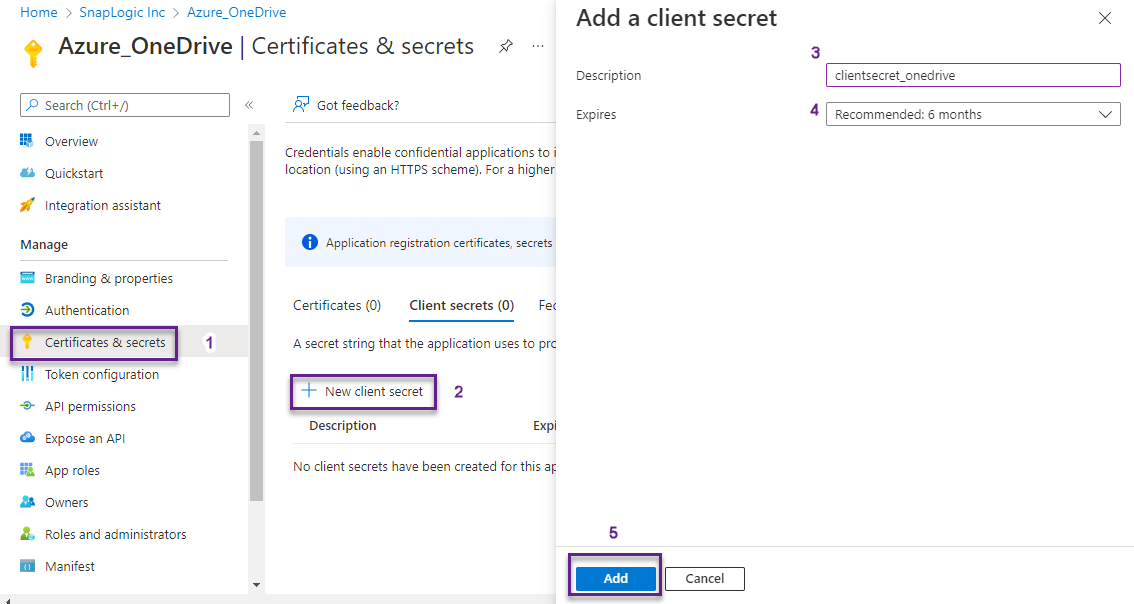
- On Certificates and Secrets page, click +New client secret.
- On the Add a client secret page, enter the Description and Expires and click Add.
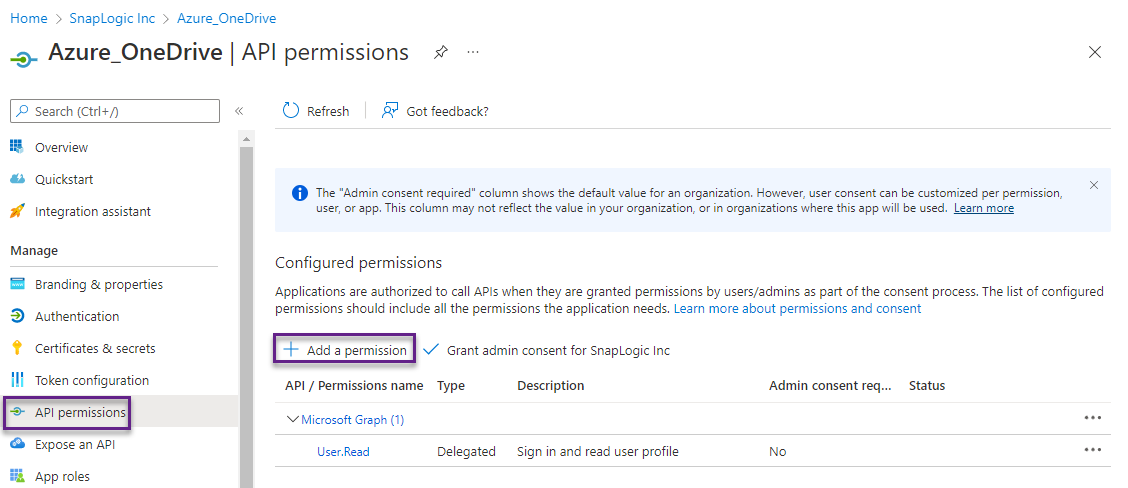
The client secret is generated. - Under Manage, Click API Permissions → Add a Permission.
- On Request API permissions page, select Microsoft Graph → Delegated Permissions for OAuth2 User account and Application Permissions for OAUth2 application Account.
- Add the following minimum API permissions to call the OneDrive APIs:
Delegated Permissions:- Files.Read: Access to read user files.
- Files.Read.All: Access to read all files that user can access.
- Files.ReadWrite: Allows full acess to user files.
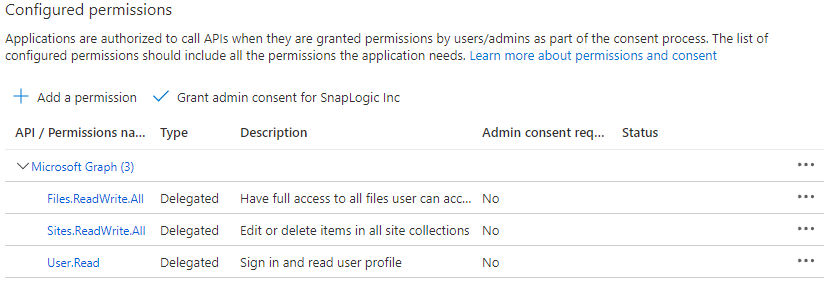
- Files.ReadWrite.All: Allows full access to all files user can access.
- User.Read.All: Allows to read emails of all users' in the organization.
- Files.Read.All: Access to read files in all site collections.
Files.ReadWrite.All: Access to read and write files in all site collections.
- Click Add Permissions. You can see all the permissions added under Configured Permissions.
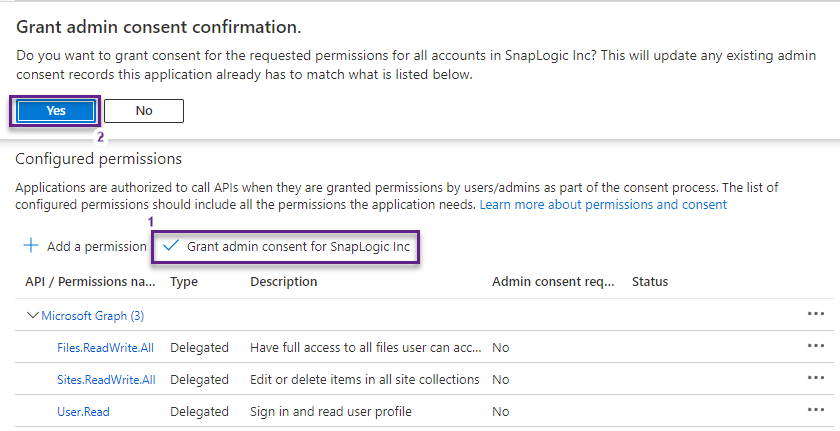
- Click Grant admin consent for SnapLogic Inc and select Yes.
- Click Overview and Add a Redirect URls.
- Under Platform Configurations, click Add a platform.
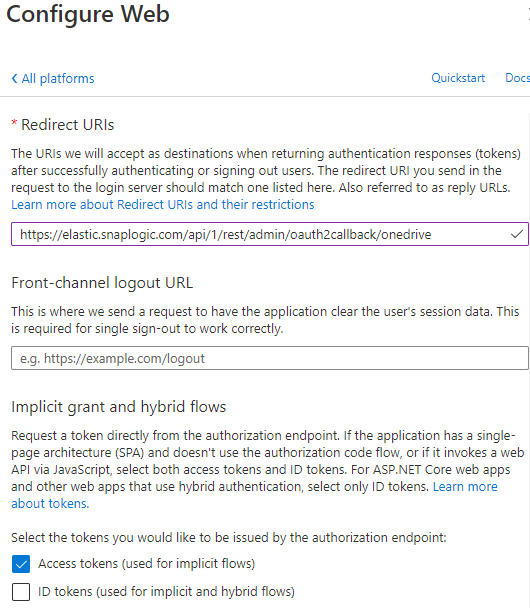
- Select Web and enter a valid redirecting URI and click Configure.
- Under Implicit grant and hybrid flows, select Access tokens (used for implicit flows) checkbox and click Save.
Scopes and Permissions Available in OneDrive API
OneDrive and SharePoint expose a few granular permissions that control the access that apps have to resources. When users sign in to your app they, or, in some cases, an administrator, are required to provide consent to these permissions. Learn more about scopes: Microsoft Graph permissions.
Files
Delegated permissions | |||
|---|---|---|---|
| Permission | Display String | Description | Admin Consent Required? |
| Files.Read | Read user files | Allows the app to read the signed-in user's files. | No |
| Files.Read.All | Read all files that user can access | Allows the app to read all files the signed-in user can access. | No |
| Files.ReadWrite | Have full access to user files | Allows the app to read, create, update, and delete the signed-in user's files. | No |
| Files.ReadWrite.All | Have full access to all files user can access | Allows the app to read, create, update, and delete all files the signed-in user can access. | No |
| Files.ReadWrite.AppFolder | Have full access to the application's folder (preview) | Allows the app to read, create, update, and delete files in the application's folder. | No |
| Files.Read.Selected | Read files that the user selects | Allows the app to read files that the user selects. The app has access for several hours after the user selects a file. | No |
| Files.ReadWrite.Selected | Read and write files that the user selects | Allows the app to read and write files that the user selects. The app has access for several hours after the user selects a file. | No |
Application permissions | |||
| Permission | Display String | Description | Admin Consent Required? |
| Files.Read.All | Read files in all site collections | Allows the app to read all files in all site collections without a signed in user. | Yes |
| Files.ReadWrite.All | Read and write files in all site collections | Allows the app to read, create, update, and delete all files in all site collections without a signed in user. | Yes |
Sites
Delegated permissions | |||
|---|---|---|---|
| Permission | Display String | Description | Admin Consent Required? |
| Sites.Read.All | Read items in all site collections | Allows the app to read documents and list items in all site collections on behalf of the signed-in user. | No |
| Sites.ReadWrite.All | Read and write items in all site collections | Allows the app to edit or delete documents and list items in all site collections on behalf of the signed-in user. | No |
| Sites.Manage.All | Create, edit, and delete items and lists in all site collections | Allows the app to manage and create lists, documents, and list items in all site collections on behalf of the signed-in user. | No |
| Sites.FullControl.All | Have full control of all site collections | Allows the app to have full control to SharePoint sites in all site collections on behalf of the signed-in user. | Yes |
Define the Information Required to Create your OAuth2 Account
- Navigate to the Snap of your choice and set up the account with the following details:
- Client ID
- Tenant ID
- Client secret
- OAuth2 Endpoint: https://login.microsoftonline.com/<tenantName>.onmicrosoft.com/oauth2/v2.0/authorize
OAuth2 Token: https://login.microsoftonline.com/<tenantName>.onmicrosoft.com/oauth2/v2.0/token
To get the OAuth2 Endpoint and OAuth2 Token, click Overview → Endpoints and copy the (V2) endpoints .
- Token Endpoint Config:
- Token endpoint parameter: response_type
- The token endpoint parameter value: code
- Auth Endpoint configuration:
- Authentication parameter: scope
- Authentication parameter value: offline_access
Check the Auto-refresh token checkbox and click Authorize.
You will be redirected to the login page of Microsoft office.Login and accept the permissions.
The Access token and the Refresh Token will be generated.Check the Auto-refresh token checkbox and save the account.
Related Links
Have feedback? Email documentation@snaplogic.com | Ask a question in the SnapLogic Community
© 2017-2024 SnapLogic, Inc.
