In this Article
| Table of Contents | ||
|---|---|---|
|
...
- Log into SnapLogic Manager as an Org admin.
- Navigate to the project where you want to create your Groundplex, then do one of the following:
- Click the Snaplex tab, then click
 to display the Snaplex popup.
OR
- Click to display the Assets drop-down list, then select Snaplex; the Snaplex popup appears.
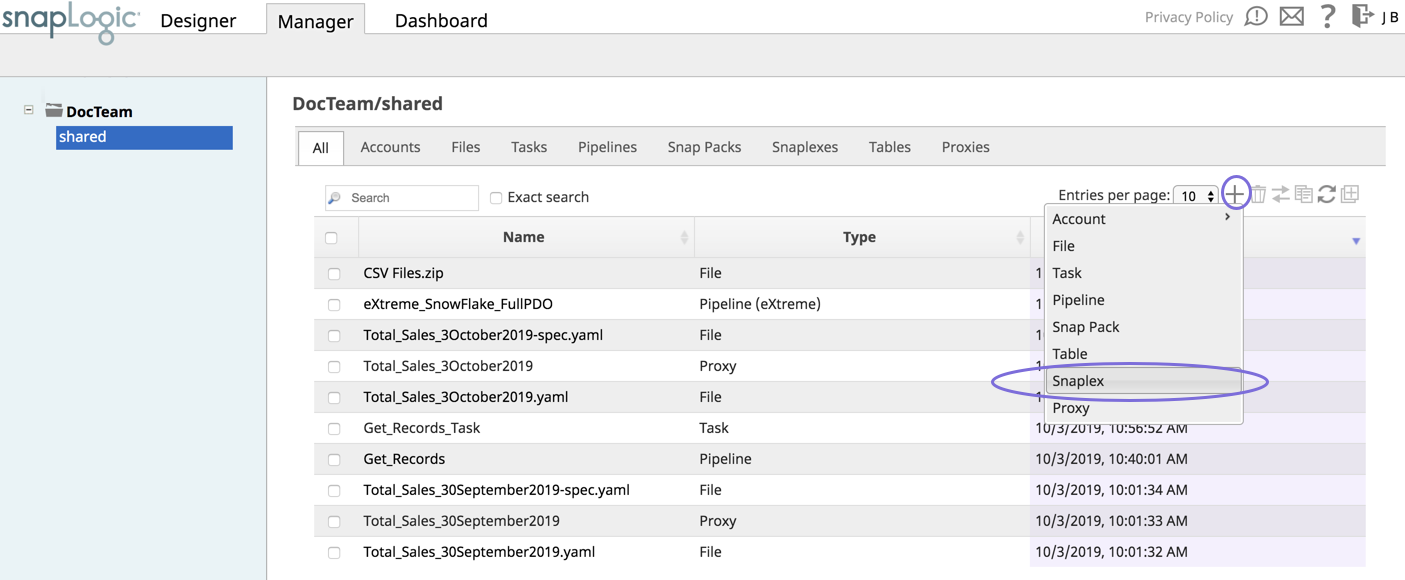
- Click the Snaplex tab, then click
- Enter the required information on the Create Snaplex form. Once completed, the Downloads tab on the Snaplex popup appears. The Downloads tab has links to the installer and configuration files.
- Download the RPM/DEB and the configuration file onto a Linux machine. :
For CentOS (or Redhat) 6.3 or newer, run the following command:
$ sudo rpm -i <filename>.rpmFor Ubuntu 14.04 or newer, run the following command:
$ sudo dpkg -i <filename>.deb.
Where <filename> is the name of the current installer file.
After the software is installed, place the downloaded configuration file in the
/opt/snaplogic/etcdirectory and make sure the file name ends with.slpropz. Change the slpropz file so that snapuser owns it by running the following commands:Code Block $ sudo chown snapuser:snapuser /opt/snaplogic/etc/myplex.slpropz $ sudo chmod 600 /opt/snaplogic/etc/myplex.slpropz
- To start the Snaplex service, run:
$ sudo /opt/snaplogic/bin/jcc.sh start - To verify the Snaplex has started, visit https://elastic.snaplogic.com/sl/dashboard.html#Health. The newly installed Snaplex node should show up in the list of nodes for the Snaplex.
| Note | ||
|---|---|---|
| ||
Some Snaps, such as the SQL Bulk Load Snaps, require write and execute permissions to the |
...
| Info | ||
|---|---|---|
| ||
Ultra Pipelines require that you set up a FeedMaster along with the JCC (Java Component Container) nodes in your Groundplex. For details, see Deploying a FeedMaster Node. |
...
To generate and import a self-signed certificate on all the JCC nodes in the Snaplex:
- Obtain the certificate (.pem) file by using SSH.
Import the file by using the following command in the JCC node:
Paste code macro /opt/snaplogic/pkgs/jre1.8.0_45/bin/keytool -import -file <path_to_pem_file_from_step_1> -alias <alias_name_optional> -keystore /opt/snaplogic/pkgs/jre1.8.0_45/lib/security/cacerts -vEnter keystore password: changeit
Note This example is an excerpt from 1.8.0_45; the directory path might vary based on the Java installation directory.
- Restart the JCC node process to confirm the import.
Run the following command to list certificates from the CAcerts file:
Paste code macro /opt/snaplogic/pkgs/jre1.8.0_45/bin/keytool -list --keystore /opt/snaplogic/pkgs/jre1.8.0_45/lib/security/cacerts -v+
...
- Log into the Groundplex host as a root or sudo user.
Create the startup service file:
Code Block touch /etc/systemd/system/snaplogic.service
Change the permissions on the file:
Code Block chmod 664 /etc/systemd/system/snaplogic.service
This change provides read and write permissions for the owner and group, and read permission for others.
Open the file with a text editor. For example, the using a vim editor:
Code Block vim /etc/systemd/system/snaplogic.service
Add the following text to the file:
Paste code macro [Unit] Description=SnapLogic JVM After=network.target [Service] Type=forking ExecStart=/opt/snaplogic/bin/jcc.sh start ExecReload=/opt/snaplogic/bin/jcc.sh restart ExecStop=/opt/snaplogic/bin/jcc.sh stop [Install] WantedBy=default.target
- Save and exit the file.
Enable the service by running the following command:
Code Block systemctl enable snaplogic.service
The service will start automatically when the host reboots.
Start the service:
Code Block systemctl start snaplogic.service
To stop the Snaplex as a service, run the following command:
Code Block systemctl disable snaplogic.service
...
- Login to the Linux machine as root.
Change directories:
Code Block cd /etc/init.d/
Create a softlink to the
jcc.shfile:Code Block ln -s /opt/snaplogic/bin/jcc.sh snaplex
Add the softlink to
chkconfigmanagement:Code Block chkconfig --add snaplex
...
- Log in to the Linux machine as root.
Change directories:
Code Block cd /etc/init.d/
Create a soft-link to the
jcc.shfile:Code Block ln -s /opt/snaplogic/bin/jcc.sh snaplex
Install the service using
update-rc.d. For example:Code Block sudo update-rc.d snaplex defaults 98 02
Note title Troubleshooting if the machine reboot fails We recommend that you reboot the machine to verify whether the Snaplex service is restarting automatically on machine reboot. Under some conditions, the symlink resolution might fail when the machine is starting up. In this case, you can change the Snaplex startup script to be a file instead of a symlink. Run the following commands a root user:
Code Block rm /etc/init.d/snaplex cp /opt/snaplogic/bin/jcc.sh /etc/init.d/snaplex echo "export SL_ROOT=/opt/snaplogic" >> /etc/sysconfig/jcc
On a Debian system, the
/etc/sysconfigdirectory would need to be created if not already present.To stop the Snaplex as a Service, remove the service from
update-rc.dmanagement:Code Block update-rc.d -f snaplex remove
...