| Table of Contents |
|---|
Overview
Most SnapLogic API requests can be sent to the SnapLogic cloud endpoint. The SnapLogic cloud runs with a signed TLS (SSL) certificate. The client sending the HTTP request validates will validate the CA certificate to verify the validity of the certificate.
Some SnapLogic API requests can be sent to the Groundplex nodes directly, including requests for Ground-triggered Pipelines and requests to the FeedMaster nodes for Ultra Pipelines. The Snaplex nodes run with self-signed certificates. A load balancer must be installed to handle the incoming requests to the Groundplex nodes. The load balancer can be configured with the customer's TLS (SSL) certificate. The clients see the certificate exposed by the load balancer.
| Note |
|---|
If the load balancer is configured with a custom TLS (SSL) certificate and configured to terminate TLS (SSL) connections, you do not have to change the TLS (SSL) certificate on the Groundplex nodes. The Groundplex nodes can run using the default SnapLogic generated certificate, which is the recommended configuration. |
If the certificate cannot be changed on the load balancer, choose one of the following methods to allow the HTTP clients to verify the authenticity of the Snaplex nodes when sending these requests:
- Allow all certificates: If running on a trusted network, the HTTP client can be configured to allow all certificates.
- Update the Snaplex nodes to run with a signed certificate: This requires updating all the Snaplex nodes to run with a signed certificate provided by the customer. The keystore would have to be updated on each Snaplex node and the service restarted to enable this option. Either a wildcard certificate or a unique certificate per node would have to be used to enable this option.
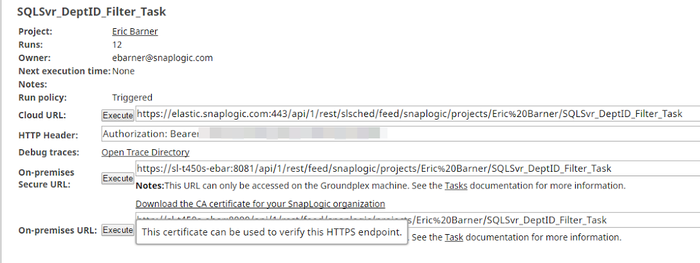
- Trust org specific CA certificate: Each Snaplex node runs with a self-signed certificate which is signed with an Org-specific CA certificate. You can download this Org certificate and add it to its trust store to allow trusted communication with any node in the Org. To download the certificate, go to the details of a Triggered task and click on the Download the CA certificate for your SnapLogic organization option.
Configuring a Snaplex Node to Host a CA-signed TLS (SSL) Certificate
on LinuxAs a best practicePerform the following steps:
- (Recommended) On the Snaplex node, create a backup copy of the of
jcc-serverkeys.jkskeys on the Snaplex node.- Linux default:
/etc/snaplogic/jcc-serverkeys.jks
To concatenate- Windows default:
C:\opt\snaplogic\etc\jcc-serverkeys.jks
- Linux default:
Concatenate all PEM encoded files into a single chain file, run the following command:
Code Block .
Linux Example:Paste code macro language xml $ cat <CA-SIGNED-PEM> <CA-INTERMEDIATE-PEM> <CA-ROOT-PEM> sl-ca-chain.pem
whereWhere:<CA-SIGNED-PEM>is the CA-signed TLS (SSL) certificate (PEM encoded).<CA-INTERMEDIATE-PEM>is the CA intermediate certificate (PEM encoded).<CA-ROOT-PEM>is the CA root certificate (PEM encoded).To ensure that there is not a password associated with the private key file for later operations, run the following OpenSSL commanduse the
opensslcommand.
Linux Example:paste-code-macro language xml $ openssl rsa -in <PRIVATE_KEY> -out key_no_pass.pem
info
where Where:<PRIVATE_KEY>is the private key used to create the CSR (PEM encoded).
If there is a password associated with the private key, you must provide it to generatekey_no_pass.pem.To Use the
opensslcommand to generate the PFX file, run the following OpenSSL command.
Linux Example:paste-code-macro language xml $ openssl pkcs12 -inkey key_no_pass.pem -in sl-ca-chain.pem -export -out sl-ca-chain.p12 -name jetty -password $(cat /etc/snaplogic/jcc-serverkeys.pass)
To Use the keytool command to import the PFX file into
jcc-serverkeys.jks, run the following keytool command.
Linux example:paste-code-macro language xml $ keytool -importkeystore -srckeystore <PATH-TO-SL-CA-CHAIN-PEM> -srcstoretype PKCS12 -srcstorepass $(cat /etc/snaplogic/jcc-serverkeys.pass) -deststore /etc/snaplogic/jcc-serverkeys.jks -deststoretype JCEKS -deststorepass $(cat /etc/snaplogic/jcc-serverkeys.pass)
Where:
where<PATH-TO-SL-CA-CHAIN-PEM>is the absolute path to thesl-ca-chain.pemfile created in Step 4.
To- Use the SnapLogic Dashboard to restart the Groundplex node to ensure that the node is in enters a steady state , restart the Groundplex node from the SnapLogic Dashboard, which allows Tasks and and allow time for running Pipelines to complete before the restart.
(Optional) Use the
opensslcommand to verify that the TLS (SSL) certificate served by the node matches the CA-signed TLS (SSL) certificate, run the OpenSSL command.
whereCode Block $ openssl s_client -connect localhost:<SECURE-PORT><SECURE-PORT>is 8081 (default) for a Groundplex or 8084 (default) for a FeedMaster node.
Repeat Steps 1 through 7 for all applicable nodes.
Configure a Snaplex Node to Host a CA-signed TLS (SSL) Certificate on Windows
Prerequisites
OpenSSL must be installed on your Windows machine. The steps in this procedure use OpenSSL.
The Windows installer does not contain the .pass keys required to set up an SSL certificate. You can generate these keys from the /etc/snaplogic folder on a Linux machine, then copy them onto your Windows machine.
Configuration Steps
As a best practice, create a backup copy of thejcc-serverkeys.jks keys on the Snaplex node.Default location:
C:\opt\snaplogic\etc\jcc-serverkeys.jks
To concatenate all PEM encoded files into a single chain file, run the following command:$ cat <CA-SIGNED-PEM> <CA-INTERMEDIATE-PEM> <CA-ROOT-PEM>> sl-ca-chain.pem
where:
<CA-SIGNED-PEM> is the CA-signed TLS (SSL) certificate (PEM encoded).
<CA-INTERMEDIATE-PEM> is the CA intermediate certificate (PEM encoded).
CA-ROOT-PEM> is the CA root certificate (PEM encoded).To ensure that a password is not associated with the private key file for later operations, run the following OpenSSL command:
| Code Block | ||
|---|---|---|
| ||
$ openssl pkcs12 -inkey key_no_pass.pem -in sl-ca-chain.pem -export -out sl-ca-chain.p12 -name jetty -password $(cat \opt\etc\snaplogic\jcc-serverkeys.pass) |
PRIVATE_KEY> is the private key used to create the CSR (PEM encoded).| Note |
|---|
If a password is associated with the private key, you must provide it to generate the |
To generate the PFX file, run the following OpenSSL command:
| Code Block | ||
|---|---|---|
| ||
$ keytool -importkeystore -srckeystore <PATH-TO-SL-CA-CHAIN-PEM> -srcstoretype PKCS12 -srcstorepass $(cat \opt\snaplogic\etc\jcc-serverkeys.pass) -deststore \etc\snaplogic\jcc-serverkeys.jks -deststoretype JCEKS -deststorepass $(cat \opt\snaplogic\etc\jcc-serverkeys.pass) |
To import the PFX file into jcc-serverkeys.jks, run the following keytool command:
| language | text |
|---|
Linux example:
Paste code macro language xml $ openssl s_client -connect localhost:<SECURE-PORT>
PATH-TO-SL-CA-CHAIN-PEM> is the absolute path to the sl-ca-chain.pem file created in Step 4.To ensure that the node is in a steady state, restart the Groundplex node from the SnapLogic Dashboard, which allows Tasks and Pipelines to complete before the restart.
Optionally, to verify that the TLS (SSL) certificate served by the node matches the CA-signed TLS (SSL) certificate, run the OpenSSL command:
| Code Block | ||
|---|---|---|
| ||
$ openssl s_client -connect localhost:<SECURE-PORT> |
SECURE-PORT>Where:
<SECURE-PORT>is 8081 (default) for a Groundplex or 8084 (default) for a FeedMaster node.- Repeat Steps 1 through 7 for all applicable
- nodes.