...
...
...
...
...
...
...
...
...
...
...
...
...
...
...
...
...
...
...
...
...
...
...
...
...
...
...
...
...
...
...
...
...
On this Page
| Table of Contents | ||||
|---|---|---|---|---|
|
| Note |
|---|
It is recommended that you to go through GitHub Options in the Snaplogic UI before referring to this page to understand the GitHub options in the SnapLogic UI. |
| Warning |
|---|
When committing files to GitHub from SnapLogic, some subdirectories might be inadvertently deleted from the repository, including GitHub Actions workflows in the |
SnapLogic → GitHub
You can perform the following operations on files in the GitHub repository through SnapLogic:
Add files
Update files
Delete files
Add Files to the GitHub Repository
Navigate to the project in SnapLogic Manager.
...

Upload the file by clicking the + symbol. The file displays in the
...
Asset table; but the GitHub
...
Status reads Untracked.
...

Open the File options menu by clicking the downward arrow adjacent to this file in the Asset table.
...

...
Click Add to Repository. The GitHub status changes
...
to Added.
...

Go to
...
the GitHub menu and click Commit to GitHub Repository. The Commit changes dialog box opens. The file is shown under Changes to
...
Commit in the dialog box.
Add
...
a Commit Message.
...

...
Click Commit. The file is added to
...
the Asset table and the GitHub Status
...
reads Tracked.
...

Refresh the GitHub page. The new file is displayed in the
...
repository along with the commit message.
...

| Note |
|---|
If you omit step #3 and commit changes to the repository:
|
...
|
...
|
...
|
Update Files in the GitHub Repository
Navigate to the project in SnapLogic Manager.
...

Upload the asset from your local storage (by clicking
...
the +
...
symbol, and uploading it). Since the file already exists in your repository (and in your Asset table), an "Overwrite" dialog box is displayed.
...
Click Overwrite to confirm.
...

Go to the GitHub menu and
...
click Commit to GitHub. The Commit Changes dialog box opens. It automatically detects if there is a newer version of a file and lists it out in the dialog box under
...
the Changes to Commit list.
...

Add
...
a Commit Message, if required.
...
Click Commit. The Asset table is updated.
...

Refresh your GitHub repository.
...

Delete Files from the GitHub Repository
Navigate to the project in SnapLogic Manager.
...

Open the File options menu by clicking the downward arrow adjacent to the file to be deleted. Click Remove from Repository. The GitHub Status changes to Removed.

Commit changes by going to the GitHub menu and clicking Commit to GitHub Repository. The Commit Changes dialog box opens.
Add
...
a Commit Message, if required.
...

...
Click Commit. The GitHub Status changes to Untracked and the file is deleted from the GitHub repository.
...

Refresh your
...
GitHub repository.
...

GitHub → SnapLogic
You can perform the following operations on assets in a SnapLogic project through GitHub:
Add files
Update files
Delete files
Add Assets/Files to the Project
Go to your GitHub repository.
Add the file.
Add a commit message.
Commit changes by
...
clicking Commit. The new file is displayed in your repository.
...

Go to the project's Asset table in SnapLogic Manager.
In the GitHub menu
...
click GitHub Pull.
...
The GitHub Pull dialog box opens, displaying the files that were added in the Asset list.|
...

...
Click OK
...
to close the dialog box. The file is added to the Asset table.
...

Update Assets/Files in the Project
Go to your GitHub repository.
Update the file.
Add a commit message and commit changes by
...
clicking Commit. The updated file is displayed in the repository.
...

Go to the project's Asset table in SnapLogic Manager.
In GitHub menu options
...
click GitHub Pull.
...
The GitHub Pull dialog box opens, displaying the files that were updated in the Asset list.
...

...
Click OK
...
to close the dialog box. The file is updated in the Asset table.
...

Delete Assets/Files from the Project
Go to your GitHub repository.
Delete the file.
Add a commit message and commit changes by
...
clicking Commit. The file is deleted from the repository.
...

Go to the project's Asset table in SnapLogic Manager.
In the GitHub menu
...
click GitHub Pull.
...
The GitHub Pull dialog box opens, displaying the file that was deleted in the Asset list.
Click OK to close the dialog box. The file is deleted from the Asset table.
...

Conflict Resolution in Pull Requests
It may happen that you have updated an asset in SnapLogic and also updated the same file in your GitHub repository. This causes a conflict when you perform a pull operation. In such scenarios,
...
SnapLogic lets you specify whether you want to overwrite.
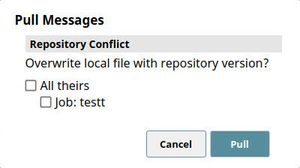
To overwrite your local file with the
...
repository version,
...
select the file and
...
click Pull.
...
Click OK
...
in the confirmation message displayed.
...
If you do not want to overwrite the local file with the version in the GitHub repository, do not select the checkbox in
...
the GitHub Pull dialog box.
...
Click Pull. To overwrite the version in the GitHub repository, perform a Commit operation.
...