In this Page
...
- Log into SnapLogic Manager as an Org admin.
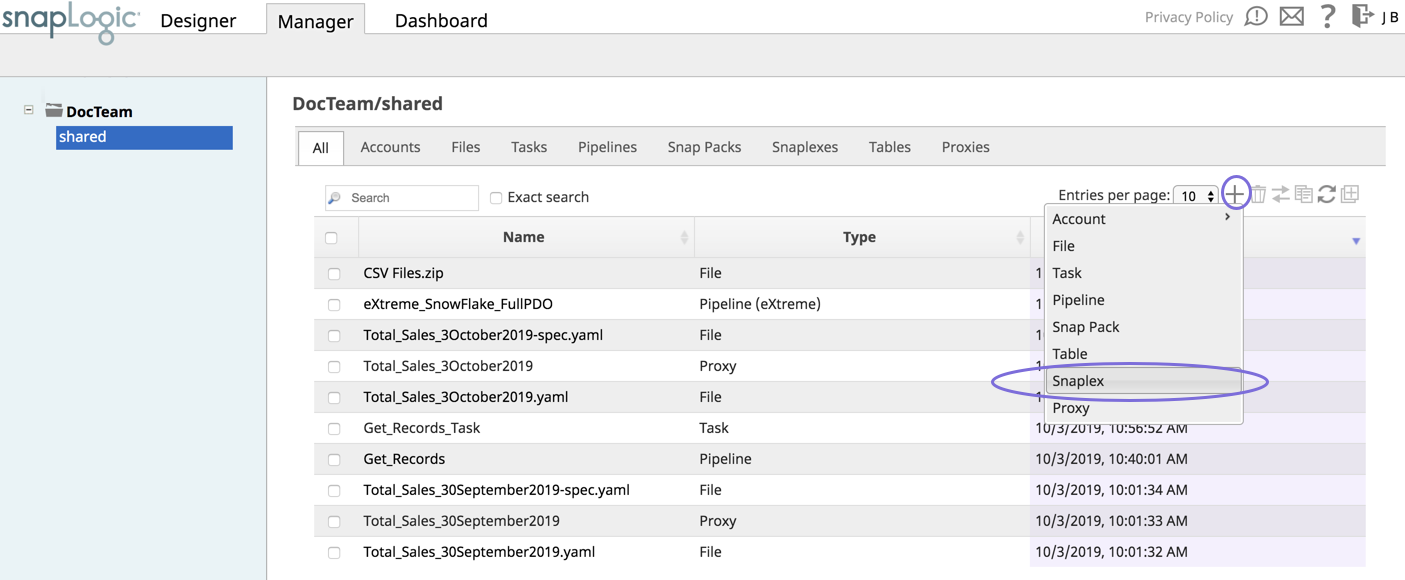
- Navigate to the project where you want to create your Groundplex, then do one of the following:
- Click the Snaplex tab, then click to display the Snaplex popup.
OR
- Click to display the Assets drop-down list, then select Snaplex; the Snaplex popup appears.
- Click the Snaplex tab, then click to display the Snaplex popup.
- Enter the required information on the Create Snaplex form. Once completed, the Downloads tab on the Snaplex popup appears. The Downloads tab has links to the installer and configuration files.
- Download the RPM/DEB and the configuration file onto a Linux machine.
For CentOS (or Redhat) 6.3 or newer, run the following command
$ sudo rpm -i <filename>.rpmFor Ubuntu 14.04 or newer, run the following command:
$ sudo dpkg -i <filename>.deb.
Where <filename> is the name of the current installer file.
After the software is installed, place the downloaded configuration file in the
/opt/snaplogic/etcdirectory and make sure the file name ends with.slpropz. Change the slpropz file so that snapuser owns it by running the following commands:Code Block $ sudo chown snapuser:snapuser /opt/snaplogic/etc/myplex.slpropz $ sudo chmod 600 /opt/snaplogic/etc/myplex.slpropz
- To start the Snaplex service, run:
$ sudo /opt/snaplogic/bin/jcc.sh start - To verify the Snaplex has started, visit https://elastic.snaplogic.com/sl/dashboard.html#Health. The newly installed Snaplex node should show up in the list of nodes for the Snaplex.
...
| Info | ||
|---|---|---|
For Snaplex downloads prior to Fall 2016 (4.7):
The RPM installation needs to be performed as the root user. The service startup needs to be done as the root user, the JCC process itself runs as the user snapuser. This allows enhanced security by allowing the keys stored in /etc/snaplogic to be protected from access by regular users. If enhanced encryption is not being used, it is possible to enable the service startup to be done directly as snapuser. To do that, perform steps 1 to 4 as above, then do:
The service start and stop can then be done as snapuser without needing root access.
|
Setting up a FeedMaster
A FeedMaster is a type of node that you use when running tasks based on Ultra Pipelines. You can designate a Groundplex as a FeedMaster by setting the Snaplex node types on the Node Properties panel in the Update Snaplex dialog. For complete instructions, see Deploying a FeedMaster Node.
...
Configuring Java 11 on Linux
To switch existing update your JCC nodes to OpenJDK Java 11:
- Stop the existing JCC node by running the following command:
$ sudo /opt/snaplogic/bin/jcc.sh stop - Download the new Snaplex installer and install the Groundplex, running the RPM, DEB, or Docker installers as appropriate.
- For RPM systems, run the following command:
$rpm -U snaplogic-snaplex.rpm - For DEB systems, run the following command:
$dpkg -i snaplogic-snaplex.deb - For Docker, stop the existing container and start a new container using the latest image.
- For RPM systems, run the following command:
- Add the following entry to the
/etc/sysconfig/jccdirectory. You must create this directory and file if neither are present.export SL_JAVA_HOME=/opt/snaplogic/pkgs/jdk-11.0.1/ - Start the JCC node by running the following command:
$ sudo /opt/snaplogic/bin/jcc.sh start.
...
- Run the following commands after installing the RPM/DEB package:
$ sudo mv /opt/snaplogic /myopt/myroot$ sudo chown -R myuser /myopt/myroot
- Add the following entities properties in the
/etc/sysconfig/jccfile. If this file does not exist, create it.export SL_USER=myuserexport SL_ROOT=/myopt/myroot
- Restart the service with the following command:
$ sudo /myopt/myroot/bin/jcc.sh restart - To make a service using init.d, make the
/etc/init.d/snaplexfile a symlink to the/myopt/myroot/bin/jcc.shfile.
...
When running a Linux Groundplex on Azure, the default TCP keepalive settings on Azure might cause connectivity issues between the Groundplex and the SnapLogic control plane. The workaround is to disable the keepalive keep alive settings in the JCC configuration.
Add the following entities in properties in the global.properties file:
Code Block jcc.jvm_options = -Dhttp.keepAlive=False -Dcom.ning.http.client.AsyncHttpClientConfig.allowPoolingConnection=false -Dcom.ning.http.client.AsyncHttpClientConfig.allowSslConnectionPool=false
- Then restart the JCC using the
/opt/snaplogic/bin/jcc.sh restartcommand.
| Note |
|---|
If you are unable to create an SLDB file using international language characters (such as æ, Æ, Ø) in the file name, update the |
...
Some Linux installations have system ulimit settings that are set to low values. This low setting can cause errors when running higher Pipeline loads on the Grounplex JCC node, such as: , java.lang.OutOfMemoryError: unable to create new native thread. To fix this issue, you need to increase the system limits for the Snapuser user. You can add the following in the /etc/security/limits.conf folder to increase the file and process limits.
...
