...
| Table of Contents |
|---|
Overview
While planning your migration to Dynamics 365 Snaps, compare your Dynamics CRM Snaps with the corresponding Dynamics 365 Snaps to identify required changes in the Snap settings. You must also map the accounts required to authenticate the SnapsSnapLogic has deprecated the MS Dynamics CRM Snap Pack from the August 2022 4.30 release. Microsoft Dynamics 365 application supports all features and capabilities of MS Microsoft Dynamics CRM application. However, the Dynamics CRM Snap Pack is SOAP-based, and Therefore, we recommend that you migrate your pipelines to use the MS Dynamics 365 for Sales Snap Pack is REST-based; therefore, the outputs are differentSnaps instead of the MS Dynamics CRM Snaps.
| Info |
|---|
Before you begin your migration:
Note: The MS Dynamics CRM Snap Pack is SOAP-based, and the MS Dynamics 365 for Sales Snap Pack is REST-based; therefore, the outputs of these Snaps differ. |
Mapping Snaps and Parameters
...
Field | Output in MS Dynamics 365 For Sales | Output in Dynamics CRM |
|---|---|---|
Object |
|
|
Batch Size | If the Batch Size is 1, the Dynamics 365 For Sales Create, Update, and Upsert Snaps display the output as follows: 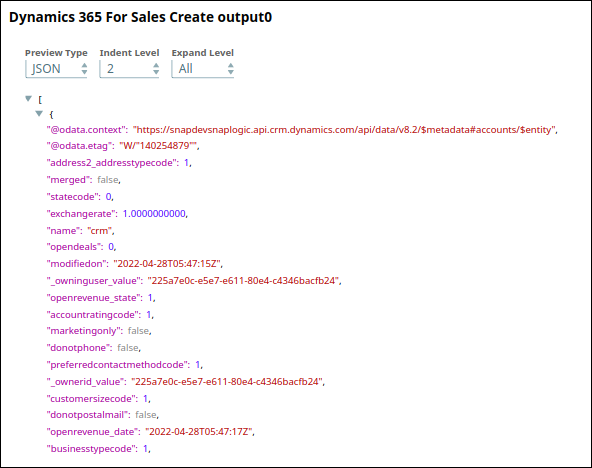 If the Batch Size is more than 1, the Dynamics 365 For Sales Create, Update, and Upsert Snaps display the output as follows: 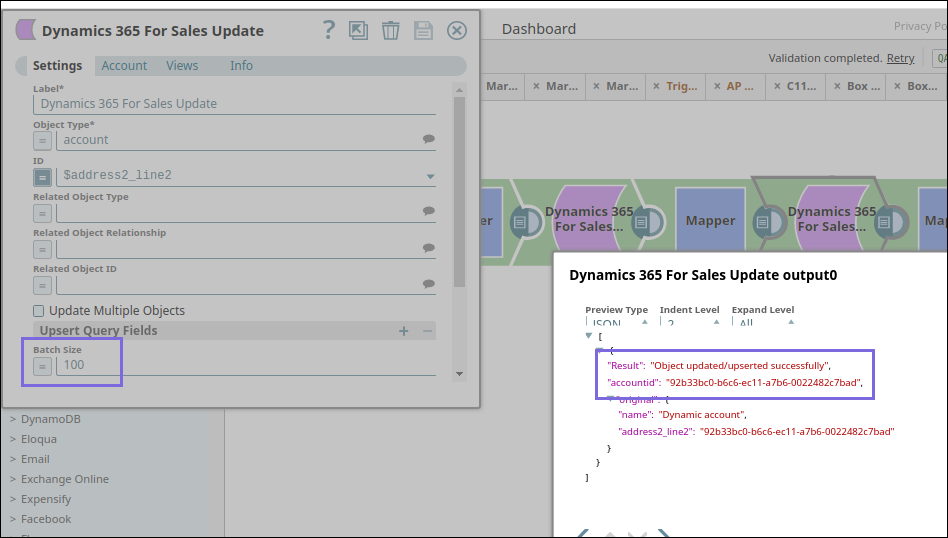 |
Migration Steps
Use the following procedure to To migrate existing SnapLogic Pipelines that contain Snaps from the Microsoft MS Dynamics CRM Snap Pack pipelines to the MS Dynamics 365 for Sales Snap Pack.:
Remove the MS Dynamics CRM Snaps from your Pipeline.
Identify the corresponding Snaps in Dynamics 365 For Sales Snaps.
Replace CRM Snaps with MS Dynamics 365 Snaps.
If you are creating a new object, modify the
$guidto$accountidin the downstream Snap of the Dynamics 365 Create Snap.
Add the accounts as applicable.
If you are using an on-premise CRM account, map it to Dynamics 365 NLTM Account.
If you are using a cloud account, map it to Dynamics 365 OAuth2 Account for Online.
Run your Pipeline.
...
Updating MS Dynamics CRM Snaps with MS Dynamics 365 For Sales Snaps
For instance, you have a simple Pipeline pipeline containing Dynamics CRM Create, Update, and Delete Snaps to add, update, and delete objects /and records. However, validating Validating this Pipeline pipeline will fail due to the deprecation of WS-Trust Security Protocol by Microsoft. Therefore, you must migrate to MS Dynamics 365 For Sales Snaps.
...
Step 1: Remove the Dynamics CRM Snaps from your Pipeline pipeline and replace them with the MS Dynamics 365 Snaps.
...
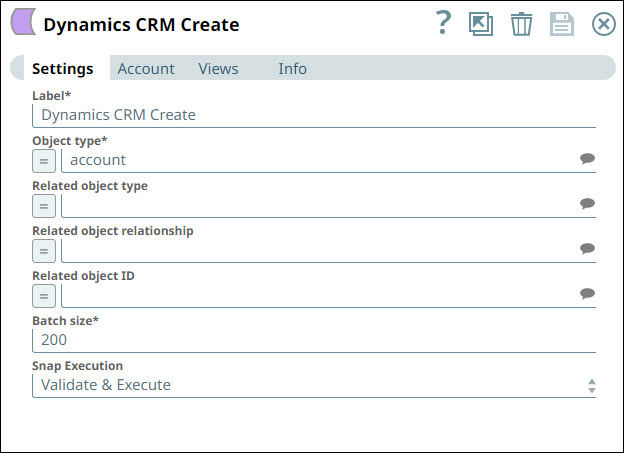
Step 2: Map the properties of the Dynamics CRM Create Snap with the MS Dynamics 365 For Sales Create Snap. In this step, we are creating an account Object Type.
 |  |
Step 3: Add the an account for the replaced Dynamics 365 For Sales Create Snap.
...
Important: Add the relevant accounts an appropriate account for all the replaced Dynamics 365 For Sales Snaps.
Step 4: Validate the Pipeline created so farpipeline. Note that the output is different from the Dynamics CRM Create Snap. A unique ID is generated after creating an account.
...
Step 5: Configure the Mapper Snap to pass this the accountid (record). In the Dynamics CRM Create Snap, the input property is displayed as $guid. Therefore, you must change this value to $accountid to pass the correct data to the downstream Snap.
...
Step 6: Validate the Pipeline created so farpipeline. You can view the following output in the preview.
...
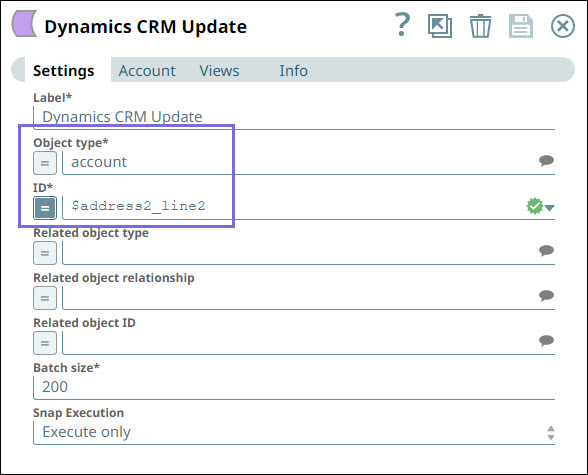
Step 7: Remove the Dynamics CRM Update Snap and replace it with the Dynamics 365 For Sales Update Snap to update the record.
Step 8: Map the settings in the Dynamics 365 For Sales Update Snap as follows:
 |  |
Step 8: Validate the Pipeline created so farpipeline. You can view the following output in the preview:
...
Step 9: Configure the Mapper Snap to map the settings.
...
Step 10: Validate the Pipelinepipeline. The account is updated as shown in the output preview below.
...
Step11: Remove the Dynamics CRM Delete Snap and replace it with the Dynamics 365 Delete Snap to delete the record.
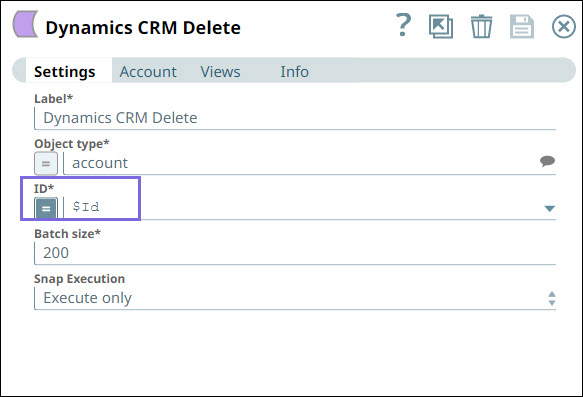 | 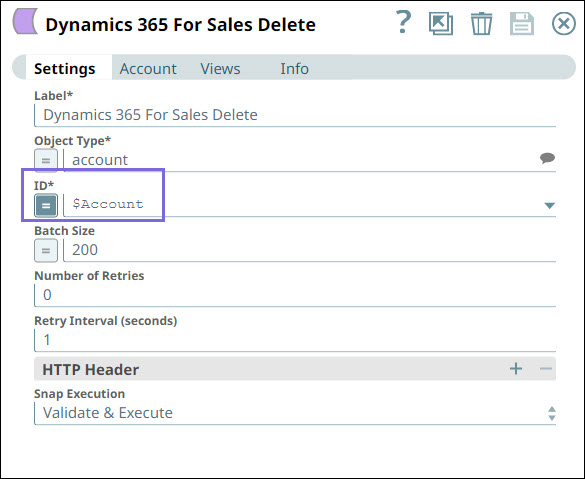 |
Step12: Validate the Pipelinepipeline. The object is deleted, and you can view the status of the object deletion message in the output preview.
...