On this Page
| Table of Contents | ||||||
|---|---|---|---|---|---|---|
|
This account is used by the Snaps in the RabbitMQ Snap Pack.
You can create an account from Designer or Manager. In Designer, when working on pipelines, every Snap that needs an account prompts you to create a new account or use an existing account. The accounts can be created in or used from:
- Your private project folder: This folder contains the pipelines that will use the account.
- Your Project Space’s shared folder: This folder is accessible to all the users that belong to the Project Space.
- The global shared folder: This folder is accessible to all the users within an organization in the SnapLogic instance.
Account Configuration
In Manager, you can navigate to the required folder and create an account in it (see Accounts). To create an account for RabbitMQ:
Click Create, then select RabbitMQ > RabbitMQ Account.
Supply an account label.
Supply the necessary information.
- (Optional) Supply additional information on this account in the Notes field of the Info tab.
- Click Apply.
| Note |
|---|
Known Issue: If you add account information and capture data from the Pipeline parameters, the Snap throws an error on validation. However, the Pipeline is validated without any error on execution. |
Account Types
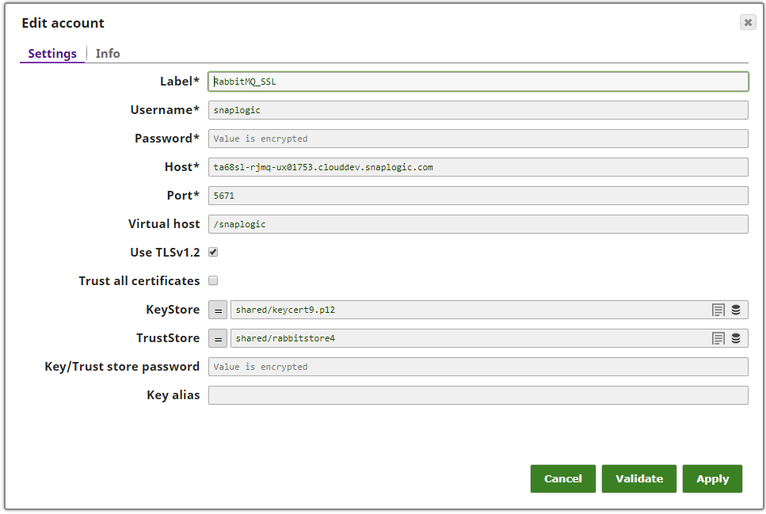
Rabbit MQ Account
Account Settings
Label | Required. User-provided label for the account instance. | |
|---|---|---|
Username | Required. A username is necessary to create the connection to the RabbitMQ server. Default value: [None] | |
Password | Required.A password (corresponding to the above Username) is necessary to create the connection to the RabbitMQ server. Default value: [None] | |
Host | ||
Hostname or IP address of the RabbitMQ server machine. Default value: [None] | ||
Port | Required. | |
The port on which the RabbitMQ server is listening. Default value: [None] | ||||
| Cluster Support | Select this checkbox to enter host and port details if you want to provide multiple cluster node support for the Snap. This checkbox is disabled by default. Click + to add a row to provide details of the cluster nodes. You can add as many rows as you want.
| |||
|---|---|---|---|---|
| Hosts* | The server address to which the application must connect. | |||
| Ports* | The server's port number to which the application must connect.
| |||
Virtual host | Specifies | |||
the virtual host to use when creating the connection |
if configured on RabbitMQ. Default value: [None] | ||
| Use TLSv1.2 | Specifies whether secure sockets TLSv1.2 | |
|---|---|---|
| are to be used with the port. | ||||||
| Trust all certificates | Specifies whether to trust all RabbitMQ server certificates. This option needs to be turned on or off based on the Rabbit MQ's server configuration file (fail_if_no_peer_cert under ssl_options in rabbitmq.conf).
| |||||
|---|---|---|---|---|---|---|
| ||
| |||
This option needs to be turned on only when fail_if_no_peer_cert is set false in the server's configuration file. Default value: Not selected | |||
| KeyStore | The location of the key store file in PKCS#12 format, can be in SLDB or any other unauthenticated endpoint such as https://... Default value: [None] | ||
|---|---|---|---|
| TrustStore | The location of the trust store file in PKCS#12 format, can be in SLDB or any other unauthenticated endpoint such | ||
as https://...
Example: shared/cacert_keystore.p12 | ||||||
| Key/Trust store password | Password for key/trust store | |||||
|---|---|---|---|---|---|---|
. It is used for both if both are defined. | ||
| Key alias | Define the key being used via its alias Default value: [None] | |
|---|---|---|
Account Encryption
| Standard Encryption | If you are using Standard Encryption, the High sensitivity settings under Enhanced Encryption are followed. | |
|---|---|---|
| Enhanced Encryption | If you have the Enhanced Account Encryption feature, the following describes which fields are encrypted for each sensitivity level selected for this account. Account:
| |
Snap Pack History
| Insert excerpt | ||||||
|---|---|---|---|---|---|---|
|
