...
After authorizing SnapLogic with GitHub, you can track SnapLogic Project Assets in a GitHub repository. SnapLogic Manager and Project APIs support checkout, add, remove, pull, and commit operations. You can also create branches and tags from Manager or from the APIs.
We recommend using different SnapLogic Orgs to manage Assets during development, testing, and deployment. Using With the Git Integration, you and your colleagues can work on the same Project in different Orgs and track it in the same GitHub repository. For example, in a development Org, you might associate Project-1 with a dev branch. When the Assets are ready for testing, commit and merge them to the test branch. When testing and bug fixing is complete, merge the changes into the main branch and tag in GitHub create a release for the production Org.Refer to the Git Integration overview page for limitations and prerequisites
Prerequisites
An authorized user creates the repository in GitHub.
Limitations
The Git Integration has the following limitations:
Snap Pack and Snaplex Assets cannot be tracked.
You cannot track more than 1,000 Assets per project.
Workflow
The workflow to begin tracking Project Assets in GitHub includes the following:
...
Use Manager or an API to check out a repository and associate it with a Project.
In the IIP, create and modify Accounts, Pipelines, files, and Tasks as usual.
Use Manager or the APIs to add and remove Assets and to commit updates to the repository.
You can also use the Git command line or the GitHub UI to add, remove, and commit file Assets. And, you can collaborate with co-workers on the same Project. In both cases, before resuming work on a Project, pull from the repository to get the latest updates.
The following sections describe how to track Project Assets in GitHubSnapLogic Manager:
| Table of Contents | |||||||
|---|---|---|---|---|---|---|---|
|
Creating a Project from a GitHub Repository
To create a Project in SnapLogic Manager when you have a Git Integration subscription:
In the navigation tree, click the Project Space where you want to create a Project.
Click Create Project.
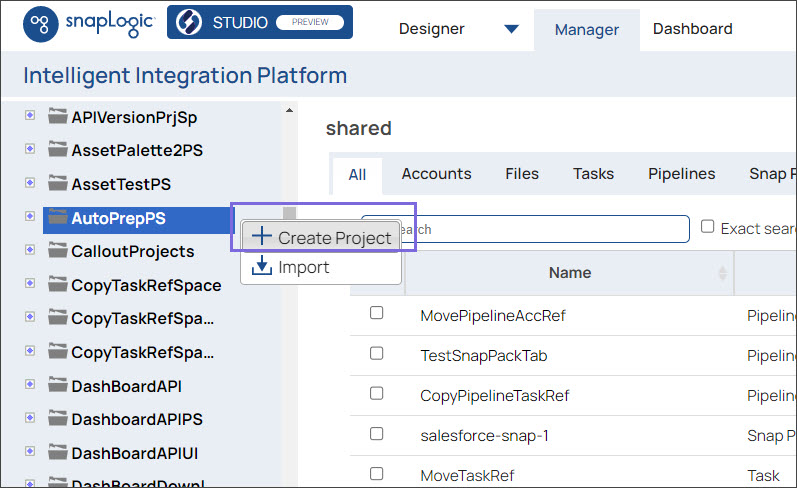
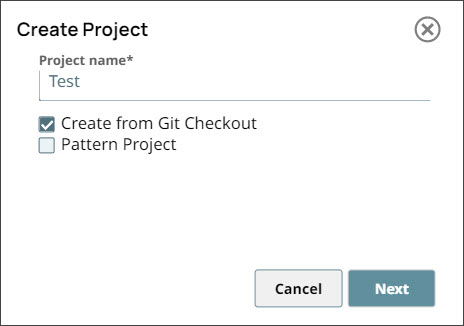
Enter a name in the Project name field.
Select the Create from Git Checkout checkbox to create a project.
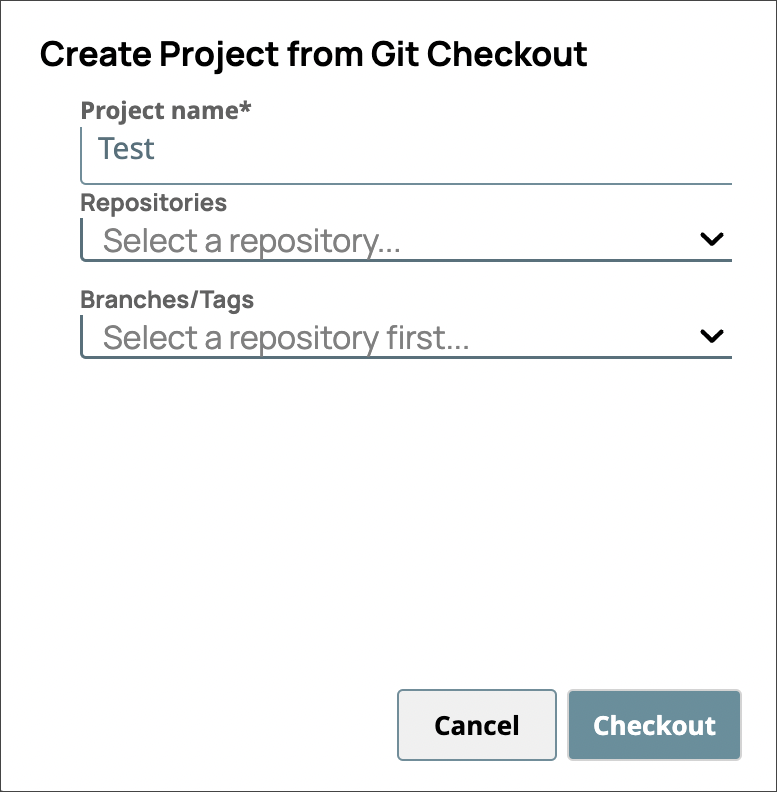
Select a repository for the Project in the Repositories field.
Select the branch where you want to create a Project in the Branches/Tags field.
Click Checkout to create a new Project.
Associating Project Assets with a Repository
Use Manager to check out a GitHub repository for tracking Project Assets. If a repository for a Project does not exist, you must first create it in your GitHub organization.
Checking out a Branch or a Tag
Check out a respository repository branch or tag in Manager:
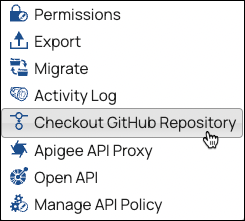
In the navigation tree, find the Project and click the arrow to open the options menu:

...
Select Checkout GitHub Repository:
...
The Checkout GitHub Repository dialog opens:

Select a repository.
In the Branches/Tags field:
To select an existing branch or tag, click the arrow to display the list.
To filter the list, start entering a name.
Click Checkout.
The Git Integration associates the Project with the branch or tag and checks out any existing Assets. The banner above the Assets table identifies which repository and branch or tag is tracking the Project and the commit SHA. The GitHub Status column shows whether assets are Tracked, Untracked, or Added:the status of each asset:
Tracked
Tracked, Modified Locally
Tracked, Modified Remotely
Tracked, Conflict
Untracked
Added
Removed
...
Creating a New Branch
Create a new branch from the branch that is already checked out for a Project. For example, to create a new branch from the main branch, first, check out main.
To create the new branch in Manager:
In the navigation tree, click the arrow to open the options menu:
From the options menu, choose Checkout GitHub Repository:
Verify that the repository and a branch are selected.
In the Branches/Tags field, enter a new name:
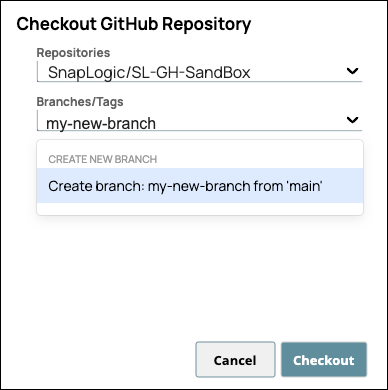
Click Checkout.
The Git Integration creates a new repository branch based on the existing branch.
Creating a New Tag
Git tags reference a specific commit and are commonly used to identify releases. To create a tag from Manager, a branch or a tag must already be checked out for the Project.
To create a new tag in Manager:
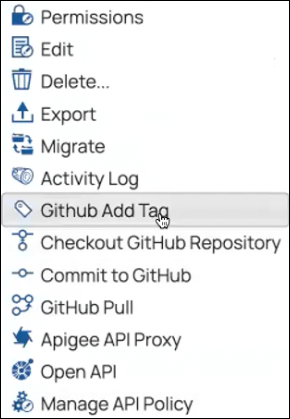
In the Project navigation tree, click the arrow next to the Project name:
From the options menu, click GitHub Add Tag:
The GitHub Add Tag dialog opens:
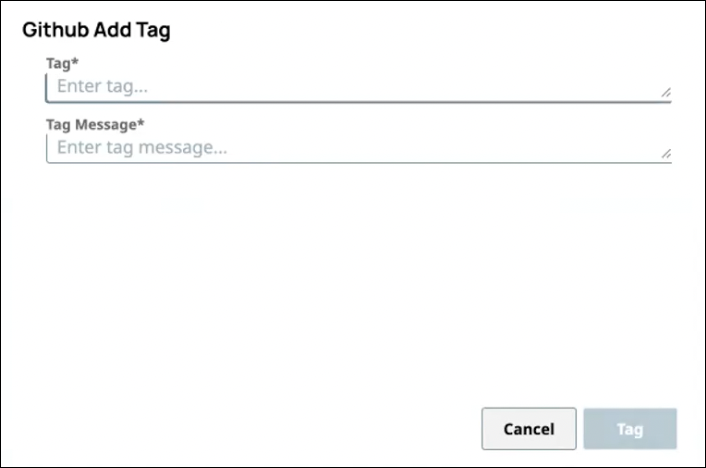
Enter a unique name for the tag and a message.
Click Tag.
The new tag is associated with the current commit of the branch.
Switching Branches
To switch to a different branch, follow these steps in Manager:
In the Project navigation tree, click the arrow next to the Project name:
From the options menu, click Checkout GitHub Repository
...
.
Select the branch or tag to switch to in the Checkout GitHub Repository dialog. Enter a name to filter the list or to create a new branch from the existing branch.
Click Checkout.
Project The Git Integration updates Assets update to the state last committed to that branch or tag.
Adding a Single Asset
Assets that are not part of the repository have a GitHub Status Status of Untracked. You can add Assets individually or commit changes to add multilpe multiple Assets at one the same time. Individually added Assets are not visible in GitHub until you commit them.
To add a single Asset to the repository in Manager:
In the navigation tree, select the Project to display the Assets table.
Find the Asset to add.
Open the options menu by clicking the arrow to the right of the Asset name.
Select Add to Repository:
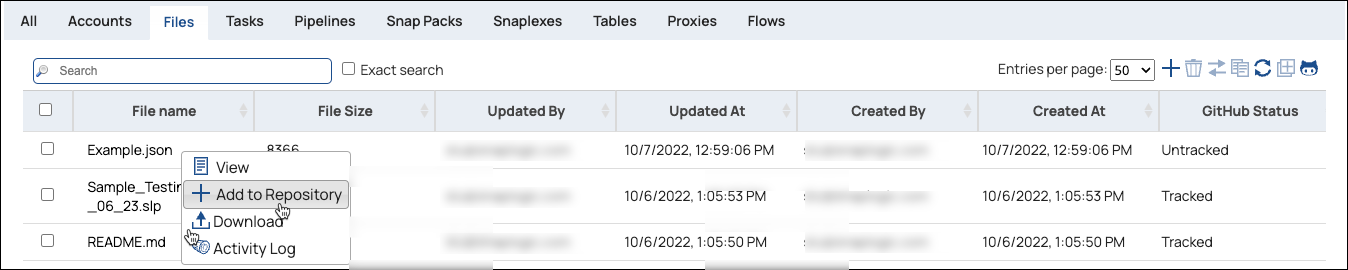
The GitHub Status changes to Added.
Committing all Updated Assets
Update one or many Assets in a single commit. When you commit Project changes, you can select which from a list of updated Assets to commit.
To commit changes from Manager:
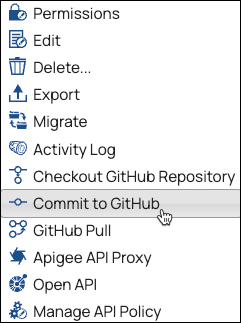
In the navigation tree, click the arrow to the right of the Project name to open the options menu.
Select Commit to GitHub:
...
The Commit Changes dialog box opens and lists the Assets to commit:
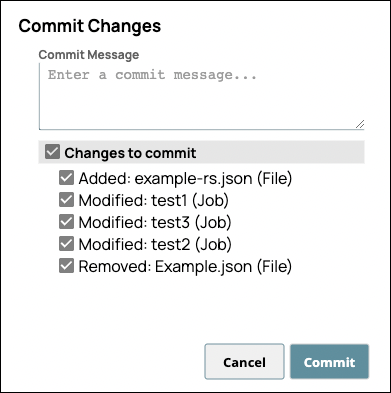
Deselect any Assets that you do not want to commit.
Add a Commit Message.
Click Commit. The Asset table updates with the new GitHub Status.
...
You can log in to your GitHub account to confirm the commit.
Removing Assets
You can delete any type of supported tracked Asset from the GitHub repository. This does not delete the Asset in Managerfrom the Project, but stops does stop GitHub from tracking it. Similar to the add operation, after removing an Asset, you must commit Project changes before the Asset is actually removed from the repositoryGitHub.
To remove an Asset from the repository, follow these steps:
In the navigation tree, select the Project to display the Assets table.
Find the Asset to remove.
Open the options menu by clicking the arrow to the right of the Asset name.
Click Remove from Repository.
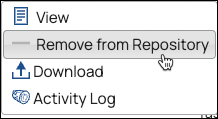
The GitHub Status changes to Removed
...
.
Pulling from a Repository
You can add, delete, or commit file Assets using the Git command line or the GitHub UI. If you or a colleague makes make any changes to Assets in the GitHub repository, you need to pull the changes into SnapLogic the Project to synchronize the changesupdates.
Pulling Updates with No Conflicts
The following example shows what happens when pulling from GitHub after nonconflicting changes were committed to the GitHub repositoryWhen the state of Assets in the GitHub repository differs but does not conflict, pull updates as follows:
In the navigation tree, click the arrow to the right of the Project name to open the options menu.
Select GitHub Pull.
The GitHub Pull Messages dialog lists the Assets that were fetched from GitHub.
Click OK to update the Assets with the changes from GitHub.
Pulling Updates with Conflicts
If an Asset was changed in both GitHub and a different change was made in the IIP since the last commit, pulling from GitHub creates a conflict. The Pull Messages dialog allows you to resolve the conflict:
...
To overwrite the local file, select it and click Pull.
To retain the local file, do not select the checkbox and click Pull, then commit the Project.