On this page
| Table of Contents | ||||
|---|---|---|---|---|
|
...
SnapLogic certifies the following IdPs as compatible with our platform:
- OpenAM
- Microsoft Azure Active Directory (AD)OKTAEntra ID
- Okta
- Ping
| Info |
|---|
If your organization has multiple SnapLogic environments (Orgs), they must all be configured to use the same IdP Application Integration. Members of an SSO-enabled Org might need to log into a different Org, such as one provided by SnapLogic for training or product trials. In this case, the account in the Org without SSO should be created using a different email address. |
...
The SAML standard defines how Service Providers, in this case, the SnapLogic Platform, communicate with Identity Providers (IdP) to securely authenticate users. You must first create an Application Integration application integration in your IdP that will handle authorization for all of your SnapLogic Orgs. After you create the Application Integration application integration in your IdP, export the metadata and import it into all of your SnapLogic Orgs using Classic Manager or Admin Manager.
The communication between the SnapLogic Platform and the IdP starts after the user clicks the Single Sign On link from the SnapLogic login screen. The user enters an Org name and clicks Log in. The request destination is defined in the SSO configuration. The SnapLogic Platform sends a SAML request to the IdP Application Integration application integration that you created for SnapLogic. The request contains an AssertionConsumerServiceURL element that specifies where the response should be sent. The IdP ensures that the AssertionConsumerServiceURL is associated with the requester. To make this possible, you must add the Reply URLs for all of your SnapLogic Orgs to the IdP Application Integrationapplication integration.
Configuration
Configuration takes place in both your IdP and in the SnapLogic Platform. You must have Org admin access to configure SSO.
The main steps include:
- Create an IdP Application Integration application integration for SnapLogic. Some IdPs call this an Application, others an app integration.
- Configure your SnapLogic Orgs
...
- Choose one of your SnapLogic Orgs to provide the metadata for the IdP Application Integration. It doesn't matter which Org you choose, however, any user who wants to use SSO to sign in must be a member of this Org.
- Log into that SnapLogic Org and do the following:
- Click Configure SSO. The dialog opens.
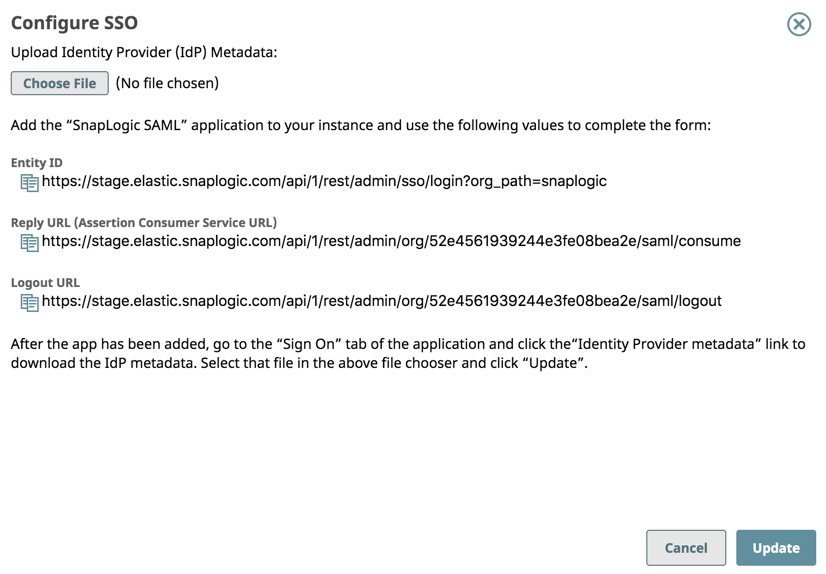
- Copy the Entity ID, Reply URL, and Logout URL to a text file. You will need them when creating your IdP application integration. Note that your IdP might use a different name for these URLs. For example, the SnapLogic Reply URL value goes into the Okta Single sign-on URL field.
- Click Configure SSO. The dialog opens.
- Log into the remaining SnapLogic Orgs and do the following:
- Click Configure SSO. The dialog opens.
- Copy the Reply URL to a text file that you created in Step 2b. Note that the Reply URL contains the Org ID, not the Org name.
- Log into your IdP and create one application integration for SnapLogic access:
- Provide the Entity ID, Reply URL, and Logout URL for the Org that you chose in step 1.
- Provide the Reply URLs that you copied in step 3b to the list of Reply URLs in the IdP’s application integration
- Export the metadata from the IdP application integration. In some IdPs, such as Okta, provide a URL instead of a download button. You can open the URL in a new browser tab to view and save the XML.
- Save the exported metadata on your machine to use when configuring your SnapLogic Orgs.
...