In this article
| Table of Contents | ||
|---|---|---|
|
Overview
This article describes the procedures for installing an on-premise Snaplex, a Groundplex, in a Windows environment. This document uses the term Groundplex to distinguish this Snaplex (on-premise) type from a Cloudplex, which SnapLogic manages. However, in command syntax and references to the UI, the generic term Snaplex is used.
Pre-requisites
Anti-virus
...
requirements
To ensure the smooth functioning of the Snaplex node, we suggest disabling any anti-virus or firewall software (, including the Windows firewall) installed on the Snaplex node. If you cannot disable disabling the software cannot be done, then ensure that the Snaplex process is not scanned by the anti-virus software does not scan the Snaplex process. The specific action depends required may vary depending on the type of antivirus software type and scanning rules enabled. The following are the guidelines:
Disable the network firewall functionality for the following ports: 8081, 8084, 8089, and 8090.
SeeRefer to the Required Ports section
belowfor more information about workarounds for other applications using the required ports.
Disable filesystem scanning for the
c:\opt\snaplogicfolder.Disable process-level scanning for the SnapLogic service.
Required Ports
Function | Port | Protocol |
|---|---|---|
JCC node's HTTPS | 8081 | TCP |
FeedMaster node's HTTPS | 8084 | TCP |
FeedMaster node's broker | 8089 | TCP |
If another application already uses one of the JCC ports used by SnapLogic, the JCC nodes do not complete a full start cycle. The workaround is to override the default port by assigning the following entries in the globalthe global.properties file properties file to available ports that are available:
For HTTP port: jcc.jetty_port = 8x89
For HTTPS port: jcc.cc_secure_port = 8x81
Java Development Kit (JDK)
You must install the Java Development Kit (JDK) before installing your on-premise Snaplex. The SnapLogic platform supports Java 11. We recommend you use , and we recommend using the latest patch version available of for Java 11 for your Windows environment. To To update your Snaplex to the Java 11, see refer to Upgrading Your Groundplex to Java 11.
...
JDK11 Distribution
Only
...
AdoptOpenJDK 11 (Adoptium) is certified by SnapLogic.
...
As no other JDK 11 distribution is currently certified by SnapLogic, we recommend
...
only using Adoptium's JDK when upgrading to Java 11
...
. Select the appropriate Operating System, Architecture, Package Type, and Version from the Adoptium site and download the Zip file and then unzip the files to the appropriate directory.
File Name Length
File names generated by SnapLogic for suggest suggested data can be longer than 260 characters long. We recommended that you configure the Snaplex node to allow longer file paths. See Learn more at Maximum Path Length Limitation - Win32 apps for details.
Installing the Snaplex
| Note |
|---|
If the Snaplex is already installed on the machine, the old installation needs to be stopped before the installation can be done at a new location. To stop the old installation, run |
...
| Info |
|---|
Groundplexes can now run on Windows Server 2022. |
Installing the Snaplex
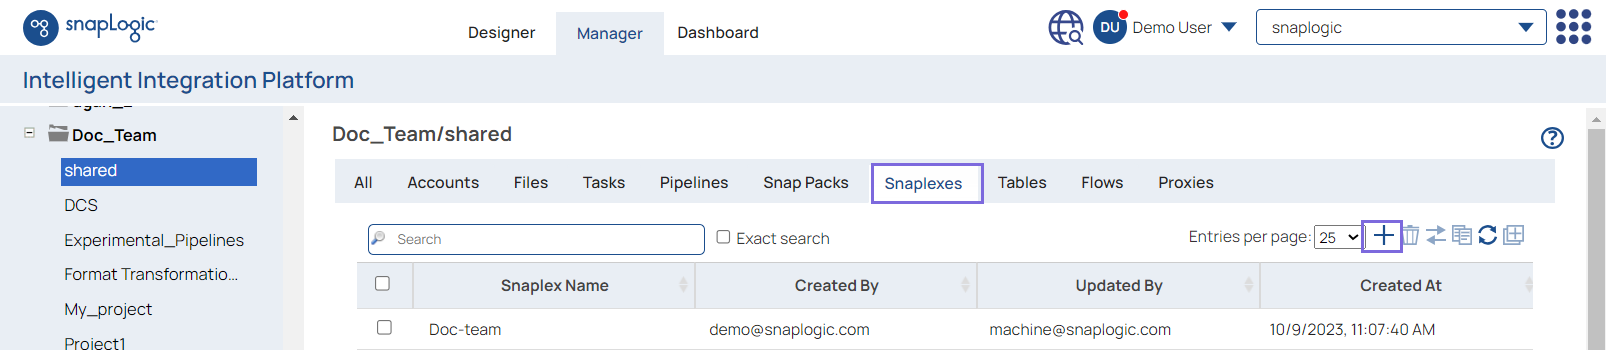
Log into the SnapLogic Manager as an Org admin.
Under Project Spaces on the left,
...
create a project space or locate the project where you want to create your Groundplex (or the global shared project)
...
. Select the Snaplexes tab on the right and click the
 icon to add a Snaplex.
...

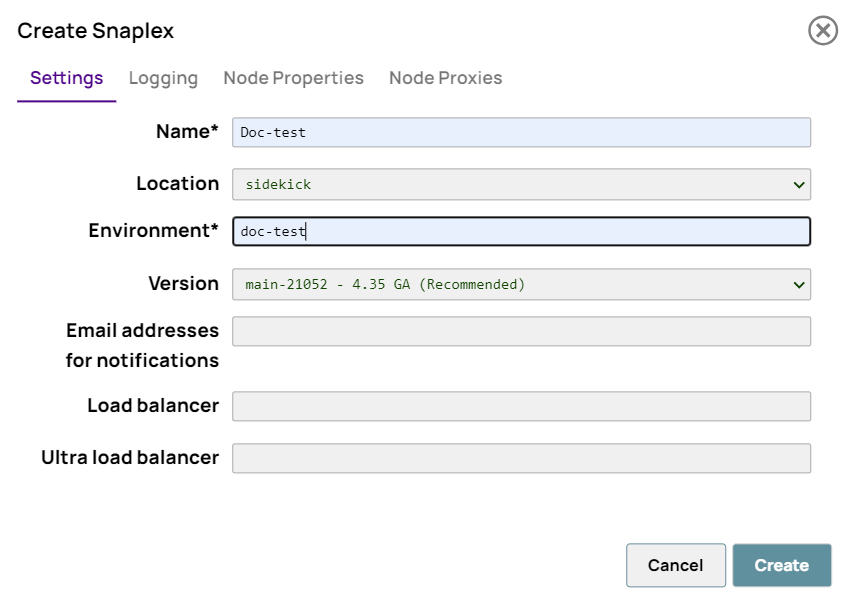
Complete the details in the Create Snaplex dialog and click the Create button. (later seen as the Update Snaplex dialog in the application).
...
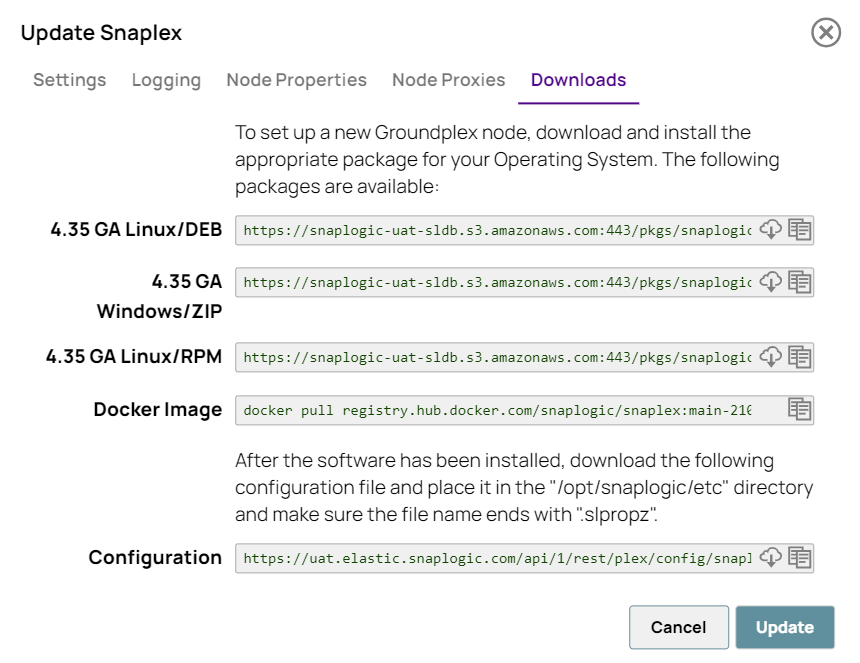
The Update Snaplex dialog opens with the Downloads tab for selecting and installing the appropriate package for the operating system. Download the Windows/ ZIP
...
configuration
...
files onto the Windows machine where you want the Groundplex installed.
Create the directory
\opton your server in the root of the C: drive.Unzip the zip file to
c:\opt. This will create a directoryc:\opt\snaplogicand a directory structure as follows:
...

After installing the software, move the Configuration file (you can get this from the Update Snaplex dialog) to the
\opt\snaplogic\etcdirectory and ensure the file extension is.slpropz.Check your Windows environment to see if you have
...
| Note | ||
|---|---|---|
| ||
Make sure the version of Java that you are installing matches the type (32-bit or 64-bit) of Windows machine. |
...
Java 11 version. This can be done by executing the command
java -version
...
from the command window.
...
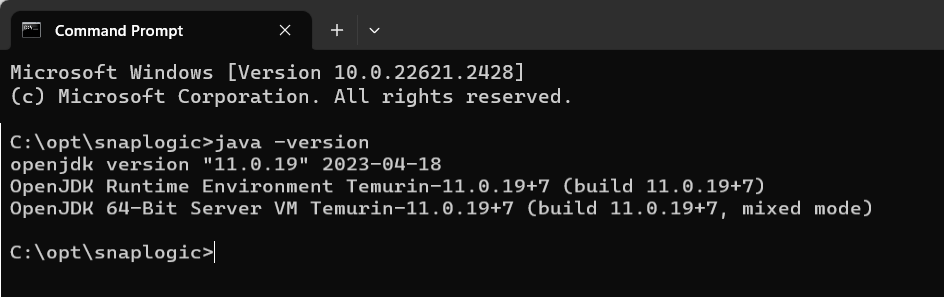
If the installed version of Java is
...
below JDK 11,
...
download and install the JDK for Windows. The existing installation can be used if JRE 11 is
...
available on the machine
...
.
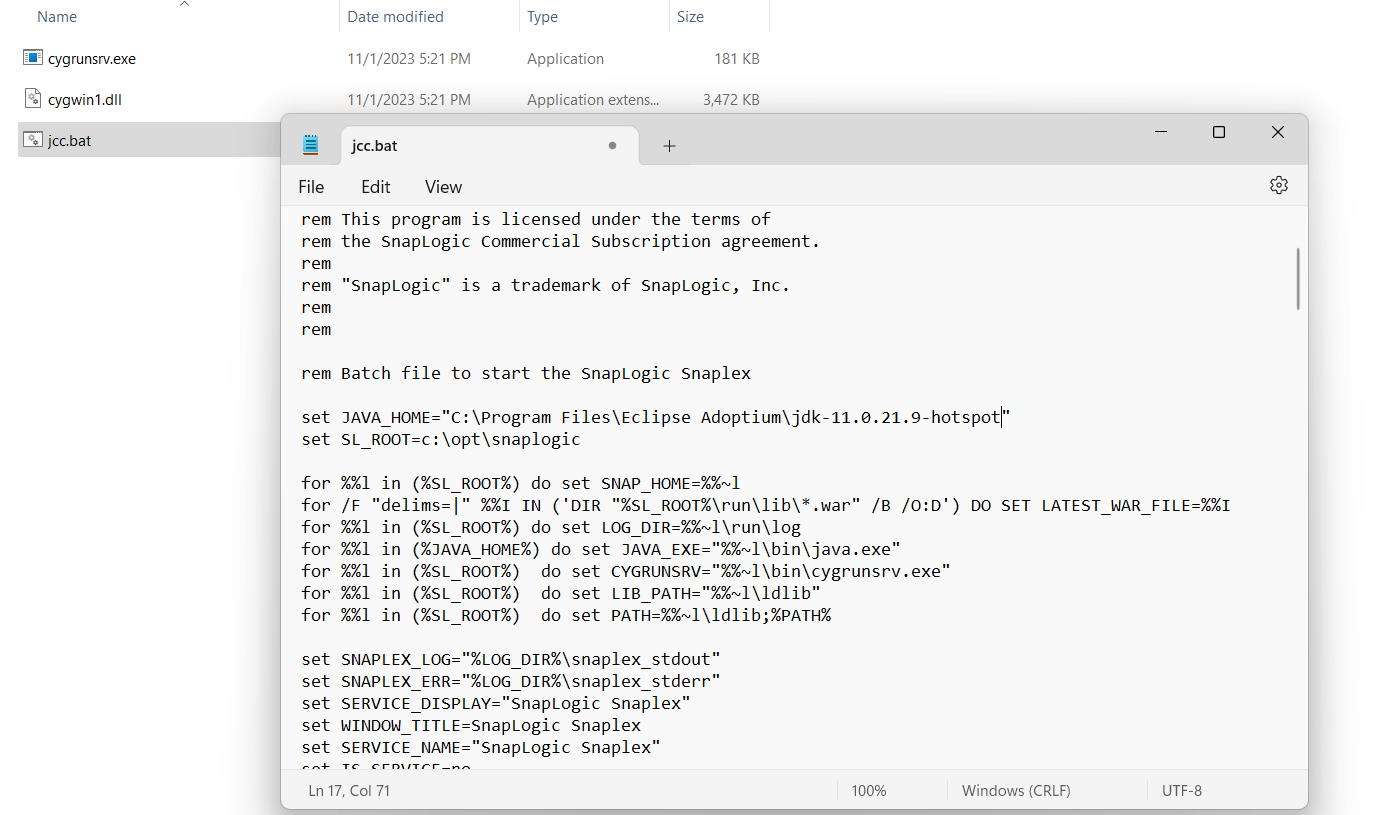
Use any text editing software like Notepad to edit the file
c:\opt\Snaplogic\bin\jcc.batand change the entry for theJAVA_HOMEenvironment variable to the location of the existing installation, putting double quotes around the value.
...
If the host machine is configured for JDK auto-update, then each time a JDK update occurs, the older JRE installation is deleted by default. As a result, the Snaplex fails to start after the JDK update. To avoid this issue, use the static installation feature of the JDK installer.
To do a static install:Add the
STATIC=1option when running the JDK installer from the command line or from the Run dialog.When the JRE auto-update occurs, uncheck the uninstall option for older JDK installations. This prevents the older installation from being removed.
...
From the command prompt, change to the
\opt\snaplogic\bindirectory. You may start the node by running the command:jcc.bat start
...
To install
...
Snaplex as a Windows service, run the following command as an administrator:
jcc.bat install_service.
...
From the Windows Control Panel
...
,
...
view the entry for the SnapLogic Snaplex, and start the service from Tools in the Services window.
To establish if the process started, run the command:
jcc.bat status. The
...
state should be
Running.To verify if the Snaplex has started, visit https://elastic.snaplogic.com/sl/dashboard.html#Health
The newly installed node should show up in the list of nodes for the Snaplex.
...
| Note |
|---|
Users with locked-down accounts need to be members of this group to have Metrics working. |
| Info |
|---|
Ensure the version of Java that you are installing matches the type (32-bit or 64-bit) of the Windows machine. |
Upgrading on Windows
Updating Cygwin Binaries
When running the Windows-based Snaplex as a service, performing a service restart causes the Monitor process to start with the old binaries files.
...
When upgrading your Snaplex to the
...
latest version, you need to reinstall the Snaplex using the
...
latest version of the installer zip file for Windows. Upgrading through the Manager will only upgrade
...
the war file,
...
not the binaries
...
. To update the service to use the latest binaries, you can choose from one of the two following options:
Option 1: Perform a
...
complete reinstallation
Stop the Windows-based Snaplex service.
Remove using
bin\jcc.bat remove_service.Back up the configuration files from the \
etcfolder.Remove
C:\opt\snaplogic.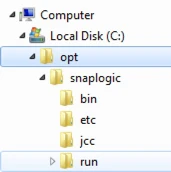
Reinstall the Windows-based Snaplex using the
...
latest version zip file.
| Info |
|---|
If you have a customized node configuration, make sure to back up the global.properties file to retain the customized node configuration after the upgrade. |
Option 2: Install the Latest Cygwin Binaries Only
Unzip the
...
version zip into a different location.
Copy
bin\cygwin1.dllandbin\cygrunsrv.exefrom the new zip to the existing installation location.Update and restart the service using
bin\jcc.bat update_service.
Uninstall the SnapLogic Snaplex package from your environment
To uninstall the SnapLogic Windows-based package from your environment:
Stop the Snaplex service before uninstalling or installing the Snaplex elsewhere by using the following command.
runbin\jcc.bat stop.If Snaplex is installed as a service
...
Disabling Automatic Update
...
, the service needs to be removed by running the command.
bin\jcc.bat remove_service.Clean up the directory
\opton your server in the root of the C: drive.
If you are reinstalling a JCC node, stop the Snaplex service that is already installed.
Older Versions of JRE and TLS
JRE versions before 11.0.8 have issues connecting to TLS 1.3 endpoints. We recommend using an updated version of JRE.
Renabling Support for Older Versions
If updating the TLS endpoint is not possible, then the Snaplex JRE can be updated to re-enable support for older TLS versions by doing these steps:
Open the
jre/conf/security/java.securityfile in the JRE installation folder that you configured during installation.Change the
jdk.tls.disabledAlgorithmsconfiguration property by removingTLSv1, TLSv1.1.Restart the Snaplex to re-enable support for TLS 1.0 and 1.1.
Renaming Snaplexes
In the Manager tab, navigate to the Shared or specific Project folder and click on the Snaplexes filter.
Select the Groundplex you wish to rename.
In the Groundplex Update dialog, change the name to your desired name and click the Update button. The change will immediately be visible in the Dashboard; however, in Designer, the drop-down box for pipeline design will reflect the old name for some time. Despite the difference in name in the Designer tab, the pipelines continue to validate or execute.
| Info |
|---|
The node would go offline for a brief time after the rename, then come back online without issue. The name change gets reflected in the Dashboard tab immediately, but not in Designer. This change does not impact the pipelines that are running. |
Groundplex - Windows Service Account Settings
Create an Active Directory Service Account User and provide the required permissions on the network objects on the Groundplex.
Set the Service Account user to be able to run the Snaplogic Snaplex service.
Add the Service Account user to the local Administrators group.
Add the Service Account user to Windows Administrative Tools > Local Security Policy > Local Policies > User Rights Assignment > Log on as a service.
From Command Prompt as Administrator
Install as a service (C:\opt\snaplogic\
...
bin\
...
| Code Block |
|---|
jcc.enable_auto_download = False |
...
jcc.bat install_service)
From Windows Services
Change login to the Service Account user
Start the service
Learn more at Service Accounts | Microsoft Learn
FAQ
| Expand | ||
|---|---|---|
|
...
|
...
|
...
| Note |
|---|
Temporary files created by the Snaplex service are stored under the user account that started the JCC process. In some cases, if the user account used to start the Snaplex is changed or if the Snaplex was previously started as an application and is now is being started as a service, then you might encounter startup errors because of the user account being is different. In such cases, deleting the following folders can help fix the issue:
|
...
|
| Expand | ||
|---|---|---|
| ||
In a Snaplex installation on a Windows machine, you must install the JRE and configure the JRE location in the We recommend installing the latest JRE 11 version at https://adoptium.net/temurin/releases/?version=11. If you run with version 11.0.10 onwards, endpoint connections to TLS 1.0 and 1.1 are disabled by default. We recommend updating the endpoint to support TLS 1.2 or higher for security. |
| Expand | ||
|---|---|---|
| ||
Yes, the Snaplex user must be a member of the specific group. Add the executing user to the Performance Monitor Users group and restart the service to view CPU usage in Snaplogic. |
| Expand | ||
|---|---|---|
| ||
Yes, we can install it in another drive. You must change the SL_ROOT variable in |
Troubleshooting
Common Errors | Reason | Response |
|---|---|---|
The Groundplex deployed on Windows 2022 has stopped running. | Groundplex on a Windows 2022 Server. | Windows 2022 server is now tested/supported for Groundplexes. For more information on deployment refer to Groundplex Deployment Planning |
...