| Table of Contents |
|---|
Overview
A Feedmaster FeedMaster is a specialized type of Snaplex node that controls load distributionthe distribution of Ultra task requests across the JCC nodes inside the Snaplex. It is a Java Virtual Machine (JVM) that acts as an interface between the JCC nodes, which execute the Pipelines, and the client. Because Feedmasters FeedMaster nodes in a Cloudplex nodes are deployed by SnapLogic, this article addresses Feedmasters nodes FeedMasters in a Groundplex (self-managed Snaplex), which your organization sets up.
Prerequisites
- To use a Feedmaster FeedMaster node for Ultra Task Pipelines, your Org must be subscribed to the Ultra feature.
- The Feedmaster FeedMaster requires a Linux or Windows server.
- The Feedmaster FeedMaster should be installed physically in a location near the Snaplex instances and the data passed by the Pipeline to support low-latency processing.
- Default ports for components:
- JCC HTTP/S—8081
- Feedmaster HTTPS—8084FeedMaster HTTPS—8084
- Feedmaster Broker—8089FeedMaster Broker—8089
- Feedmaster HTTP—8090FeedMaster HTTP—8090
- Snaplex HTTP Interface
- Local host—127.0.0.1
- Any network—0.0.0.0
If other resources are using the specified ports, you can change the port number to the component on the Node Properties tab.
Deploying a
FeedmasterFeedMaster
For details about server requirements, see Snaplex Installation on Linux for Groundplex installation and Groundplex Deployment Planning for specific configurations.
| Info | ||
|---|---|---|
| ||
You can configure more than one FeedmasterFeedMaster. In that configuration, you put a load balancer in front of the Feedmasters FeedMasters so that the requests are automatically distributed. The /healthz URL can be used by the load balancer to check for the health status of the FeedmasterFeedMaster. |
To deploy a FeedmasterFeedMaster:
- In SnapLogic Manager, navigate to the target Project, then click and select Snaplex from the drop-down menu.
- Enter the information in the Create a Snaplex dialog on the Settings tab.
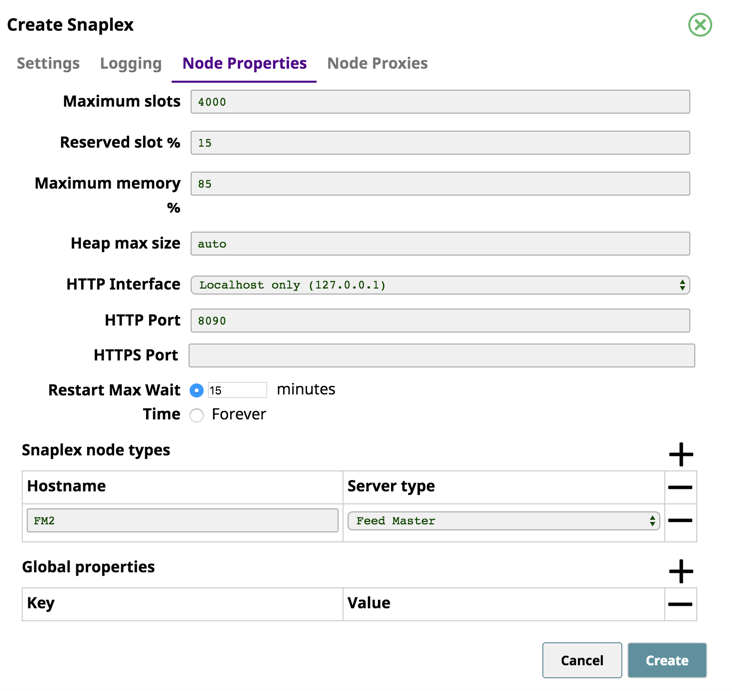
- Click the Node Properties tab; under Snaplex node types, click , then enter the name of the hosting server in the Hostname field.
From the Server type drop-down list, select Feedmaster FeedMaster.
Alternatively, you can create the Snaplex node first, then specify the Snaplex node-type in the SnapLogicglobal.propertiesfile by settingserver_type=feed_master.Info title Specifying a DNS Host If specifying a DNS host server name or other custom host name, then enter the hostname in the Snaplex properties to define Feedmaster FeedMaster node. The actual host name is the same one returned by the
hostnamecommand on your Linux or Windows machine.- Click Update.
In the SnapLogic Dashboard, the Feedmaster FeedMaster Node is designated by the icon.
Storage Limits
Because the Feedmaster FeedMaster node has to queue up requests, a certain amount of storage is required. The requests stay in the queue and take up space on disk until the message has been processed by the Pipeline.
- The default space for queued messages is 10GB.
- The maximum storage which can be configured depends on the disk space available.
- As the storage limit is reached, the Feedmaster FeedMaster rejects new requests by failing with HTTP 420 error message,
Rate limit exceeded. - If one of the upstream services used by the Ultra Pipeline is slow, that can cause the queue to grow. Setting the storage limit higher allows for more requests to be queued up, but the higher setting also delays the clients from being notified about the upstream slowness.
- The storage space used is for each Feedmaster FeedMaster node. If your deployment consists of multiple FeedmastersFeedMasters, each request takes up space on one of the Feedmaster FeedMaster nodes.
- All Ultra Pipelines configured on a Snaplex share this disk space. The
jcc.broker.disk_limitproperty specifies the maximum space used to store queued messages on disk when the message is being processed. The default value is 10GB.If your Snaplex uses the slpropz configuration method, you can configure this value in Snaplex > Node Properties tab in Manager by specifying the limit in bytes in the Global properties field set:
jcc.broker.disk_limit=20971520If your Snaplex does not use the slpropz configuration method, you must add the
jcc.broker.disk_limitvalue as an entry in the global.properties configuration file.
You can also change the storage location for the broker files using the following properties:
jcc.broker_data_dir=/mnt/datajcc.broker_sched_dir=/mnt/datajcc.broker_tmp_dir=/mnt/data
The default location is
$SL_ROOT/run/broker. Ensure that the mount you use for the broker files has sufficient disk space as per thedisk_limitconfiguration. Thesnapuseruser should have full access to the data location.
| Info |
|---|
When running multiple Tasks on one Snaplex/FeedmasterFeedMaster, consider the following:
In some cases, in the latter scenario, all Tasks may be affected, even though some isolation between Task performance is maintained by the FeedmasterFeedMaster. To ensure complete isolation, we recommend that you use separate Snaplex instances for different workloads and to configure sufficient space. Thus making it easier to meet your SLA (Service Level Agreements). |
Timeout between
FeedmasterFeedMaster and Clients
The timeout between the Feedmaster FeedMaster and client triggering requests to Ultra Pipeline Task is user configurable. You can configure the timeout on a per-request basis by passing an X-SL-RequestTimeout header with the timeout value stated as the number of milliseconds (the default is 900000). You can also configure the timeout for the Feedmaster FeedMaster as a whole with the jcc.llfeed.request_timeout global property.
| Info |
|---|
Ultra requests are guaranteed to run at least once before the timeout. |
