In this article
Overview
Whenever you provide resources such as WSDLs and XSDs, in SOAP-based Snap Packs such as Workday, Xactly, NetSuite, Soap, and Birst, SnapLogic caches the data for some time. The default cache duration is four hours (240 minutes). You can modify this to any positive number by updating the Snaplex properties either through the SnapLogic Manager or by manually editing the Snaplex's global properties.
It is not recommended to set the cache duration to "0" as this disables the cache completely, and can cause severe performance issues for complex WSDLs that include the same core XSD files from other multiple XSD files. For example, loading the NetSuite WSDL would cause the core.xsd file to be loaded at least 15 times via multiple paths through its many XSD files that depend on the core definitions.
Modifying Cache Duration
Method 1: Defining the Cache Duration in the SnapLogic Manager
If your Snaplex uses the slpropz file, you can set the cache duration in SnapLogic Manager.
- Confirm that the global properties file
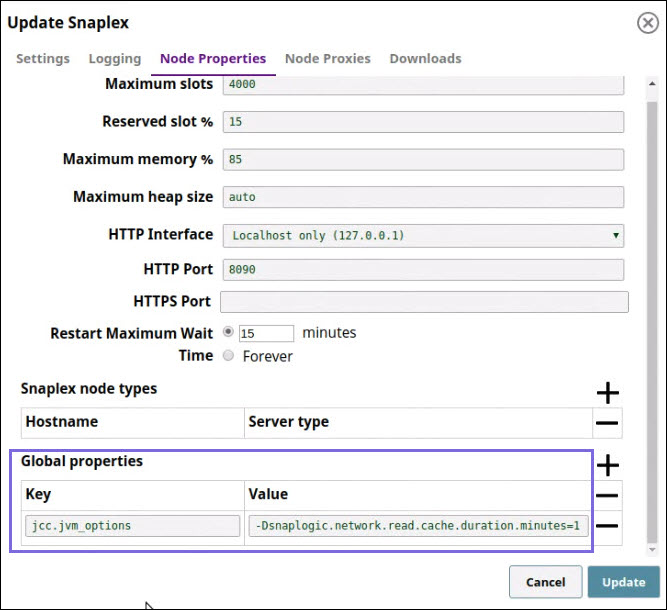
jcc.slpropzis available in your Snaplex'ssnaplogic/etcfolder. - In the Update Snaplex dialog, Node Properties tab, under Global properties, add the global property, "
jcc.jvm_options = -Dsnaplogic.network.read.cache.duration.minutes=nnn", wherennnis the cache duration in minutes. For example, to decrease the cache duration to 1 minute, specify the Value as-Dsnaplogic.network.read.cache.duration.minutes=1. - Click Apply. This updates the cache duration and restarts the Snaplex with the new setting.
Method 2: Manually Specifying the Cache Duration in the global.properties File
You can manually modify the cache duration in the global.property file in your local SnapLogic environment.
- Access the
/etcfolder in your SnapLogic installation:For a Linux installation, enter the following command in the Terminal.
cd $SL_ROOT/etc
For a Windows installation, enter the following command in the command prompt.
cd %SL_ROOT%\etc
- Open the
global.propertiesfile. - Add the following entry:
jcc.jvm_options = -Dsnaplogic.network.read.cache.duration.minutes=1 - Save the file and restart the Snaplex to update the cache duration.
