In this article
...
Open an existing Snaplex in the Org:
Navigate to the target Snaplex in Manager.
Click on the Snaplex name to display the Update Snaplex dialog.
Alternatively, if none exists, Create a Snaplex.
On the Downloads tab, click
 to copy the Configuration link. Paste this link into your Helm Chart.
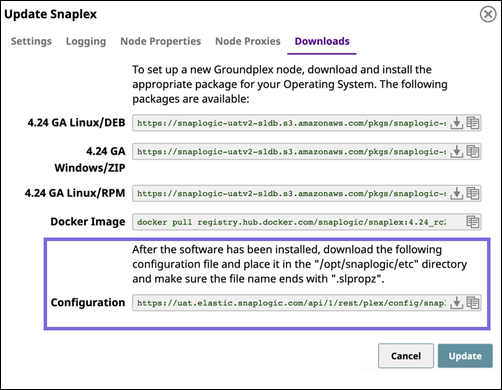
Click Cancel to exit the dialog.
Since the configuration link has an expiration, to ensure that the Kubernetes pods continue to run:
Delete all query string parameters from the Configuration Link URL.
In the following example URL, delete everything from the question mark to the end:
https://elastic.snaplogic.com/api/1/rest/plex/config/PlatformQA/shared/Ground_Triggered?expires=1613086219&user_id=testuser22@snaplogic.com&_sl_authproxy_key=1BN...Set the parameter
snaplogic_secretin the Helm chart YAML file to the name of the Kubernetes secret you create, as described in the Deploying the Helm Chart section.
...
You can now deploy the Helm Chart.
Deploying the Helm Chart
...
About the Helm Chart
The helm chart defines the values for your Groundplex nodes in your Kubernetes environment.
You can download the Helm Chart package which contains the following:
values.yaml- This file is the helm chart.templates folder- Boilerplate charts based on parameters.Chart.yaml- This file contains metadata about the artifact repository.
Helm Chart Fields
The following list describes each field parameter in the values.yaml file:
Regular nodes count.
SpecifySpecifies the number of JCC Nodes to deploy.
FeedMaster nodes count.
Specify theSpecifies the number of FeedMaster nodes to deploy.
Docker image of SnapLogic Snaplex image.
SpecifySpecifies the repository where the image resides and the tag indicating the version of the image. While you can specify a version of your Snaplex, we recommend that you enter the latest version for the most recently released SnapLogic build.
SnapLogic configuration link.
SpecifySpecifies the link to the SnapLogic JCC configuration file (also known as .slpropz).
SnapLogic Org admin credential.
SpecifySpecifies the secret (an encoded username and password) to authenticate the deployment.
Enhanced encryption secret.
SpecifySpecifies the secret (an additional encoded username and password) to authenticate the deployment, available to the user only.
CPU and memory limits for the nodes.
SpecifySpecifies the upper limits and requests for the CPU and memory resources. You can set these values for upper limits
only; the lower limits are system-defined and cannot be modified.Default file ulimit and process ulimit: Specifies the number of possible open file descriptors and processes in a node CPU.
Probes. Monitors the SnapLogic app.
Autoscaling: Sets autoscaling properties. Enabled to false by default. Contact your CSM for SnapLogic recommendations for this setting.
Termination Grace Period Seconds: The time to shut down a node gracefully before it gets terminated.
IPv6: Enabled to false by default. You can enable IPv6 for your connections if your infrastructure supports it.
Example Helm Chart
| Code Block |
|---|
# Default values for snaplogic-snaplex.
# This is a YAML-formatted file.
# Declare variables to be passed into your templates.

# Regular nodes count
jccCount: 1

# Feedmaster nodes count
feedmasterCount: 1

# Docker image of SnapLogic snaplex
image:
  repository: snaplogic/snaplex
  tag: latest

# SnapLogic configuration link
snaplogic_config_link:
|
...
|
...
# SnapLogic Org admin credential
#snaplogic_secret: |
...
# Enhanced encryption secret
#enhanced_encrypt_secret: |
...
# CPU and memory limits/requests for the nodes |
...
limits: memory: 8Gi cpu: 2000m |
...
requests: memory: 8Gi cpu: 2000m # Default file ulimit and process ulimit sl_file_ulimit: 8192 sl_process_ulimit: 4096 # Enable/disable startup, liveness and readiness probes probes: enabled: true # JCC HPA autoscaling: enabled: false minReplicas: maxReplicas: # Average count of Snaplex queued pipelines (e.g. targetPlexQueueSize: 5), leave empty to disable # To enable this metric, Prometheus and Prometheus-Adapter are required to install. targetPlexQueueSize: # Average CPU utilization (e.g. targetAvgCPUUtilization: 50 means 50%), leave empty to disable. # To enable this metric, Kubernetes Metrics Server is required to install. targetAvgCPUUtilization: # Average memory utilization (e.g. targetAvgMemoryUtilization: 50 means 50%), leave empty to disable. # To enable this metric, Kubernetes Metrics Server is required to install. targetAvgMemoryUtilization: # window to consider waiting while scaling up. default is 0s if empty. scaleUpStabilizationWindowSeconds: # window to consider waiting while scaling down. default is 300s if empty. scaleDownStabilizationWindowSeconds: # grace period seconds after JCC termination signal before force shutdown, default is 30s if empty. terminationGracePeriodSeconds: 900 # Enable IPv6 service for DNS routing to pods enableIPv6: false |
Steps
Configure the following parameters in the Helm Chart and name the file values.yaml.
In the Helm Chart console, run the following command:
$ helm install --name snaplogic <helm_chart_folder>
Where <helm_chart_folder> is the Helm Chart zip file, which you can download from this document.Run the
helm listcommand to determine the status of the deployment.
The following sample output shows a successful deployment:
Note If you deploy the Snaplex JCC nodes but resources in the Kubernetes environment are not available to fulfill the Helm Chart, then your deployment goes into a pending state until sufficient resources are available.
The following sample output shows the pending status of resources:

...