Table of Contents maxLevel 2
...
| Multiexcerpt include macro | ||||
|---|---|---|---|---|
|
Account Settings
| Panel | ||||||||||
|---|---|---|---|---|---|---|---|---|---|---|
| ||||||||||
|


| Parameter | Field Dependency | Description | |||||||
|---|---|---|---|---|---|---|---|---|---|
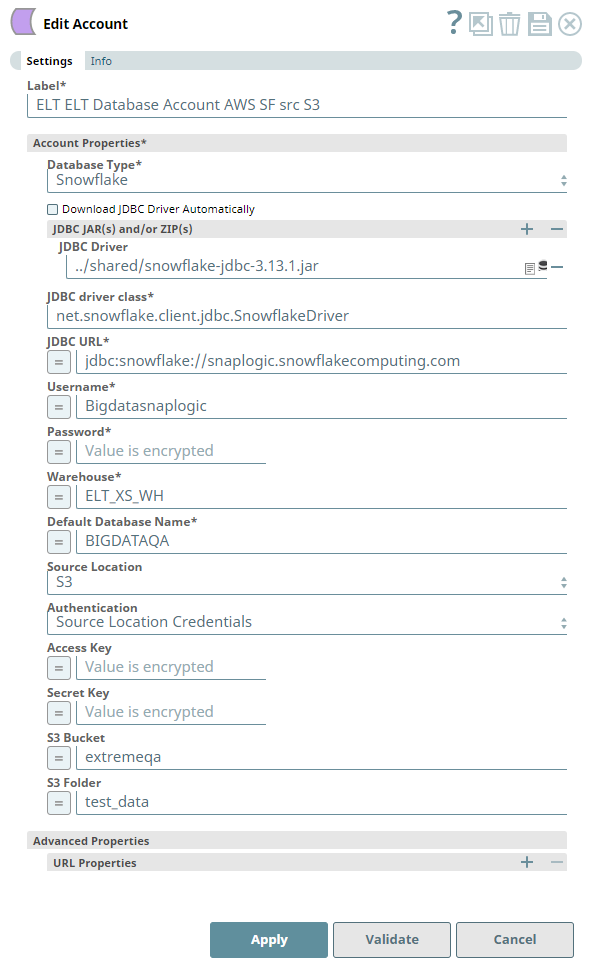
| Label* | None. | Required. Unique user-provided label for the account. Default Value: N/A Example: ELT SF AWS Account AD OFF | |||||||
| Account Properties* | Use this fieldset to configure the information required to establish a JDBC connection with the account. This fieldset consists of the following fields:
| ||||||||
| Database Type* | None. | Select the target data warehouse into which the queries must be loaded, that is Snowflake. This activates the following fields:
Default Value: N/A Example: Snowflake | |||||||
| Download JDBC Driver Automatically | None. | Select this checkbox to allow the Snap account to download the certified JDBC Driver for Snowflake. The following fields are disabled when you select this checkbox.
To use a JDBC Driver of your choice, clear this checkbox, upload (to SLDB), and choose the required JAR files in the JDBC JAR(s) and/or ZIP(s): JDBC Driver field.
Default Value: Not Selected Example: Selected | |||||||
| JDBC JAR(s) and/or ZIP(s): JDBC Driver | Required when the Download JDBC Driver Automatically checkbox is not selected. | Upload the JDBC driver and other JAR files that you want to use into SLDB. Click Default Value: N/A Example: snowflake-jdbc-3.12.16.jar | |||||||
| JDBC driver class* | Required when the Download JDBC Driver Automatically checkbox is not selected. | Specify the driver class to use for your application. We recommend that you use net.snowflake.client.jdbc.SnowflakeDriver to suit your Snowflake database, as other classes and methods may change due to future enhancements. Default Value: N/A Example: net.snowflake.client.jdbc.SnowflakeDriver | |||||||
| JDBC URL* | None. | Enter the JDBC driver connection string that you want to use in the syntax provided below. See Snowflake's JDBC Connection Parameters for more information.
Alternatively, you can make use of the Username, Password, and Database Name fields, along with the Advanced Properties > URL Properties fieldset to provide the parameters required for building your JDBC URL. See Passing your JDBC URL for more information.
Default Value: N/A Example:jdbc:snowflake://xy12345.us-east-2.aws.snowflakecomputing.com, jdbc:snowflake://xy12345.east-us-2.azure.aws.snowflakecomputing.com | |||||||
| Authentication Types | None. | Select one of the following modes of authentication that you want to use to access your Snowflake instance.
| |||||||
| Username* | Authentication Types is Basic. | Enter the username provided for your database account. Default value: N/A Example: SFBigdata | |||||||
| Password* | Authentication Types is Basic. | Enter the password corresponding to the username specified above. Default value: N/A Example: <Encrypted> | |||||||
Private Key* | Authentication Typeis Key Pair. | Specify the key that you have generated for authentication. The key must include the generated header and footer. The private key is read, decrypted if necessary, and included with properties to connect to Snowflake, where it is validated against its paired public key to authenticate the connection. Learn more about Key Pair Authentication & Key Pair Rotation — Snowflake Documentation. DefaultValue: N/A -----END PRIVATE KEY----- | |||||||
| Encrypted Private Key Passphrase | Authentication Typeis Key Pair. | Specify the passphrase for the encrypted private key. DefaultValue: N/A | |||||||
| Warehouse* | Database Type is Snowflake | Enter the name of the Snowflake warehouse that you want to use. Default value: N/A Example: 12345abcdefghikj1km2345no | |||||||
| Default Database Name* | None. | Enter the name of the database to use by default. This database is used if you do not specify one in the ELT Select, ELT Insert-Select, or ELT Merge Into Snaps. Default value: N/A Example: EMPLOYEEDB | |||||||
Client ID | Authentication Types is OAuth2. | Enter the client ID associated with your OAuth integration. You can create the client ID by creating an OAuth integration between your client and Snowflake. Default value: N/A Example: YmkCxrn03kty78shYstvFgObIrw= | |||||||
| Client secret | Authentication Types is OAuth2. | Enter the client secret associated with the above client ID. Default value: N/A Example: <An encrypted value> | |||||||
| Access token | Authentication Types is OAuth2. | Auto-generated upon authorization—when you click Authorize or Refresh or during an Auto-refresh action. The access token associated with your OAuth integration is used to make API requests on behalf of the user associated with the client ID. This token is valid for 10 minutes. Select Auto-refresh token checkbox to refresh the token automatically. Default value: N/A Example: <An encrypted value> | |||||||
| Refresh token | Authentication Types is OAuth2. | Auto-generated upon authorization—when you click Authorize or Refresh or during an Auto-refresh action. You need to specify the refresh token retrieval for the application when setting up the OAuth integration. When the OAuth2 flow is executed, the resulting refresh token is stored in this field. If the refresh token is stored and is valid (within 90 days of its generation), then the access token can be refreshed automatically before it expires. Default value: N/A Example: <An encrypted value> | |||||||
| Access token expiration | Authentication Types is OAuth2. | Auto-generated and displayed upon authorization—when you click Authorize or Refresh or during an Auto-refresh action. The number of seconds remaining until the Access token expires. | |||||||
| OAuth2 Endpoint | Authentication Types is OAuth2. | Enter the URL of your OAuth2 endpoint that the client must call to request authorization codes needed for generating Access and Refresh tokens. Default value: N/A Example: https://<account_full_name_from_SF>.snowflakecomputing.com/oauth/authorize | |||||||
| OAuth2 Token | Authentication Types is OAuth2. | Enter the URL of your OAuth2 endpoint that the client must call to request for Access and Refresh tokens. Default value: N/A Example: https://<account_full_name_from_SF>.snowflakecomputing.com/oauth/token-request | |||||||
| Auto-refresh token | Authentication Types is OAuth2. | Select this checkbox to enable the Snap account to refresh the Access token before it expires, using the Refresh token, if available. Default value: Not selected Example: Selected | |||||||
| Authorize | Authentication Types is OAuth2. | Click this button after providing your Client ID, Client secret, and the endpoint URLs above, to generate an Access token and a Refresh Token. These tokens are displayed in encrypted mode along with the actual value of Access token expiration. Default value: N/A Example: N/A | |||||||
| Refresh | Authentication Types is OAuth2. | Click this button after providing your Client ID, Client secret, and the endpoint URLs above, to manually refresh the Access token when it is about to expire. The updated tokens are displayed in encrypted mode. The new Access token expiration value indicates that the Access token is updated. Default value: N/A Example: N/A | |||||||
| Source Location* | None. | Select the source data warehouse from which to load data into the Snowflake target database. You must configure this field if you want to use the ELT Load Snap. Available options are:
Default value: None Example: S3, Azure, Google Cloud Storage | |||||||
| Authentication | Source Location is S3, Azure, or Google Cloud Storage | Select the authentication method to use for accessing the source data. Available options are:
Default value: Source Location Credentials for S3 and Azure, Storage Integration for Google Cloud Storage. Example: Storage Integration | |||||||
| Storage Integration Name | Source Location is S3, Azure, or Google Cloud Storage and Authentication is Storage Integration. | Enter the name of the storage integration in your Snowflake database. Navigate to one of the following links for more information on setting up your Storage Integration in Snowflake. Default value: N/A Example: my_s3_integration, my_azure_integration, my_sf_gcs_integration | |||||||
| Access Key | Source Location is S3 and Authentication is Source Location Credentials. | Enter the access key ID associated with your AWS S3 account. Default value: N/A Example: ABCDEFGHIJKL1MNOPQRS | |||||||
| Secret Key | Source Location is S3 and Authentication is Source Location Credentials. | Enter the client secret key associated with your AWS S3 account. Default value: N/A Example: aBcdeFGhiJKLM/N1OPQRS/tUvWxyZABCDEFGHIJKLMN | |||||||
| SAS Token | Source Location is Azure and Authentication is Source Location Credentials. | Enter the SAS token part of the SAS URI associated with your Azure storage account. See Getting Started with SAS for details. Default value: N/A Example: ?sv=2020-08-05&st=2020-08-29T22%3A18%3A26Z&se=2020-08-30T02%3A23%3A26Z&sr=b&sp=rw&sip=198.1.2.60-198.1.2.70&spr=https&sig=A%1DEFGH1Ijk2Lm3noI3OlWTjEg2tYkboXr1P9ZUXDtkk%3D | |||||||
| Session Access Key | Source Location is S3 and Authentication is Source Location Session Credentials. | Enter the access key ID associated with your AWS S3 account. Default value: N/A Example: ABCDEFGHIJKL1MNOPQRS | |||||||
| Session Secret Key | Source Location is S3, and Authentication is Source Location Session Credentials. | Enter the client secret key associated with your AWS S3 account. Default value: N/A Example: aBcdeFGhiJKLM/N1OPQRS/tUvWxyZABCDEFGHIJKLMN | |||||||
| Session Token | Source Location is S3 and Authentication is Source Location Session Credentials. | Enter the session token value when the authorization to access the S3 folder is based on Security Token Service (STS) based temporary credentials. Note that only global STS regions are supported. Default value: N/A Example: A%1DEFGH1Ijk2Lm3noI3OlWTjEg2tYkboXr1P9ZUXDtkk%3D | |||||||
| Azure External Location | Source Location is Azure and Authentication is Source Location Credentials. | Specify the type of Azure external storage location (source)—an Azure Data Lake Gen2 or a Blob Storage—where your source data is available. Default Value: Azure Data Lake Gen2 Example: Blob Storage | |||||||
| Storage Account | Source Location is Azure and Authentication is Source Location Credentials. | Enter the name of your Azure storage account. Default value: N/A Example: employeedata | |||||||
| S3 Bucket | Source Location is S3. | Enter the name of the bucket from which to load the data. Default value: N/A Example: employeedata | |||||||
| S3 Folder | Source Location is S3. | Enter the name of the folder in the S3 bucket specified above where the source files are located. Default value: N/A Example: hrdepartment | |||||||
| Azure Container | Source Location is Azure. | Enter the name of the container in the Azure storage account. Default value: N/A Example: hrdepartment | |||||||
| Azure Folder | Source Location is Azure. | Enter the relative path for the folder within the container specified above. Leave this field blank to use all the folders in the specified container. Default value: N/A Example: salaries | |||||||
| Google Cloud Storage (GCS) Bucket | Source Location is Google Cloud Storage and Authentication is Storage Integration. | Enter the name of the GCS bucket from which to load the data to your Snowflake database. Default value: N/A Example: elt_gcs_bucket_1 | |||||||
| Google Cloud Storage (GCS) Folder | Source Location is Google Cloud Storage and Authentication is Storage Integration. | Enter the name of the folder in the GCS bucket where the source files are located. Default value: N/A Example: elt_gcs_bucket_1_CSV_Files | |||||||
| Advanced Properties | Other parameters that you want to specify as URL properties. See the following resources for a list of parameters that can be specified in this fieldset. In case of Snowflake, DO NOT configure parameters that are already present in the Account Properties fieldset. For example:
This fieldset consists of the following fields:
| ||||||||
| URL Properties | None. | The account parameter's name and its corresponding value. Click + to add more rows. Add each URL property-value pair in a separate row. Specify the name of the parameter in the URL Property Name field and its value in the URL Property Value field. | |||||||
Click Validate after entering the required details to ensure that all fields have been filled accurately. Click Apply to save the settings.
| Note | ||
|---|---|---|
| ||
If you have used Pipeline parameters or expressions to define values for the account fields above, the account validation (done by clicking the Validate button) is not supported. However, the Snaps that use this account may connect to the endpoint successfully depending on the accuracy and validity of the expressions and parameters used. |
...