In this article
...
Open an existing Snaplex in the Org:
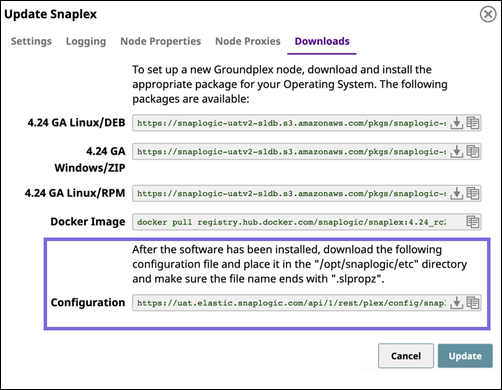
Navigate to the target Snaplex in Manager.
Click on the Snaplex name to display the Update Snaplex dialog.
Alternatively, if none exists, Create a Snaplex.
On the Downloads tab, click to copy the Configuration link. Paste this link into your Helm Chart.
Click Cancel to exit the dialog.
Since the configuration link has an expiration, to ensure that the Kubernetes pods continue to run:
Delete all query string parameters from the Configuration Link URL.
In the following example URL, delete everything from the question mark to the end:
https://elastic.snaplogic.com/api/1/rest/plex/config/PlatformQA/shared/Ground_Triggered?expires=1613086219&user_id=testuser22@snaplogic.com&_sl_authproxy_key=1BN...Set the parameter
snaplogic_secretin the Helm chart YAML file to the name of the Kubernetes secret you create, as described in the Deploying the Helm Chart section.
...
Configure the following parameters in the Helm Chart and name the file values.yaml.
In the Helm Chart console, run the following command:
$ helm install --name snaplogic <helm_chart_folder>
Where <helm_chart_folder> is the Helm Chart zip file, which you can download from this document.Run the
helm listcommand to determine the status of the deployment.
The following sample output shows a successful deployment:Note If you deploy the Snaplex JCC nodes but resources in the Kubernetes environment are not available to fulfill the Helm Chart, then your deployment goes into a pending state until sufficient resources are available.
The following sample output shows the pending status of resources:
...
In the Helm console, run the
helm listcommand to list the services.In SnapLogic Manager, navigate to the target Project folder, then click the target Snaplex; the Update Snaplex dialog appears.
On the Settings tab of the Update Snaplex dialog, enter the corresponding values in the following fields:
Load balancer. Enter the protocol and port number of the Snaplex JCC node. See PORT(s) associated with
snaplogic-snaplex-regular.Ultra load balancer. Enter the the protocol and port number of the FeedMaster node. See PORT(s) associated with
snaplogic-snaplex-feed.
Review the information, then click Update.
Once your Snaplex and FeedMaster nodes are deployed, you can start designing and running Pipelines and Tasks.
...


