Overview
Exporting a project sends all pipelinesthe Pipelines, files, and tasks to a .zip file, including those in the Shared folder. It does not include Snaps or Snaplexes saved within that project. Accounts Tasks associated with the project into a ZIP file. Accounts are exported only when the org Org supports encryption. SnapLogic, by default, has standard encryption enforced on all the orgs Orgs, unless an org Org has chosen opted for Enhanced Account Encryption. With standard Standard encryption , the encrypts accounts are encrypted with cloud-managed keys. If the org by some reason does not have any kind of an Org has no encryption, the accounts will are not be exported.
Pipeline dependencies such as nested pipelines within that project and accounts are maintained. Once the project is imported, you will need to add any files that were previously referenced, configure the Snaplex the pipeline should run on, and re-add any Snaps that were specific to the project.
...
Pipeline dependencies, such as nested Pipelines and related accounts, are maintained.
Exporting Projects
| Note |
|---|
Before you export a project, ensure that all the Pipelines in the project are saved and closed. |
To export a project:
- Hover In SnapLogic Manager, hover your mouse over the project name in Manager, then select Export from the drop-down menu.

You can then choose to export all assets that make up the project, or to exclude certain assets like files, to limit the size of the resulting compressed file.
Note When exporting large projects, there is no indicator to inform you that the project is being exported. You will need to wait for the .zip file to be downloaded to know it has completed.
To import a project:
...
- you want to export, and click the Options button (
 ) that appears:
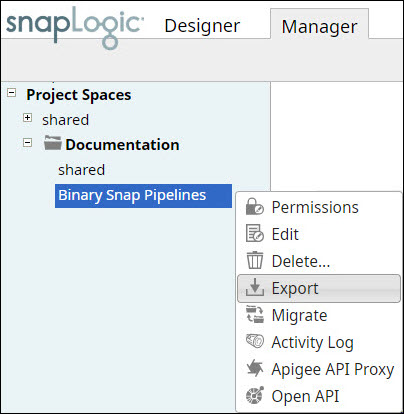
- Click Export in the list of options displayed. This displays the Export <Project Space>/<Project Name> popup:

By default, the popup has the following options selected: Pipeline, Task, and Account. You can choose to deselect either of these if you do not want them included in your exported ZIP file. - Select the File check box to indicate that you also want to download the assets that currently exist in the project. Select All to include all files available in the project in the download.
- Click Export to export the project files as a ZIP file.
Importing Projects
To import a project:
- Hover your mouse over the project space in which you want to import the project and click the Options button () that appears:
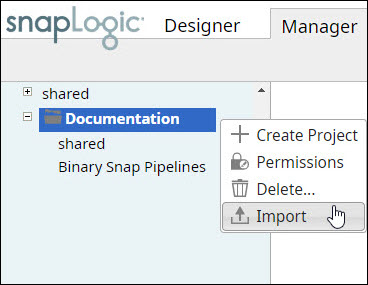
- Click Import in the list of options displayed. This displays the Confirm project import popup:
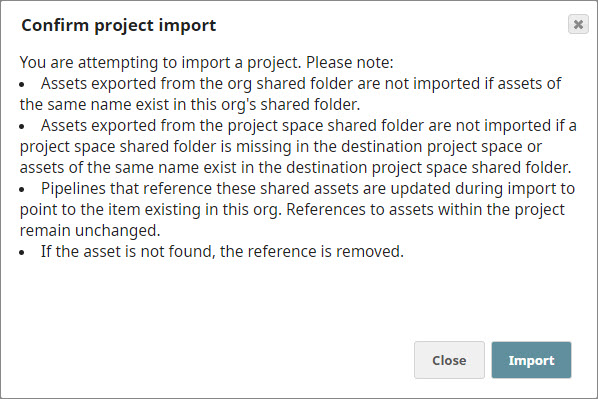
- The Confirm project import popup lists out guidance that you must keep in mind while importing a project. Review these carefully before you proceed. Once you are sure you want to go ahead with the import, click the Import button. This triggers the import.
Once the import is complete, a confirmation message appears on the page, and the new project appears in the list of projects on the left.
| Note |
|---|
Once the project is imported, you will need to add any files that were previously referenced, configure the Snaplex the Pipeline should run on, and re-add any Snaps that were specific to the project. |
| Note |
|---|
|
...