On this Page
| Table of Contents | ||||||
|---|---|---|---|---|---|---|
|
In this article
| Table of Contents | ||||||
|---|---|---|---|---|---|---|
|
This account is used by Snaps in the Snowflake Snap Pack.
You can create an account from SnapLogic Designer or Manager. In Designer, when working on pipelines, every Snap that needs an account prompts you to create a new account or use an existing account. The accounts can be created in or used from:
Articles in this section
| Panel | ||
|---|---|---|
| ||
|
Overview
You must create Snowflake accounts to connect to data sources that you want to use in your Pipelines.
Snap-Account Compatibility
Configuring Snowflake Accounts
You can configure your Snowflake accounts in SnapLogic using either the Designer or Manager.
Using SnapLogic Designer
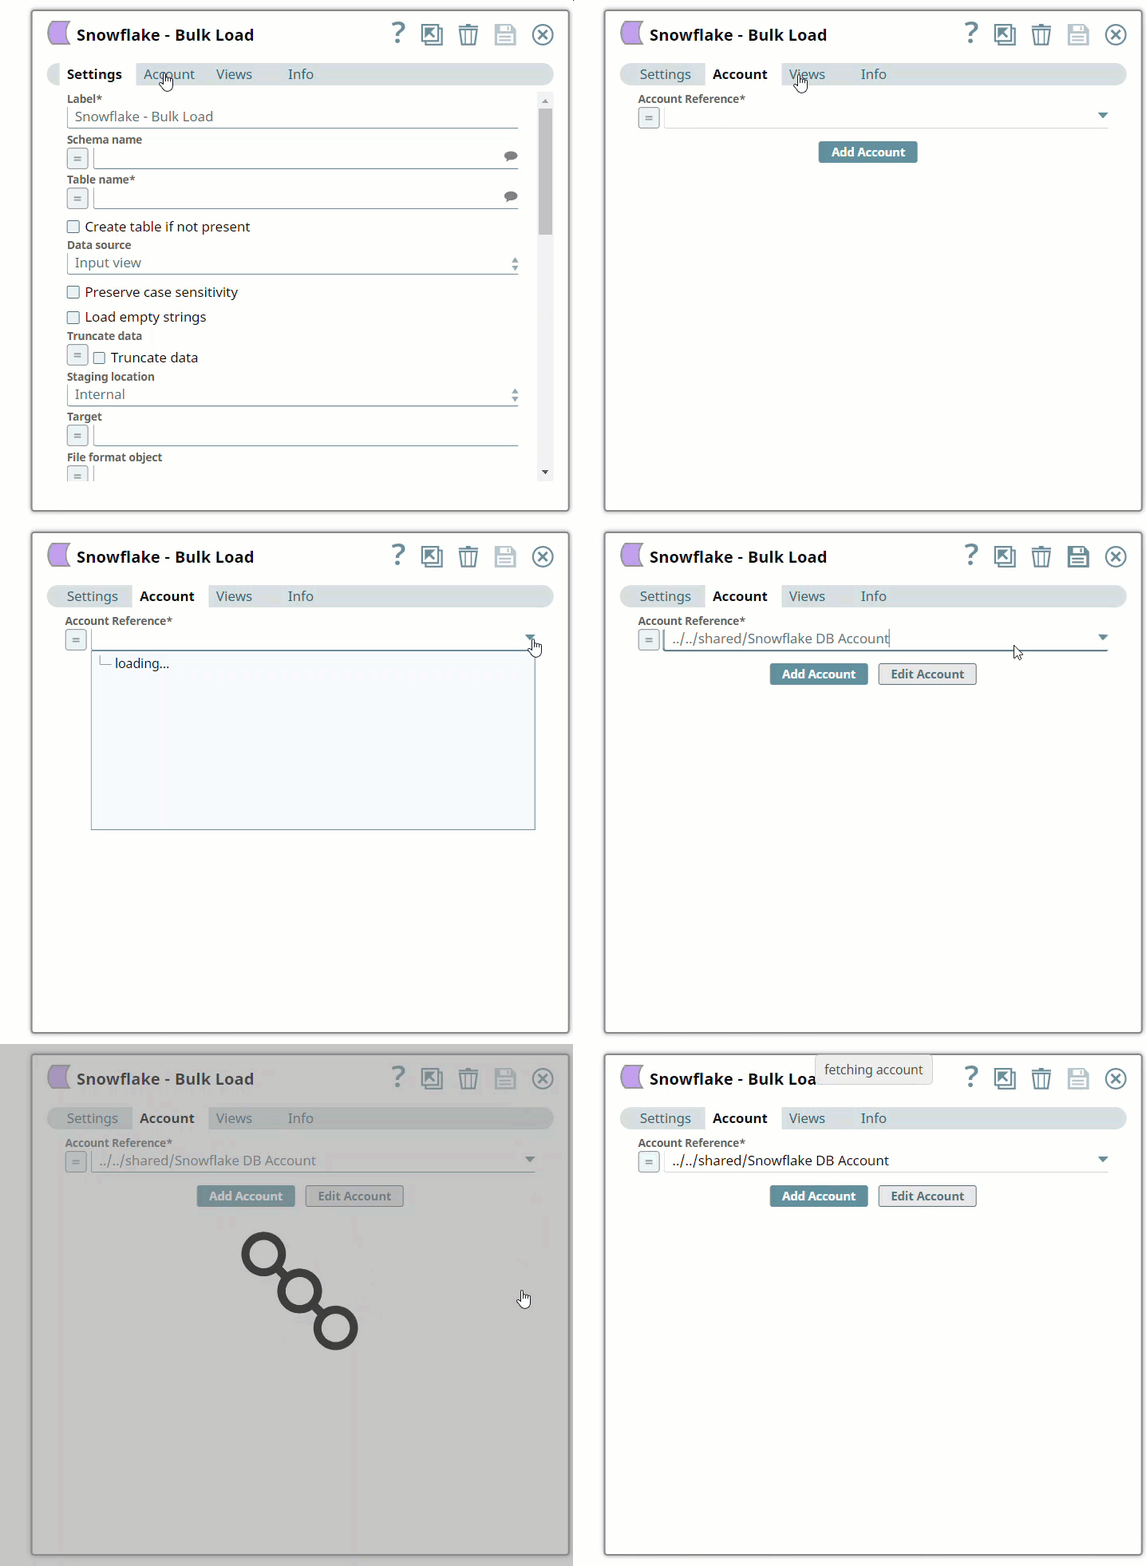
Drag a Snowflake Snap to the Canvas and click the Snap to open its settings. Click the Account tab. You can now either use an existing account or create a new one.
Selecting an existing account
SnapLogic organizes and displays all accounts to which you have access, sorting them by account type and location. To select an existing account:
- Click the icon to view the accounts to which you have access and select the account that you want to use.
- Click to save the Snap settings.
Creating an account
Enter the required account details. For detailed guidance on how to provide information associated with each account type, use the following links:
| Child pages (Children Display) |
|---|
| Info |
|---|
Enter additional information on this account in the Notes field of the Info tab. This will help you–and other users–understand the purpose of the account, especially if there are multiple accounts of the same type. |
Click Validate to verify the account, if the account type supports validation.
Click Apply to complete configuring the Snowflake account.
Using SnapLogic Manager
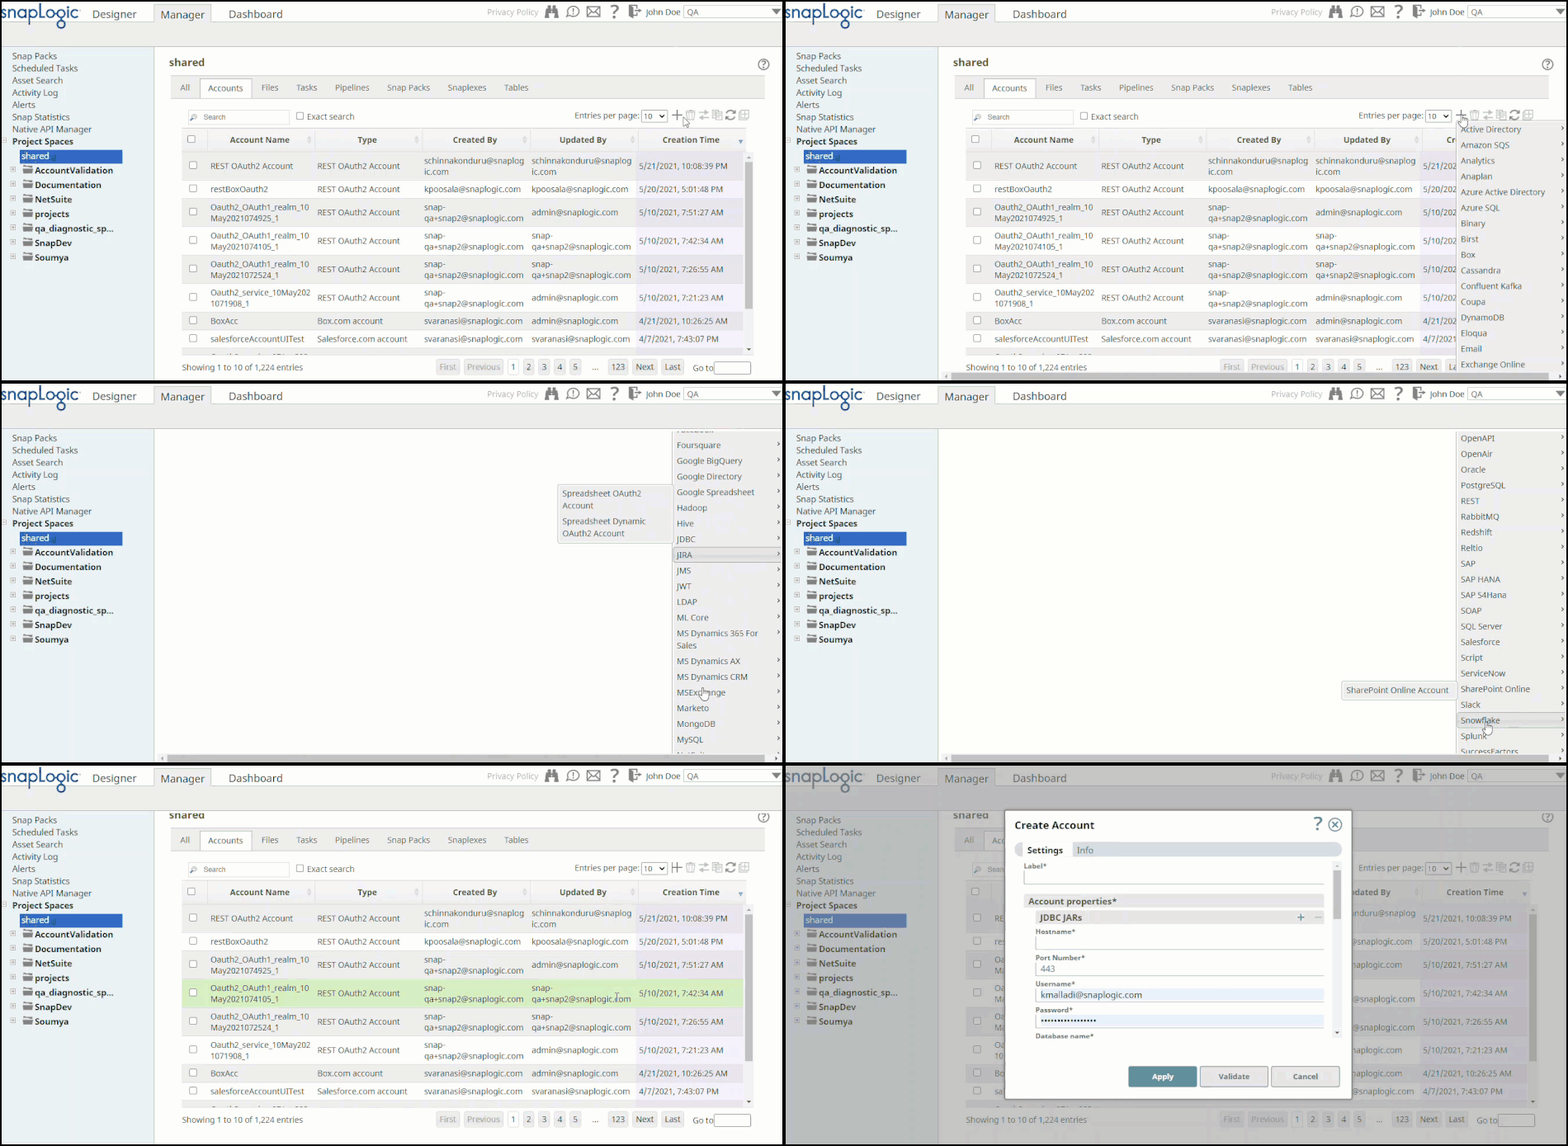
Use Manager to create accounts without associating them immediately with Pipelines.
| Note |
|---|
Accounts in SnapLogic are associated with projects. You can use accounts created in other projects only if you have at least Read access to them. |
Repeat the steps numbered 3 through 5 in the Creating an account section.
| Note |
|---|
Avoid updating account credentials while Pipelines using that account are executing. This may lead to unexpected results, including locking your account. |
Account Encryption
If the account you are using has the Enhanced Encryption feature, the account fields are encrypted for each sensitivity level as shown below:
- High: Password
- Medium + High: Username, password
- Low + Medium + High: Username, password
Account Types
Snowflake Azure Database Account
| title | Account Settings |
|---|
| Note |
|---|
You can use the Snowflake Azure Account option to create both standard and dynamic accounts. If you want to enter a dynamic value for a specific field, click the '=' button adjacent to the concerned field, and you can use expressions in the field to specify dynamic values as required. |
Account Settings
Label
Required. The name for the account.
Default value: None.
Account properties
Required. The information required to create the account.
JDBC jars
Required. The list of JDBC jars to be loaded (Snowflake JDBC jar 3.0.0 or higher).
| Note |
|---|
The Snowflake account has been tested for version 3.12.3 JDBC jar. |
Example: snowflake-jdbc-3.12.3.jar
Default value: None.
Hostname
Required. The hostname of the Snowflake server to which you want to connect the new account.
Example: demo.snowflake.net
Default value: None.
Port Number
Required. The port number associated with the Snowflake database server that you want to use for this account.
Default value: 443
Username
The username that you want to use to connect to the database server.
Example: testuser
Default value: None.
Password
The password associated with the username specified above. This will be used as the default password while retrieving connections.
Default value: None.
Database name
Required. The name of the database to which you want to connect.
Example: testdb
Default value: None.
Warehouse name
Required. The name of the warehouse to which you want to connect.
Example: testwh
Default value: None.
The fully-qualified name of the JDBC driver class to be used for connecting to the server.
Example: net.snowflake.client.jdbc.SnowflakeDriver
Default value: com.snowflake.client.jdbc.SnowflakeDriver
Azure storage account name
The name of the instance of the Azure storage account.
Example: testazurestorage
Default value: None.
Azure storage account key
The key needed to connect to the instance of the Azure storage account listed above.
You can use either of the two keys available in the Access Key tab of the dashboard in the Azure portal to populate this value.
Default value: None.
Container
The name of the Azure storage blob container that you want to use for hosting files.
Example: Container1
Default value: None.
Path
The location of the folder in the container listed above where you want to host files.
Example: Folder1/SubFolder1
Default value: None.
The method of supplying the SAS token to the Snaps. You can choose between the following two options:
User Supplied: Choose this option if you intend to manually enter the shared access token signature.
| Note |
|---|
If you opt for the User Supplied option, then you need to ensure that your tokens are valid whenever the pipeline is run; else, the pipelines will fail. For more information, see Generating a SAS Token in Snowflake documentation. |
System Generated: Choose this option if you want Snaps to generate and use the SAS tokens as and when required.
Default value: User Supplied
The shared access token that you want to use to access the Azure storage blob folder specified in the Path above. You can get a valid SAS token from the Azure portal.
This property is applicable only when you choose User Supplied in the Shared Access Token Signature Method field above.
Default value: None.
Allows the Snaps to encrypt the blob before being uploaded to Microsoft Azure. You can choose between the following two options:
- None: Indicates that you do not want to use client-side encryption.
- Custom_Key: Indicates that you want to use a custom key to access the storage blob.
Default value: None.
The custom key that you want to use to access the Azure storage blob.
This property is applicable only when you select Custom_Key in the Client side encryption field above. The key should be a 128- or 256-bit Base64-encoded key.
Default value: None.
URL Properties
Use these fields to configure the URLs associated with this account.
| Note | ||
|---|---|---|
| ||
You can grant roles to the SnapLogic Snowflake account by using the role parameter in the URL Properties field set. Ensure that the roles are predefined in your Snowflake account before configuring the SnapLogic Snowflake account. URL Property Name: role URL Property Value: SYSADMIN See Roles and Grant Roles for details. |
URL property name
The name of the URL property.
Default value: None.
Example: queryTimeout
URL property value
The URL property value associated with the URL property name.
Default value: None.
Example: 0
Batch size
Required. The number of statements that you want to execute at a time.
| Note |
|---|
Select queries are not batched. |
| Warning |
|---|
Using a large batch size could use up the JDBC placeholder limit of 2100. |
Default value: 50
Fetch size
Required. The number of rows you want a query to fetch during each execution.
| Warning |
|---|
Large values could cause the server to run out of memory. |
Default value: 100
Min pool size
Required. The minimum number of idle connections that you want the pool to maintain at a time.
Default value: 3
Minimum value: 0
Maximum value: No limit
Max pool size
Required. The maximum number of connections that you want the pool to maintain at a time.
| Note |
|---|
Snowflake Bulk Load/Bulk Upsert/S3 Upsert Snap requires a minimum of 2 connections per Snap in a pipeline. For example, if a pipeline has a Snowflake Bulk Load Snap and an S3 Upsert Snap, then the pool size must be greater than or equal to 4 for successful execution. |
Default value: 50
Minimum value: 0
Maximum value: No limit
Max life time
Required. The maximum lifetime of a connection in the pool. Ensure that the value you enter is a few seconds shorter than any database or infrastructure-imposed connection time limit. A value of 0 indicates an infinite lifetime, subject to the Idle Timeout value. An in-use connection is never retired. Connections are removed only after they are closed.
Default value: 60
Idle Timeout
Required. The maximum amount of time a connection is allowed to sit idle in the pool. A value of 0 indicates that idle connections are never removed from the pool.
Default value: 5
Checkout timeout
Required. The number of milliseconds you want the system to wait for a connection to become available when the pool is exhausted. A value of 0 instructs the system to wait forever. For any other value, the system throws an exception after the wait time has expired.
Default value: 10000
Snowflake S3 Database Account
| title | Account Settings |
|---|
Label
Required. The name for the account.
Default value: None.
Required. The JDBC JAR files to be loaded (Snowflake JDBC jar 3.0.0 or higher). Click the + button at the right of the field to add a row.
| Info |
|---|
The Snowflake account has been tested for version 3.12.3 JDBC JAR. |
Example: snowflake-jdbc-3.12.3.jar
Default value: None.
Required. The hostname of the Snowflake server to which you want to connect.
Example: demo.snowflake.net
Default value: None.
Required. The port number associated with the Snowflake S3 database server that you want to use for this account.
Example: 808
Default value: 443
The username that you want to use to connect to the Snowflake database server.
Example: testuser
Default value: None.
The password for the username specified in Username. This password is used as the default password while retrieving connections.
Default value: None.
Required. The name of the Snowflake database to which you want to connect.
Example: testdb
Default value: None.
Required. The name of the warehouse to which you want to connect.
Example: testwh
Default value: None.
The fully-qualified/domain name of the JDBC driver class to be used for connecting to the server.
Example: net.snowflake.client.jdbc.SnowflakeDriver
Default value: com.snowflake.client.jdbc.SnowflakeDriver
S3 Bucket
Enter the name of the S3 bucket that you want to use for staging data to Snowflake.
Example: sl-bucket-ca
Default value: None.
S3 Folder
Enter the relative path to a folder in the S3 bucket listed in the S3 Bucket field. This is used as a root folder for staging data to Snowflake.
Example: https://sl-bucket-ca.s3.<ca>.amazonaws/<sf>
Default value: None
S3 Access-key ID
Enter the S3 access key ID that you want to use for AWS authentication.
Example: NAVRGGRV7EDCFVLKJH
Default value: None
S3 Secret key
Enter the S3 secret key associated with the S3 Access-ID key listed in the S3 Access-key ID field.
Example: 2RGiLmL/6bCujkKLaRuUJHY9uSDEjNYr+ozHRtg
Default value: None
URL Properties
Use these fields to configure the URLs associated with this account.
| Note | ||
|---|---|---|
| ||
You can grant roles to the SnapLogic Snowflake account by using the role parameter in the URL Properties field set. Ensure that the roles are predefined in your Snowflake account before configuring the SnapLogic Snowflake account. URL Property Name: role URL Property Value: SYSADMIN See Roles and Grant Roles for details. |
URL property name
The name of the URL property. URL property is the full URL.
Default value: None.
Example: queryTimeout
URL property value
The URL property value associated with the URL property name.
Default value: None.
Example: 0
Batch size
Required. The number of Snowflake queries that you want to execute at a time.
| Info |
|---|
|
Default value: 50
Example: 8
Fetch size
Required. The number of rows a query must fetch for each execution.
| Note |
|---|
Large values could cause the server to run out of memory. |
Default value: 100
Example: 12
Min pool size
Required. The minimum number of idle connections that you want the pool to maintain at a time.
Default value: 3
Minimum value: 0
Maximum value: No limit
Max pool size
Required. The maximum number of connections that you want the pool to maintain at a time.
Default value: 15
Minimum value: 0
Maximum value: No limit
Max life time
Required. The maximum lifetime of a connection in the pool, in seconds.
| Info |
|---|
|
Default value: 60
Minimum value: 0
Maximum value: No limit
Idle Timeout
Required. The maximum amount of time in seconds that a connection is allowed to sit idle in the pool.
| Info |
|---|
0 indicates that idle connections are never removed from the pool. |
Default value: 5
Minimum value: 0
Maximum value: No limit
Checkout timeout
Required. The maximum time in milliseconds you want the system to wait for a connection to become available when the pool is exhausted.
| Info |
|---|
0 instructs the system to wait forever. For any other value, the system throws an exception after the wait time. |
Default value: 10000
Minimum value: 0
Maximum value: No limit
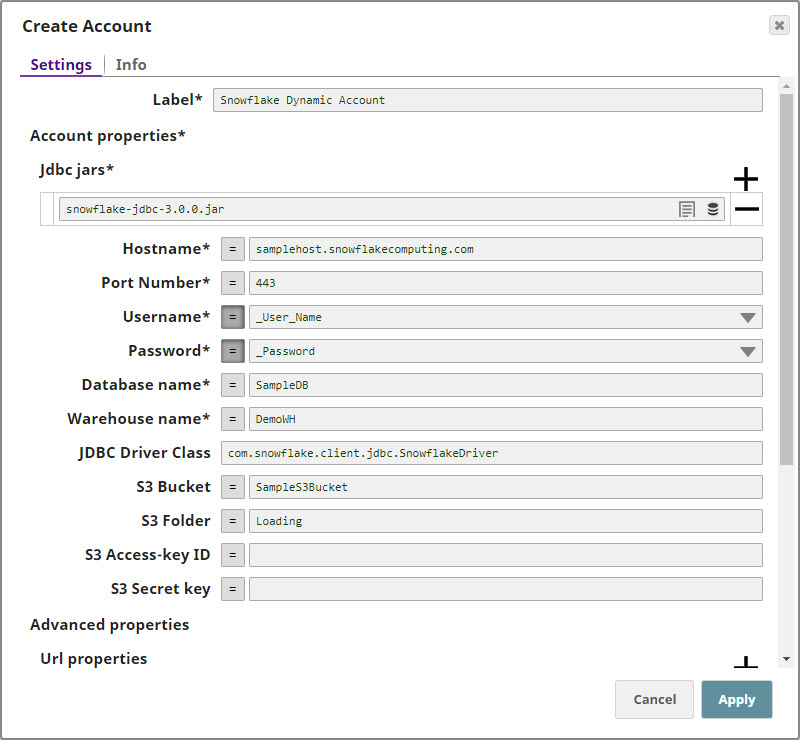
Snowflake S3 Dynamic Account
| title | Account Settings |
|---|
Label
Required. The name for the account.
Default value: None.
Account properties
Required. The information required to create a connection to the database.
JDBC jars
Required. The list of JDBC jars to be loaded (Snowflake JDBC jar 3.0.0 or higher). Click the + button at the right of the field to add a row.
| Note |
|---|
The Snowflake account has been tested for version 3.12.3 JDBC jar. |
Example: snowflake-jdbc-3.12.3.jar
Default value: None.
Hostname
Required. The hostname of the Snowflake server to which you want to connect for the new account.
Example: demo.snowflake.net
Default value: None.
Port Number
Required. The port number associated with the Snowflake database server that you want to use for this account.
Default value: 443
Username
The username that you want to use to connect to the database server.
Example: testuser
Default value: None.
Password
The password associated with the username specified above. This will be used as the default password while retrieving connections.
Default value: None.
Database name
Required. The name of the database to which you want to connect.
Example: testdb
Default value: None.
Warehouse name
Required. The name of the warehouse to which you want to connect.
Example: testwh
Default value: None.
The fully-qualified name of the driver class to be used for connecting to the server.
Example: net.snowflake.client.jdbc.SnowflakeDriver
Default value: com.snowflake.client.jdbc.SnowflakeDriver
S3 Bucket
Enter the S3 bucket that you want to use for staging data onto Snowflake.
Default value: None.
S3 Folder
Enter the relative path to a folder in the S3 Bucket listed in the S3 Bucket field. This is used as a root folder for staging data onto Snowflake.
Default value: None.
S3 Access-key ID
Enter the S3 access key ID that you want to use for AWS authentication.
Default value: None.
S3 Secret key
Enter the S3 secret key associated with the S3 Access-ID key listed in the field above.
Default value: None.
URL Properties
Use these fields to configure the URLs associated with this account.
| Note | ||
|---|---|---|
| ||
You can grant roles to the SnapLogic Snowflake account by using the role parameter in the URL Properties field set. Ensure that the roles are predefined in your Snowflake account before configuring the SnapLogic Snowflake account. URL Property Name: role URL Property Value: SYSADMIN See Roles and Grant Roles for details. |
URL property name
The name of the URL property.
Default value: None.
Example: queryTimeout
URL property value
The URL property value associated with the URL property name.
Default value: None.
Example: 0
Batch size
Required. The number of statements that you want to execute at a time.
| Note |
|---|
Select queries are not batched. |
| Warning |
|---|
Using a large batch size could use up the JDBC placeholder limit of 2100. |
Default value: 50
Fetch size
Required. The number of rows you want a query to fetch during each execution.
| Warning |
|---|
Large values could cause the server to run out of memory. |
Default value: 100
Min pool size
Required. The minimum number of idle connections that you want the pool to maintain at a time.
Default value: 3
Minimum value: 0
Maximum value: No limit
Max pool size
Required. The maximum number of connections that you want the pool to maintain at a time.
Default value: 15
Minimum value: 0
Maximum value: No limit
Max life time
Required. Maximum lifetime of a connection in the pool. Ensure that the value you enter is a few seconds shorter than any database or infrastructure-imposed connection time limit. A value of 0 indicates an infinite lifetime, subject to the Idle Timeout value. An in-use connection is never retired. Connections are removed only after they are closed.
Default value: 60
Idle Timeout
Required. The maximum amount of time a connection is allowed to sit idle in the pool. A value of 0 indicates that idle connections are never removed from the pool.
Default value: 5
Checkout timeout
Required. The number of milliseconds you want the system to wait for a connection to become available when the pool is exhausted. A value of 0 instructs the system to wait forever. For any other value, the system throws an exception after the wait time has expired.
Default value: 10000In this article
| Table of Contents | ||||||
|---|---|---|---|---|---|---|
|
In this section
| Child pages (Children Display) |
|---|
Overview
You must create Snowflake accounts to connect to data sources that you want to use in your pipelines. You can configure your Snowflake accounts in SnapLogic using either the Designer or the Manager.
The Snowflake Snap Pack is now bundled with the default Snowflake JDBC JAR v3.14.
As of November 1, 2023, Snowflake instances hosted on Google Cloud must use Snowflake JDBC JARs v3.13.25 or higher. If you are using the default drivers bundled with Snowflake or ELT Snaps, your pipelines are not affected. If your Snowflake instances hosted on Google Cloud use older JARs, you must update the client drivers. Learn more.
Snap-Account Compatibility
Snap | |||||||
|---|---|---|---|---|---|---|---|
✔ | ✔ | ✔ | ✔ | ✔ | ✔ | ✔ | |
✔ | ✔ | ✔ | ✔ | ✔ | ✔ | ✔ | |
✔ | ✔ | ✔ | ✔ | ✔ | ✔ | ✔ | |
✔ | ✔ | ✔ | ✔ | ✔ | ✔ | ✔ | |
✔ | ✔ | ✔ | ✔ | ✔ | ✔ | ✔ | |
✔ | ✔ | ✔ | ✔ | ✔ | ✔ | ✔ | |
✔ | ✔ | ✔ | ✔ | ✔ | ✔ | ✔ | |
✔ | ✔ | ✔ | ✔ | ✔ | ✔ | ✔ | |
✔ | ✔ | ✔ | ✔ | ✔ | ✔ | ✔ | |
✔ | ✔ | ✔ | ✔ | ✔ | ✔ | ✔ | |
✔ | ✔ | ✔ | ✔ | ✔ | ✔ | ✔ | |
✔ | ✔ | ✔ | ✔ | ✔ | ✔ | ✔ |
Configuring Snowflake Accounts Using SnapLogic Designer
Drag a Snowflake Snap to the Canvas and click the Snap to open its settings. Click the Account tab. You can now either use an existing account or create a new one.
Selecting an existing account
SnapLogic organizes and displays all accounts to which you have access, sorting them by account type and location. To select an existing account:
Click the icon to view the accounts to which you have access and select the account that you want to use.
Click to save the Snap settings.
Creating an account
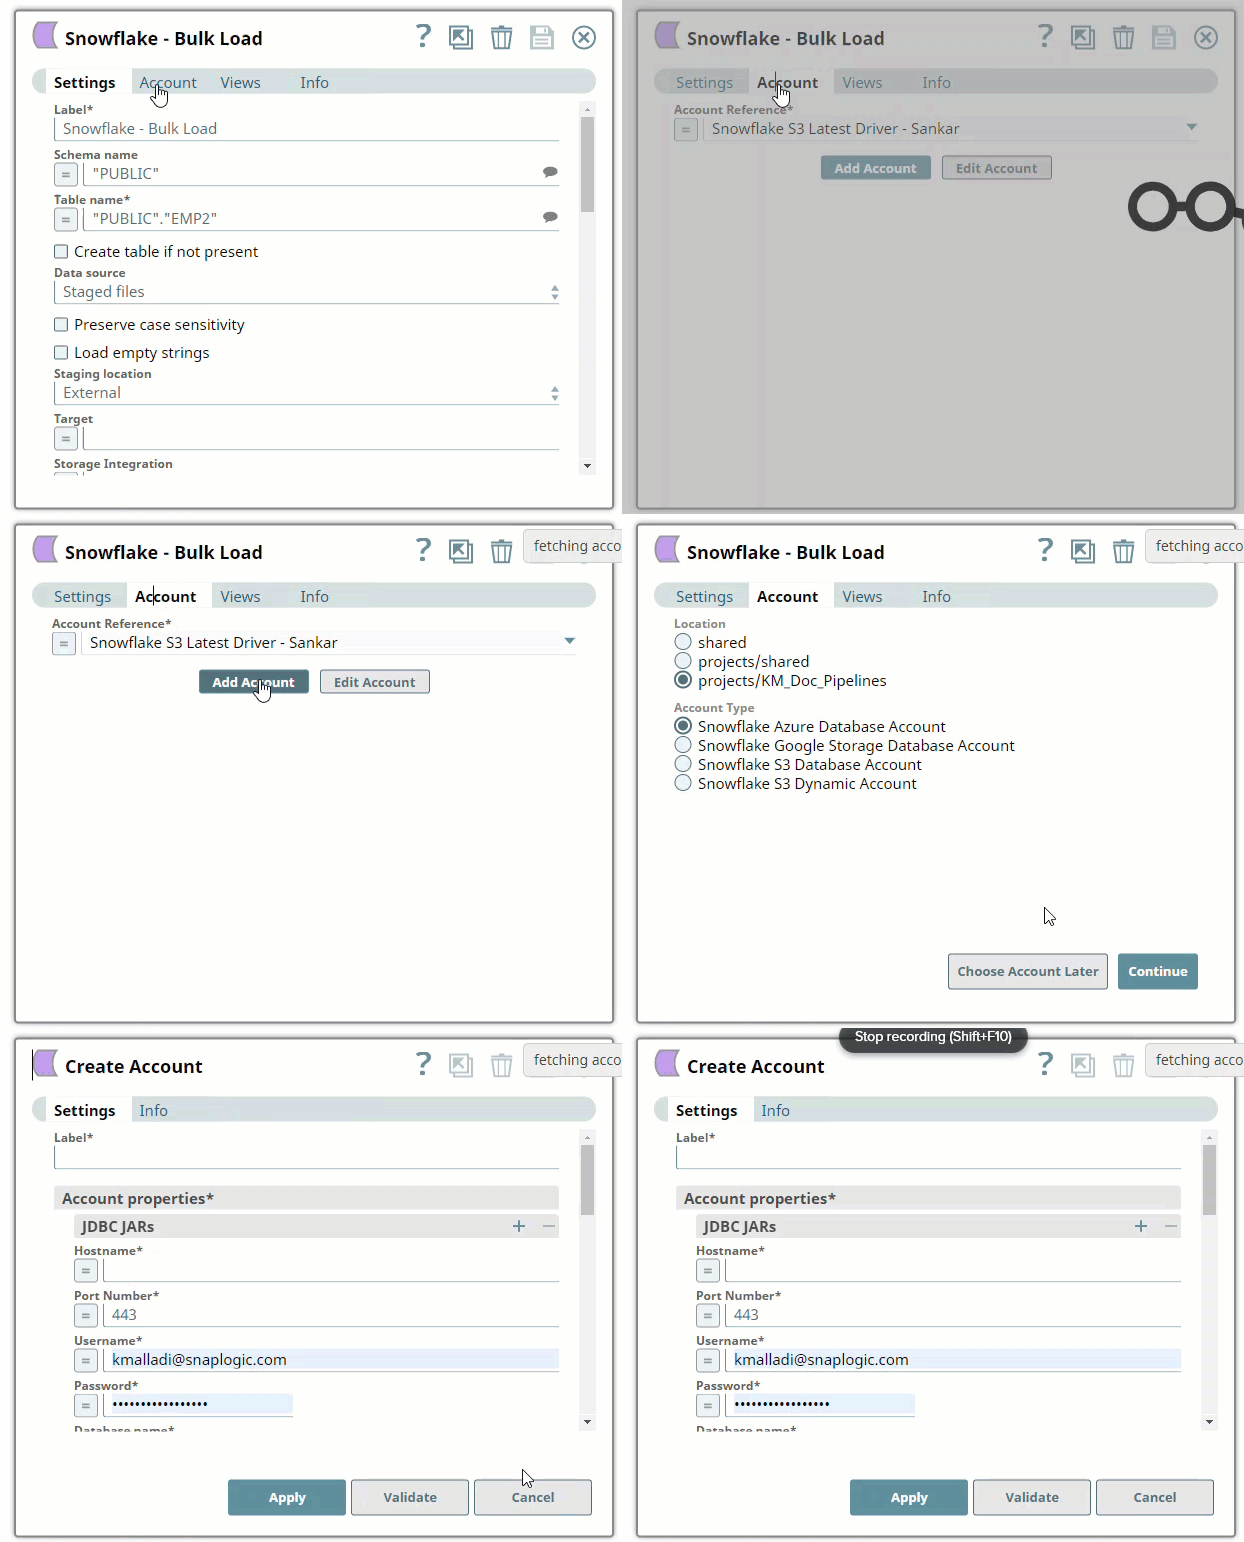
Click Add Account in the Account Reference dialog.
Select the Location in which you want to create the account, select the account type, and click Continue. The Add Account dialog associated with the account type appears.
Enter the required account details. For detailed guidance on how to provide information associated with each account type, refer to Snowflake Azure Database Account, Snowflake Google Storage Database Account, Snowflake S3 Database Account, Snowflake S3 Dynamic Account, Snowflake Azure OAuth2 Account, Snowflake Google Storage OAuth2 Account, and Snowflake S3 OAuth2 Account
Click Validate to verify the account, if the account type supports validation.
Click Apply to complete configuring the Snowflake account.
| Info |
|---|
Enter additional information on this account in the Notes field of the Info tab. This will help you–and other users–understand the purpose of the account, especially if there are multiple accounts of the same type. |
Configuring Snowflake Accounts Using SnapLogic Manager
Use Manager to create accounts without associating them immediately with Pipelines.
Accounts in SnapLogic are associated with projects. You can use accounts created in other projects only if you have at least Read access to them.
In the left pane, browse to the project in which you want to create the account and click
 > Account > Snowflake, followed by the appropriate account type. The Create Account dialog associated with the selected account type is displayed.
Repeat the steps numbered 3 through 5 in the Creating an account section.
Avoid updating account credentials while Pipelines using that account are executing. Doing so may lead to unexpected results, including your account getting locked.
Account Encryption
Standard Encryption | If you are using Standard Encryption, the High sensitivity settings under Enhanced Encryption are followed. | |
|---|---|---|
Enhanced Encryption | If you have the Enhanced Account Encryption feature, the following describes which fields are encrypted for each sensitivity level selected per each account. Account
| |
Using Pipeline Parameters in Account Configuration
You can use
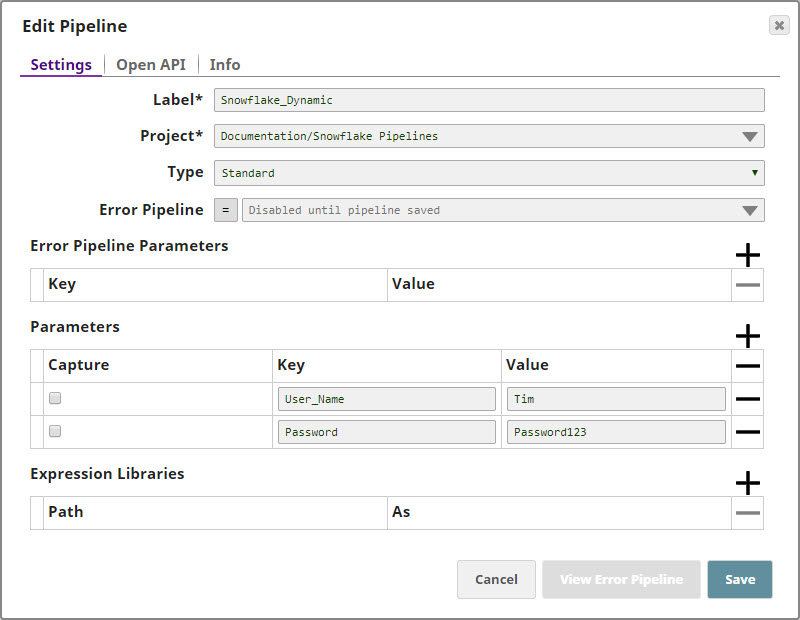
Pipeline parameters when configuring dynamic Snowflake accounts.
Pipeline parameters in the
Pipeline with which you want to associate the new account:
User_name
Pass_word
You will use these values in the
Dynamic account.
In the Snowflake pipeline, create a Snowflake Dynamic Account
Set the expression toggle on for both Username and Password
Set Username to _user_name and Password to _password
Click Apply and fill the Snap Settings for the desired function.
| Info |
|---|
You cannot Validate an account connection when creating a Snowflake Dynamic |
Account, because the account properties of a dynamic account are provided dynamically as |
Pipeline parameters. |
Apply the changes. Your dynamic account is now configured; and your username and password details should change as you update them in your
Pipeline parameters.
See Also
Snap Pack History
| Expand | ||||||||||
|---|---|---|---|---|---|---|---|---|---|---|
|


