Overview
You can use this Snap to perform the MERGE INTO operation from Amazon S3 buckets or Azure Cloud Storage containers to a Snowflake, Azure Synapse database, or a Databricks Lakehouse Platform (DLP) instance. You can also use this Snap to merge data from:
Amazon S3 buckets in to the Amazon Redshift database.
Amazon Redshift or Google Cloud Storage in to BigQuery tables.
A DBFS folder in to a DLP table.
Refer to ELT Source-Target-Hosting Support Matrix for complete information.
The MERGE INTO operation updates, inserts, and deletes rows in/from the target table based on values in a source table. You can set match conditions in the Snap based on which the operation is carried out. The Snap creates a table and inserts the data if the target table does not exist.
After successfully validating the Pipeline with this Snap, you can use this Snap's output view to verify whether the data would be inserted correctly in the target table.
 Image Removed
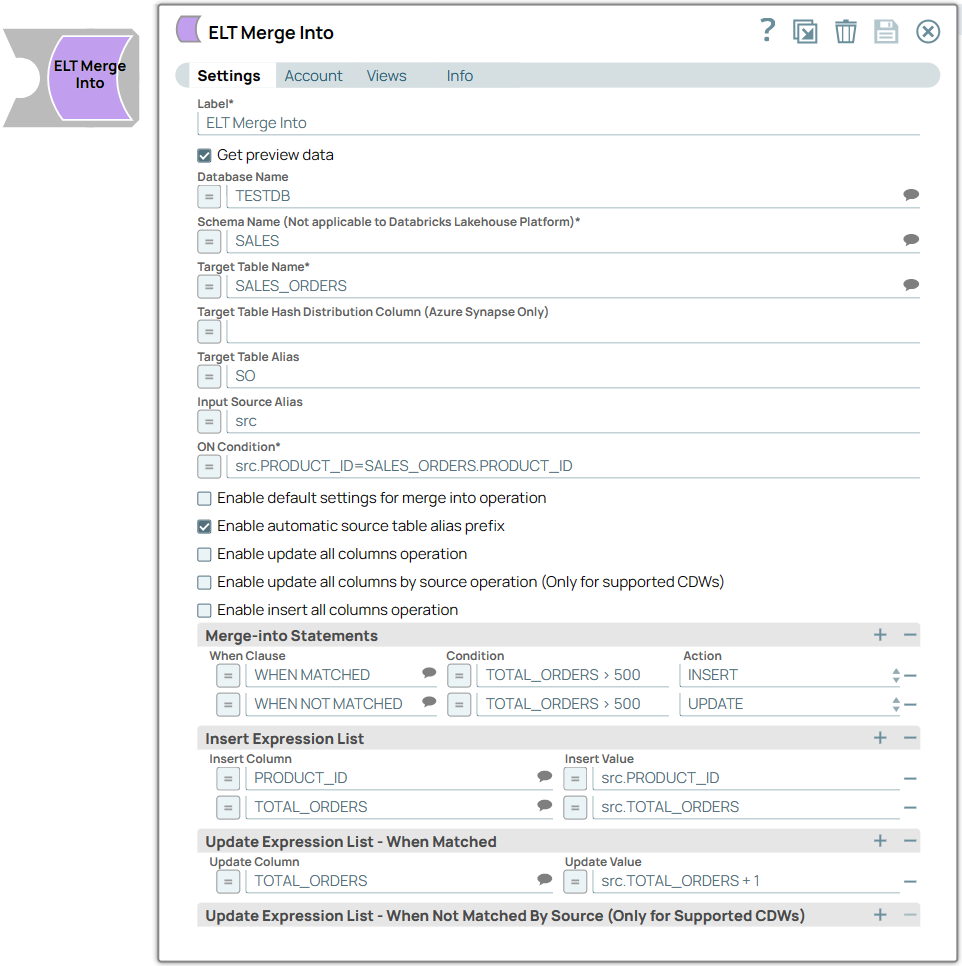 Image Added
Snap Type
The ELT Merge Into Snap is a write-type Snap that writes data from the source file to matching rows in an existing table in the target CDW.
Prerequisites
Valid accounts and access permissions to connect to one source and one target in the following source and target locations (Refer to the ELT Source-Target-Hosting Support Matrix for the supported source-target combinations):
Source: Amazon S3, Azure Cloud Storage, DBFS location, or Google Cloud Storage
Target: Snowflake, Redshift, Azure Synapse, DLP, or BigQuery
Appropriate database permissions to read, insert, update, or delete records.
Appropriate database permissions to create a table.
Appropriate read permissions for the source table that you want to use in the MERGE INTO operation.
Limitations
Though Snowflake allows any number of merge (insert, update, and delete) actions in any combination, you can configure a maximum of three Merge-into Statements in this Snap. The ELT Merge Into Snap returns an error when you specify more than 3 actions, more than 2 WHEN MATCHED actions, or more than 1 WHEN NOT MATCHED action.
| Multiexcerpt include macro |
|---|
| name | ME_ELT_GBQ_StandardSQL |
|---|
| page | ELT Aggregate |
|---|
|
Known Issues
| Cfm tabs page |
|---|
| colorPalettes | Default |
|---|
| primaryTab | true |
|---|
| tabsPageTitle | All CDWs |
|---|
| color | #0052CC |
|---|
| hasBorder | true |
|---|
| id | p06pxujtjqp |
|---|
| backgroundColorPalette | Default |
|---|
|
If the last Snap in the Pipeline takes 2 to 5 seconds to update the runtime, the ELT Pipeline statistics are not displayed even after the Pipeline is completed. The UI does not auto-refresh to display the statistics after the runtime.
Workaround: Close the Pipeline statistics window and reopen it to see the ELT Pipeline statistics. In this Snap’s Pipeline Statistics, the Records Updated parameter in the Snap Statistics tab (on Pipeline execution) displays the combined count of records inserted, updated, and deleted from target tables in Azure Synapse, Google BigQuery, and Amazon Redshift. The Snap displays individual counts for target tables in Snowflake and DLP. When you return to the Snap Statistics tab from the Extra Details tab in the Pipeline Execution Statistics pane, it contains the status bar (Pipeline execution status) instead of the Download Query Details hyperlink and the individual counts of Records Added, Records Updated, and Records Deleted. Suggestions displayed for the Schema Name field in this Snap are from all databases that the Snap account user can access, instead of the specific database selected in the Snap's account or Settings. In any of the supported target databases, this Snap does not appropriately identify nor render column references beginning with an _ (underscore) inside SQL queries/statements that use the following constructs and contexts (the Snap works as expected in all other scenarios): WHERE clause (ELT Filter Snap)
WHEN clause
ON condition (ELT Join, ELT Merge Into Snaps)
HAVING clause
QUALIFY clause
Insert expressions (column names and values in ELT Insert Select, ELT Load, and ELT Merge Into Snaps) Update expressions list (column names and values in ELT Merge Into Snap) Secondary AND condition Inside SQL query editor (ELT Select and ELT Execute Snaps)
| Info |
|---|
Workaround As a workaround while using these SQL query constructs, you can: |
|
| Cfm tabs page |
|---|
| colorPalettes | Default |
|---|
| primaryTab | false |
|---|
| tabsPageTitle | Azure Synapse |
|---|
| color | #0052CC |
|---|
| hasBorder | true |
|---|
| id | bx285fi0mep |
|---|
| backgroundColorPalette | Default |
|---|
|
|
| Cfm tabs page |
|---|
| colorPalettes | Default |
|---|
| tabsPageTitle | DLP |
|---|
| color | #0052CC |
|---|
| hasBorder | true |
|---|
| id | 6knk8o1p1n |
|---|
| backgroundColorPalette | Default |
|---|
|
If your DLP instance uses Databricks Runtime Version 8.4 or lower, ELT operations involving large amounts of data might fail due to the smaller memory capacity of 536870912 bytes (512MB) allocated by default. This issue does not occur if you are using Databricks Runtime Version 9.0. In case of DLP where CSV files do not have a header (column names), a simple query like SELECT * FROM CSV.`/mnt/csv1.csv` returns default names such as _c0, _c1, _c2 for the columns which this Snap cannot interpret. To avoid this scenario, you can: Write the data in the CSV file to a DLP table beforehand, as in: CREATE TABLE csvdatatable (a1 int, b1 int,…) USING CSV `/mnt/csv1.csv` where a1, b1, and so on are the new column names. Then, read the data from this new table (with column names a1, b1, and so on) using a simple SELECT statement.
In case of DLP, all ELT Snaps' preview data (during validation) contains a value with precision higher than that of the actual floating point value (float data type) stored in the Delta. For example, 24.123404659344 instead of 24.1234. However, the Snap reflects the exact values during Pipeline executions.
|
Snap Views
Type | Format | Number of Views | Examples of Upstream and Downstream Snaps | Description |
|---|
Input | Document | | ELT Transform ELT Select ELT Copy
| The source table you want to compare with the target table before updating, inserting, or deleting the values in the target table. |
Output | Document | | | A document containing the SQL query executed on the target database and the rows data inserted in the target table (after running the Pipeline successfully). |
Error | Error handling is a generic way to handle errors without losing data or failing the Snap execution. You can handle the errors that the Snap might encounter when running the Pipeline by choosing one of the following options from the When errors occur list under the Views tab: Stop Pipeline Execution: Stops the current Pipeline execution if the Snap encounters an error. Discard Error Data and Continue: Ignores the error, discards that record, and continues with the remaining records. Route Error Data to Error View: Routes the error data to an error view without stopping the Snap execution.
Learn more about Error handling in Pipelines. |
Snap Settings
| Info |
|---|
Asterisk ( * ): Indicates a mandatory field. Suggestion icon ( ): Indicates a list that is dynamically populated based on the configuration. ): Indicates a list that is dynamically populated based on the configuration. Expression icon ( ): Indicates the value is an expression (if enabled) or a static value (if disabled). Learn more about SQL Expressions and Functions supported for ELT. This list is common to all target CDWs supported. You can also use other expressions/functions that your target CDW supports. Add icon ( ): Indicates that you can add fields in the fieldset. Remove icon ( ): Indicates that you can remove fields from the fieldset. Upload icon ( ): Indicates that you can upload files.
|
Field Name | Field Type | Field Dependency | Description |
|---|
Label* Default Value: ELT Merge Into
Example: Merge Sales Data | String | None. | Specify a name for the Snap. You can modify this to be more specific, especially if you have more than one of the same Snap in your Pipeline. |
Get preview data Default Value: Not selected
Example: Selected | Checkbox | None. | Select this checkbox to include a preview of the query's output. The Snap performs limited execution and generates a data preview during Pipeline validation. | Info |
|---|
In case of ELT Pipelines, only the SQL query flows through the Snaps but not the actual source data. Hence, the preview data for a Snap is the result of executing the SQL query that the Snap has generated in the Pipeline. |
The number of records displayed in the preview (upon validation) is the smaller of the following: | Note |
|---|
Rendering Complex Data Types in DLP Based on the data types of the fields in the input schema, the Snap renders the complex data types like map and struct as object data type and array as an array data type. It renders all other incoming data types as-is except for the values in binary fields are displayed as a base64 encoded string and as string data type. |
|
Database Name Default Value: N/A
Example: TESTDB | String/Expression/Suggestion | None. | Specify the name of the database in which the target table exists. Leave this blank if you want to use the database name specified in the Default Database Name field in the account settings. |
Schema Name* Default Value: N/A
Example: SALES | String/Expression/Suggestion | None. | Specify the name of the database schema. In case it is not defined, then the suggestions for the schema name retrieves all schema names in the specified database when you click the Suggestion icon. | Info |
|---|
Ensure that you include the exactly same schema name including the double quotes, if used, when you repeat the schema name in the Target Table Name field. Leave this field blank if your target database is Databricks Lakehouse Platform (DLP).
|
|
Target Table Name* Default Value: N/A
Example: SALES_ORDERS | String/Expression/Suggestion | None. | Specify the name of the table or view in which you want to perform the MERGE INTO operation. | Info |
|---|
Only views that can be updated (have new rows) are listed as suggestions. So, Join views are not included. This also implies that the Snap account user has the Insert privileges on the views listed as suggestions. |
| Note |
|---|
Ensure that you include the exactly same schema name, if at all, including the double quotes as specified in the Schema Name field. If the target table or view does not exist during run-time, the Snap creates one with the name that you specify in this field and writes the data into it. During Pipeline validation, the Snap creates the new table or view but does not write any records into it. The new table or view thus created will not be dropped if a subsequent/downstream Snap failure occurs during validation. Use double quotes (““) to specify the table or view name if you want to include special characters such as hyphens (-) in the name. A table or view name must always start with a letter. Integers and underscores (_) can also be a part of the name. All characters are automatically converted to uppercase at the backend. Use double-quotes to retain lowercase.
|
|
Target Table Hash Distribution Column (Azure Synapse Only) Default Value: N/A
Example: var_table | String/Expression | None. | Specify the Hash distribution column name for the target table in Azure Synapse, if you configure INSERT action in the Snap. | Info |
|---|
Azure Synapse needs a table to be always Hash distributed, because the MERGE INTO statement on Azure Synapse supports only Hash distributed tables and does not support other types of target tables. See Troubleshooting section for related information on an edge case in creating a table in Azure Synapse. If the target table is created outside the Snap or if you do not use Merge Into statement, you need not specify any value in this field. |
|
Target Table Alias Default Value: N/A
Example: tgt | String/Expression | None. | Specify the alias name for the target table.
You can use the alias names in MERGE INTO statements, instead of using the lengthy target table names. | Info |
|---|
The Snap is equipped with the ability to auto-replace the actual table names (with the alias name), if any, used in the ON clause condition, secondary AND conditions, Update Expression list, or Insert Expression list. This applies to Snowflake, Redshift, and Synapse databases. |
|
Input Source Alias Default Value: N/A
Example: src | String/Expression | None. | Enter the alias name that you want to use for the source table. | Note |
|---|
The alias name is optional. It is useful in cases where the source table's column and the target table's column names are the same. For example: src.order_id = sales.order_id In such cases, the database cannot resolve the column ambiguity and the table qualifier is required to resolve it. |
|
ON Condition* Default Value: N/A
Example: src.PROD_ID=tgt.PROD_ID | String/Expression | None. | The condition based on which you want to check the values in the target table. You can also use Pipeline parameters in this field to bind values. However, you must be careful to avoid SQL injection. See Preventing SQL Injection for details. |
Enable default settings for merge into operation Default Value: Not selected
Example: Selected | Checkbox | None. | Select this checkbox to run the merge into operation with the default settings and assumptions (the same set of column names are used in the source and target tables in the same order) in the following scenarios. For an Update operation: To update all columns of the target table with the corresponding source table column values. For an Insert operation: To insert all the corresponding source column values into the target table. Extra columns in the target table, if any, are populated with nulls. Extra columns in the source table, if any, result in failure with the appropriate error message.
Selecting this checkbox disables all the fields below except Merge-into Statements fieldset. Proceed to define your Merge-into Statements. |
Enable automatic source table alias prefix Default Value: Not selected
Example: Selected | Checkbox | None. | Select this checkbox to prefix the Input Source Alias value to all the source column names inside the expressions defined (without an alias) in the Insert and Update Expression List fieldsets below. For example: colA+colB-colC in the Insert value field is replaced with src.colA+src.colB-src.colC when the Snap prepares the final MERGE INTO SQL statement. | Note |
|---|
Selecting this checkbox adds the source table alias prefix to also those target table column names that do not have their table name or alias as prefix. This may result in erroneous results especially when the source and target tables have identical column names (colA of the target table becomes src.colA if tgt were not prefixed to it). |
Proceed to define your Merge-into Statements and the appropriate expression lists. |
Enable update all columns operation Default Value: Not selected
Example: Selected | Checkbox | None. | Select this checkbox to perform a WHEN MATCHED update operation on all columns in the target table. You can choose the update operation type (by source table column name (default) or by the order of source table columns) for this update. Proceed to define your Merge-into Statements and the appropriate expression lists. |
Enable update all columns by source operation ( |
Azure Synapse and BigQueryOnly for supported CDWs) Default Value: Not selected
Example: Selected | Checkbox | Target CDW is Azure Synapse, DLP, or Google BigQuery. | Select this checkbox to perform a WHEN NOT MATCHED BY SOURCE update operation on all columns in the target table. You can choose the update operation type (by source table column name (default) or by the order of source table columns) for this update. This update operation is supported only on Azure Synapse, DLP, and Google BigQuery target CDWs. |
Azure Synapse and BigQuery |
Enable insert all columns operation Default Value: Not selected
Example: Selected | Checkbox | None. | Select this checkbox to perform a WHEN NOT MATCHED insert operation on all columns in the target table. You can choose the insert operation type (by source table column name (default) or by the order of source table columns) for this operation. |
and Update Expression List - When Not Matched by Source (Azure Synapse and BigQuery) fieldsets and |
Merge Into All Columns Operations Type Default Value: Source and target table column names are identical
Example: Source table column order | Drop-down list | Enable update all columns operation checkbox |
or , Enable update all columns by source operation ( |
Azure Synapse and BigQueryOnly for supported CDWs) checkbox, or Enable insert all columns operation checkbox is selected. | Select one of the following scenarios associated with the selected operation type for the Merge-Into operation. Source and target table column names are identical. When the source column names exactly match with the target table column names (though not in the same order). Source table column order. When the order of your source column names does not match with the order of target table column names and hence the Merge Into operation shall follow the order of the source table column names while performing the INSERT and UPDATE operations defined in the Merge-into Statements fieldset.
|
Merge-into Statements | Use this fieldset to specify the conditions that activate the MERGE INTO operation and the additional conditions that must be met. Specify each condition in a separate row. This fieldset contains the following fields: When Clause Condition Action
|
When Clause Default Value: N/A
Example: WHEN MATCHED | String/Expression/Suggestion | | Specify the matching condition based on the outcome of the ON Condition. Alternatively, select a clause from the suggestion list. Available options are: WHEN MATCHED: Applies the specified condition and action when the source data matches with the target. WHEN NOT MATCHED: Applies the specified condition and action when the source data does not match with the target. WHEN NOT MATCHED BY SOURCE: (Available only for Azure Synapse, DLP, and BigQuery.) Applies the specified condition and action when the target rows do not match the source rows.
|
, , and DLP support the following actions with the WHEN clauses: Azure Synapse, DLP, and |
|
Google BigQuery support the following actions with the WHEN clauses: |
|
Condition Default Value: N/A
Example: TOTAL_ORDERS > 0 | String/Expression | None. | Specify the additional criteria that must be specified.
The action associated for the specified condition is not performed if the condition's criteria is not fulfilled. It can be a combination of both source and target tables, source table only, target table only, or may not contain references to any table at all. Having this additional condition allows the Snap to identify whether the UPDATE or DELETE action must be performed (since both the actions correspond to the WHEN MATCHED clause). You can also use Pipeline parameters in this field to bind values. However, you must be careful to avoid SQL injection. See Preventing SQL Injection for details. |
Action Default Value: INSERT
Example: DELETE | Drop-down list | None. | Choose the action to apply on the condition. Available options are: Though the Snap honors the order of actions defined, the UPDATE and DELETE actions are completed in the order they are specified before the INSERT action is carried out (even when INSERT is specified first). Unlike the UPDATE and DELETE actions, the Snap triggers INSERT action only when the ON Condition is not satisfied.
With Snowflake, Amazon Redshift, and DLP, you can specify up to three Merge Into statements with one of the above options for each WHEN clause. | Info |
|---|
Example WHEN MATCHED… ON <secondary condition> UPDATE… WHEN MATCHED… ON <secondary condition> DELETE… WHEN NOT MATCHED… ON <secondary condition> INSERT…
|
With Azure Synapse and Google BigQuery, you can specify up to five Merge Into statements with one of the above options for each WHEN clause. | Info |
|---|
Example WHEN NOT MATCHED (BY TARGET)… ON <secondary condition> INSERT… WHEN MATCHED (BY SOURCE)… ON <secondary condition>UPDATE… WHEN MATCHED (BY SOURCE)… ON <secondary condition>DELETE… WHEN NOT MATCHED BY SOURCE… ON <secondary condition>UPDATE… WHEN NOT MATCHED BY SOURCE… ON <secondary condition>DELETE…
|
|
Insert Expression List | Use this fieldset to specify the column in which you want to insert the data and also the values that you want to insert into them. Each column must be specified in a separate row. This fieldset contains the following fields: Insert Column Insert Value
|
Insert Column Default Value: N/A
Example: PRODUCT_ID | String/Expression/Suggestion | None. | Specify the column in which the value must be inserted. Alternatively, select a column from the suggestion list. |
Insert Value Default Value: N/A
Example: src.PRODUCT_ID | String/Expression | None. | Specify the value to be inserted for the column. This field can be an SQL expression that references the source table's columns only or none. It cannot reference the target table's columns. You can also use Pipeline parameters in this field to bind values. However, you must be careful to avoid SQL injection. See Preventing SQL Injection for details. |
Update Expression List - When Matched | Use this fieldset to add expressions whose values must be updated when the the Merge Into condition matches the source data. Specify each column to be updated in a separate row. This fieldset contains the following fields: Update Column Update Value
|
Update Column Default Value: N/A
Example: TOTAL_ORDERS | String/Expression/Suggestion | None. | Specify the column in which the value must be updated. Alternatively, select a column name from the suggestion list. |
Update Value Default Value: N/A
Example: src.TOTAL_ORDERS + 1 | String/Expression | None. | Specify the new value to be inserted when the Merge Into condition matches the source.
This field can be an SQL expression that may reference columns in the source table, the target table, both source and target, or neither.
You can also use Pipeline parameters in this field to bind values. However, you must be careful to avoid SQL injection. See Preventing SQL Injection for details. |
Update Expression List - When Not Matched By Source ( |
Azure Synapse and BigQueryOnly for Supported CDWs) | Applicable only for Azure Synapse, DLP, and BigQuery, and is used only when you choose the WHEN NOT MATCHED BY SOURCE as the When clause.
Use this fieldset to add expressions listing out columns whose values must be updated or deleted if the source rows do not match the target rows in the Merge Into operation. This fieldset contains the following fields: Update Column Update Value
| Note |
|---|
If the options in this fieldset do not populate on choosing the WHEN NOT MATCHED BY SOURCE clause, the Snap displays an error. |
|
Update Column Default Value: N/A
Example: TOTAL_ORDERS | String/Expression/Suggestion | None. | Specify the column name in which the value must be updated or deleted as specified in the conditions. Alternatively, select a column from the suggestion list. | Note |
|---|
When you choose Delete action, the Snap ignores the Update Expression - When Not Matched by Source fieldset. |
|
Update Value Default Value: N/A
Example: src.TOTAL_ORDERS + 1 | String/Expression | None. | Specify the new value to be inserted when the Merge Into condition matches the source.
This field can be an SQL expression that may reference columns in the source table, the target table, both source and target, or neither.
You can also use Pipeline parameters in this field to bind values. However, you must be careful to avoid SQL injection. See Preventing SQL Injection for details. |
Different Flavors of Merge Into Operation
Merge Into Operation | Snap Settings needed (in addition to the mandatory fields) |
|---|
Default merge into operation (Choose this operation to update and insert all the differential data from the source table to the target table) | |
Default Settings Image Removed
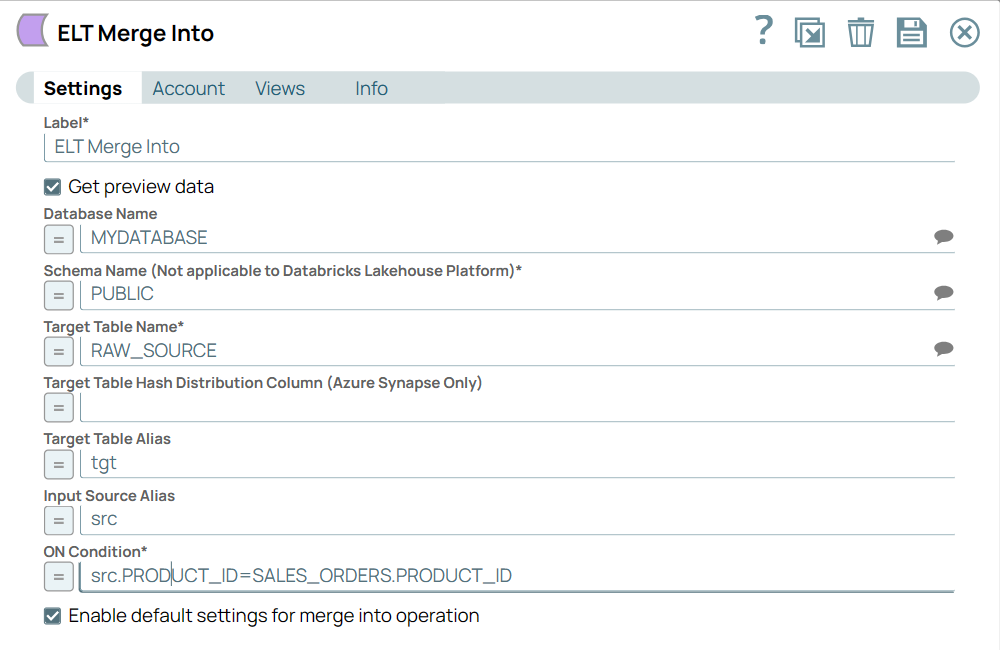 Image Added Image Added |
Use expressions based on source column names to specify the Insert values for the Insert Expression List | Select the Enable automatic source table alias prefix checkbox. Select the type of merge into operation as Source and target table column names are identical or Source table column order. Specify the Merge-into Statements. Define the list of insert expressions for individual columns in the Insert Expression List.
|
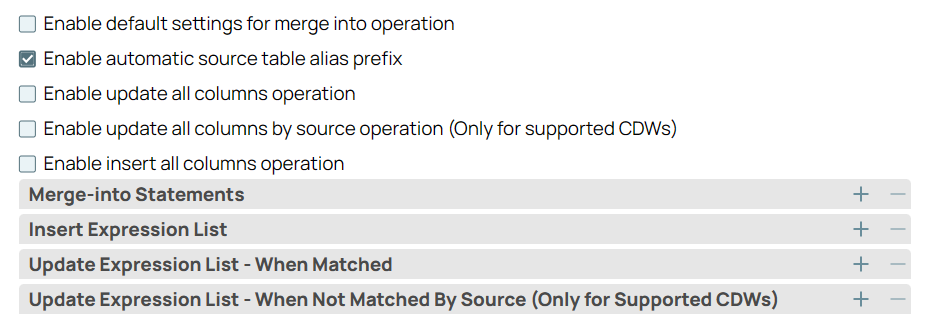 Image Removed
 Image Added Image Added |
Update all columns but insert values only in specific columns | Select the Enable update all columns (by target) operation checkbox. Select the type of merge into operation as Source and target table column names are identical or Source table column order. Specify the Merge-into Statements. Define the lists of insert and update expressions for individual columns in the respective Expression Lists. Ensure that you use appropriate table aliases both for source and target columns.
|
 Image Removed
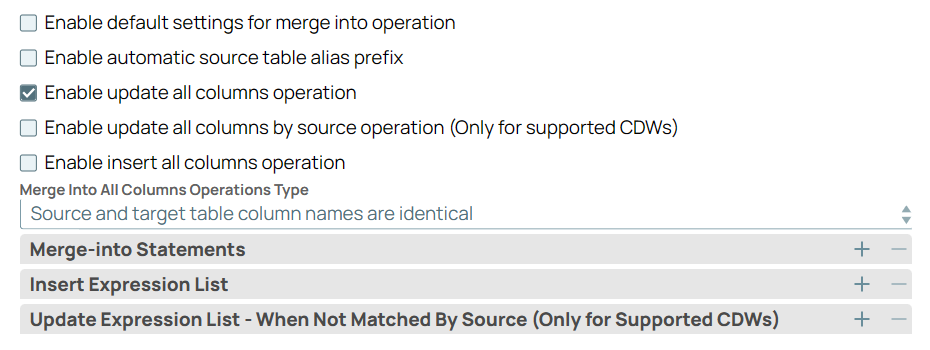 Image Added Image Added |
Update all columns by source (Target CDW is Azure Synapse or BigQuery) but insert values only in specific columns | |
Azure Synapse and BigQueryOnly for ) checkbox. Select the type of merge into operation as Source and target table column names are identical or Source table column order. Specify the Merge-into Statements. Provide the values for each of these columns where the source is not updated (WHEN NOT MATCHED BY SOURCE) in the Insert Expression List fieldset. Define the list of update expressions for individual columns in the Update Expression List - When Matched fieldset. Ensure that you use appropriate table aliases both for source and target columns.
|
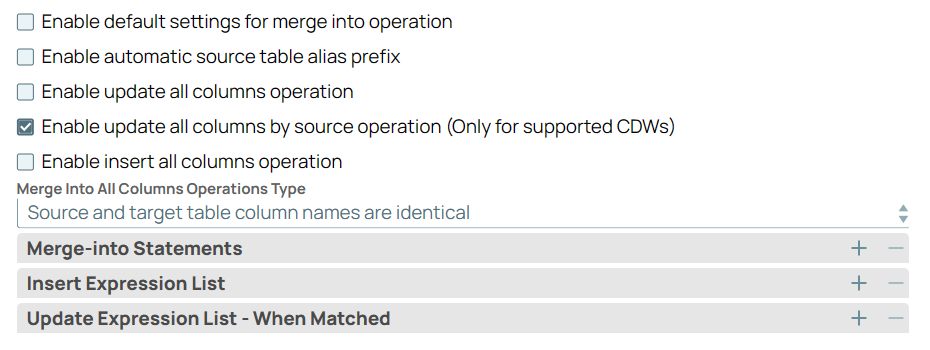 Image Removed
 Image Added Image Added |
Insert all columns but update values only in specific columns | Select the Enable insert all columns operation checkbox. Select the type of merge into operation as Source and target table column names are identical or Source table column order. Specify the Merge-into Statements. Define the lists of update expressions (when matched and when not matched by source) for individual columns in the respective Update Expression Lists. Ensure that you use appropriate table aliases both for source and target columns
|
. Image Removed
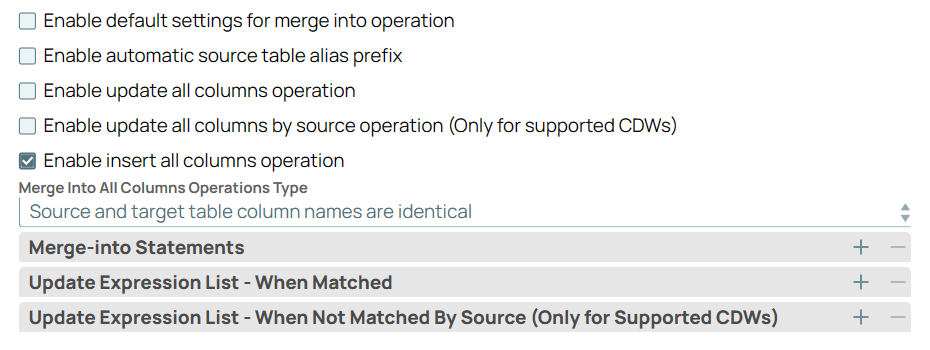 Image Added Image Added |
To update the target table without specifying any column/field-wise insert or update expressions. | Select the last four checkboxes (all except the Enable default settings for merge into operation checkbox). Select the type of merge into operation as Source and target table column names are identical or Source table column order. Specify the Merge-into Statements.
 Image Added Image Added |
Preventing SQL Injection
You can pass Pipeline parameters as values in an SQL expression; however, if you do not properly phrase the expression it can lead to the parameter's name being bound as a value in the database. This potentially incorrect information being inserted into the database is known as SQL injection. It is thus necessary to take precautions when including Pipeline parameters in your SQL expression to prevent SQL injection. Based upon the intended use of the Pipeline parameter, use one or both of the following methods to prevent accidental SQL injection:
Method 1: Simple Substitutions
You can reference the Pipeline parameter directly with a JSON-path without enabling expressions.
For example, if you want to use the Pipeline parameter, name, which contains the value of a column in the ON Condition, Condition, Insert Value, or Update Value fields:
| Code Block |
|---|
ON Condition or Condition field:
colname = _name

Insert Value or Update Value field:
_name |
Method 2: Dynamic Substitutions
You must enable expressions when using Pipeline parameters for dynamic substitutions. Format the SQL expression, except the Pipeline parameter's reference, as a string.
For example, if you want to use the Pipeline parameter, name, which contains the value of a column in the ON Condition, Condition, Insert Value, or Update Value fields:
| Code Block |
|---|
ON Condition or Condition field:
_columnname + “= _name”

Insert Value or Update Value field:
“_name” |
The Snap evaluates the expression and also carries out path substitutions.
Here is how it works
The Snap pre-processes the query to extract any JSON-Paths and converts them to bound parameters. For example, consider the following query:
| Code Block |
|---|
_columnname + “= _name” |
The Snap converts this query into the following before turning it into a prepared statement for the database:
The Snap evaluates the JSON-Path to get the value to bind the Pipeline parameter in the prepared statement.
| Note |
|---|
Using escape charactersWhen expressions are disabled, use \ as an escape character to treat underscore (_) as a string. For example: colname = \_name
|
Pipeline Execution Statistics
As a Pipeline executes, the Snap shows the following statistics updating periodically. You can monitor the progress of the Pipeline as each Snap performs executes.
Records Added
Records Updated
Records Deleted
You can view more information when clicking the Download Query Details link.

| Info |
|---|
The statistics are also available in the output view of the child ELT Pipeline. |
Troubleshooting
| Cfm tabs page |
|---|
| colorPalettes | Default |
|---|
| primaryTab | true |
|---|
| tabsPageTitle | All CDWs |
|---|
| color | #0052CC |
|---|
| hasBorder | true |
|---|
| id | y7zu2jqwtva |
|---|
| backgroundColorPalette | Default |
|---|
|
Error | Reason | Resolution |
|---|
Database cannot be blank. (when seeking the suggested list for Schema Name field) | Suggestions in the Schema Name and Target Table Name fields do not work when you have not specified a valid value for the Database Name field in this Snap. | Specify the target Database Name in this Snap to view and choose from a suggested list in the Schema Name and Target Table Name fields respectively. | Invalid placement of ELT Merge Into Snap. | You cannot define your pipeline to begin with a ELT Merge Into Snap. | Move the ELT Merge Into Snap to either the middle or the end of the pipeline. | Failure: Unable to execute MERGE INTO operation. WHEN MATCHED clause wrongly configured. | You cannot perform an INSERT operation based on a secondary WHEN MATCHED clause/condition. | Choose an UPDATE or DELETE Action for the WHEN MATCHED Merge-into Statement. |
|
| Cfm tabs page |
|---|
| colorPalettes | Default |
|---|
| tabsPageTitle | Snowflake |
|---|
| color | #0052CC |
|---|
| hasBorder | true |
|---|
| id | 0vj5rjccicds |
|---|
| backgroundColorPalette | Default |
|---|
|
Error | Reason | Resolution |
|---|
SQL exception from Snowflake: Syntax error in one or more positions in the SQL query | Column names in Snowflake tables are case-sensitive. It stores all columns in uppercase unless they are surrounded by quotes during the time of creation in which case, the exact casing is preserved. See, Identifier Requirements — Snowflake Documentation. | Ensure that you follow the same casing for the column table names across the Pipeline. |
|
| Cfm tabs page |
|---|
| colorPalettes | Default |
|---|
| tabsPageTitle | Azure Synapse |
|---|
| color | #0052CC |
|---|
| hasBorder | true |
|---|
| id | 2fijww3szmh |
|---|
| backgroundColorPalette | Default |
|---|
|
Error | Reason | Resolution |
|---|
The Snap has not been configured properly. (This error scenario occurs when the Target table does not exist (Snap needs to create one), and the Target Table Hash Distribution Column is not specified.) | Without the Target Table Hash Distribution Column defined for creating the new table in Azure Synapse, the Snap creates a new target table with Round-Robin distribution (default for Azure) instead of a Hash-distributed table. But, as the Snap cannot insert values into a non-Hash-distributed table, it errors out with this message. | If you have not created the Hash-distributed table before hand, ensure that you specify the Target Table Hash Distribution Column for creating the new table. To do so, validate the Pipeline to get the target table column names through the Input SQL coming from the upstream Snap. This allows the ELT Merge Into Snap to create a Hash-distributed table in the Azure Synapse Database and insert the rows, as needed. If the target table exists already and was created with Hash distribution, you can leave this field blank. |
|
| Cfm tabs page |
|---|
| colorPalettes | Default |
|---|
| tabsPageTitle | DLP |
|---|
| color | #0052CC |
|---|
| hasBorder | true |
|---|
| id | cham4on0phe |
|---|
| backgroundColorPalette | Default |
|---|
|
Error | Reason | Resolution |
|---|
Multiple source rows are attempting to update or delete the same target row. | When you configure an ELT Merge Into Snap to perform an Update or Delete operation or an ELT Execute Snap with a MERGE INTO statement that performs Update or Delete operation on a DLP cluster it may return an error if multiple source rows attempt to update or delete the same target row. | To prevent such errors, you need to preprocess your source table to have only unique rows. | [Simba][SparkJDBCDriver](500051) ERROR processing query/statement. Error Code: 0 Cannot create table ('<schema name>`.`<table name>`'). The associated location (`…<table name>`) is not empty but it's not a Delta table | The specified location contains one of the following: A non-Delta table (such as CSV, ORC, JSON, PARQUET) A corrupted table A Delta table with a different table schema
So, the Snap/Pipeline cannot overwrite this table with the target table as needed. | Ensure that you take appropriate action (mentioned below) on the existing table before running your Pipeline again (to create another Delta table at this location). Move or drop the existing table from the schema manually using one of the following commands: Access the DBFS through a terminal and run: OR Use a Python notebook and run: dbutils.fs.mv(from: String, to: String, recurse: boolean = false): boolean to move the table/file/directory or
dbutils.fs.rm(dir: String, recurse: boolean = false): boolean to drop the table/file/directory.
|
|
Example
In this example, we want to retrieve records from two tables. First, we transform the retrieved records using conditions and use a JOIN clause to join the queries from the two tables. We then perform transformations on the records and apply aggregate function. Finally, we merge the records by applying conditions and actions. This example demonstrates how we can accomplish this task.
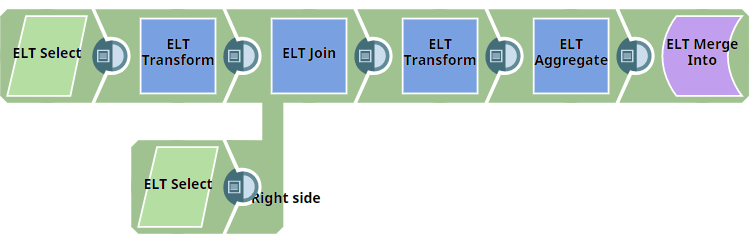
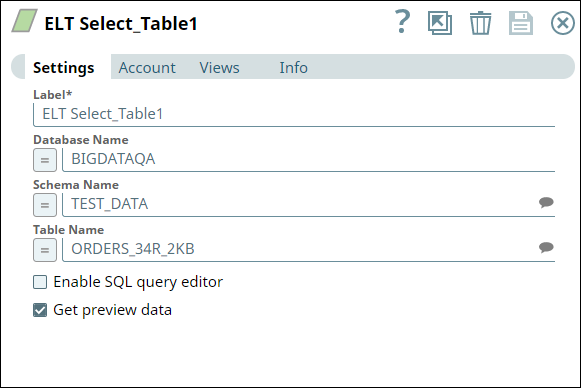
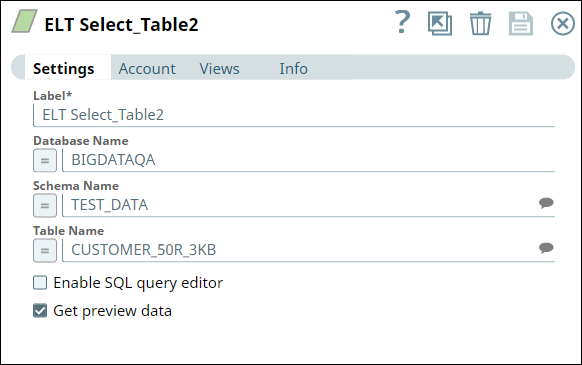
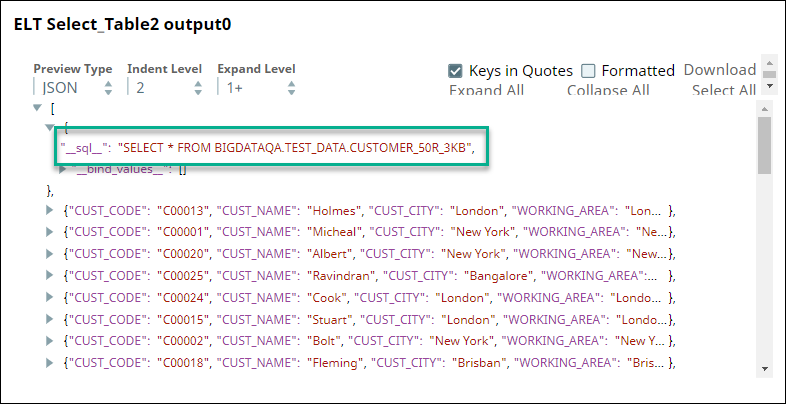
First, we use two ELT Select Snaps to build SELECT queries to retrieve all records from the tables (ORDERS_34R_2KB and CUSTOMER_50R_3KB). The configuration and query output is as shown below:
The tables have several columns. But, we want to retrieve only the CUST_CODE and ORD_AMOUNT columns. Therefore, we configure the ELT Transform Snap with the following settings, which builds the query as shown below:
ELT Transform | Output |
|---|
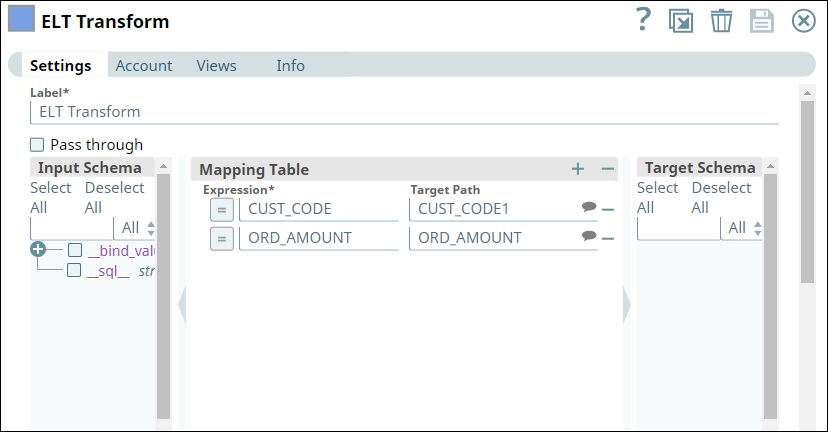 Image Modified Image Modified | 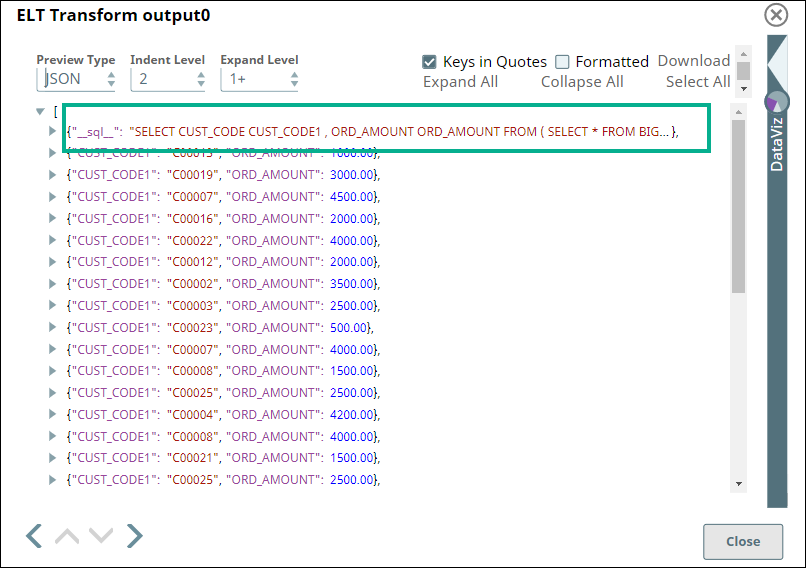 Image Modified Image Modified |
The SELECT queries in the ELT Select and ELT Transform Snaps form the inputs for the ELT Join Snap. Now, we apply an inner join based on matching values of the CUST_CODE column in the tables. Hence, we configure the ELT Join Snap and validate. Upon validation, the ELT Join Snap combines both the incoming SELECT queries and adds the JOIN clause. The output preview is as shown below:
ELT Join | Output |
|---|
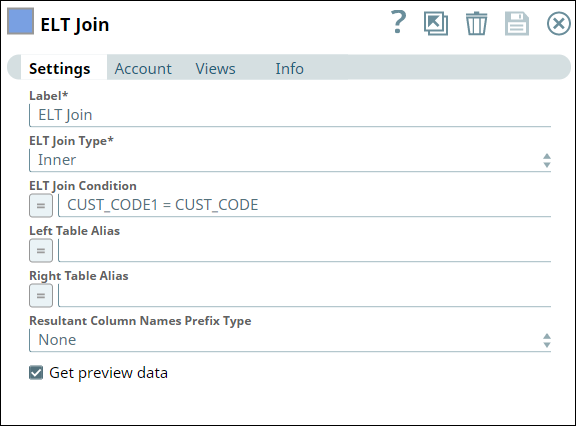 Image Modified Image Modified | 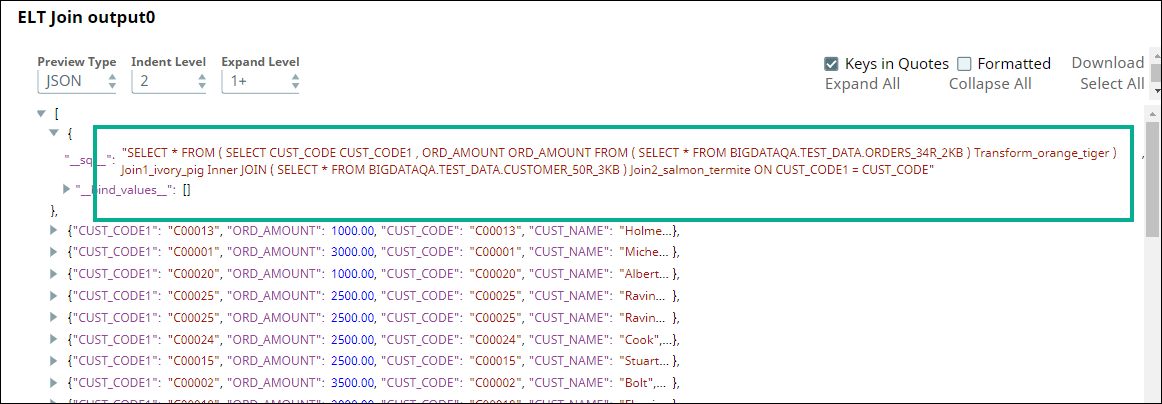 Image Modified Image Modified |
We use the ELT Transform Snap to retrieve only the CUST_NAME and ORD_AMOUNT columns after joining the queries. We configure the Snap with the following setting which builds the query as shown below:
ELT Transform Snap | Output |
|---|
 Image Modified Image Modified | 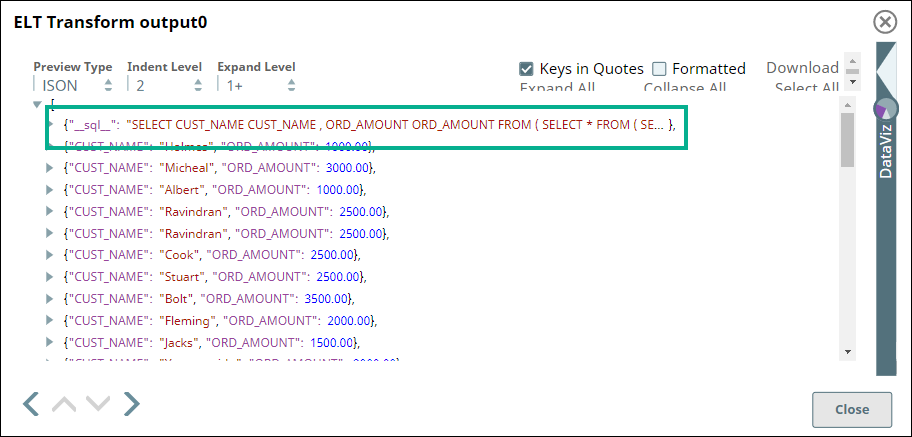 Image Modified Image Modified |
Subsequently, we use an ELT Aggregate Snap to apply an aggregate function on the values in the ORD_AMOUNT column. Here, we want to calculate the SUM for the ORD_AMOUNT column.
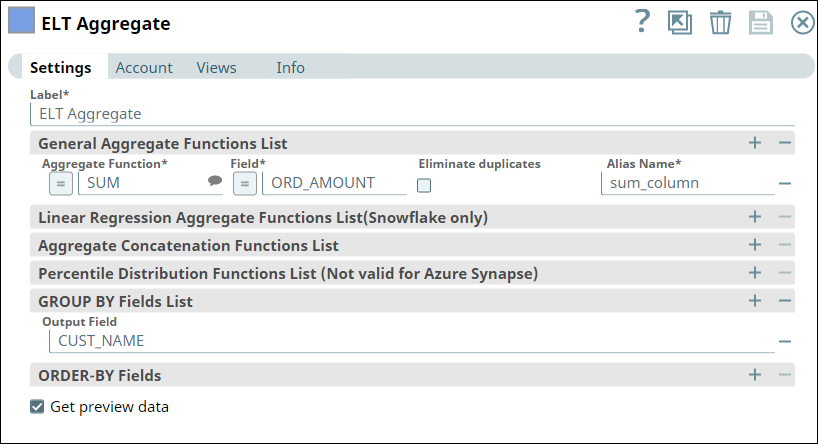
The Snap builds the query as shown below:
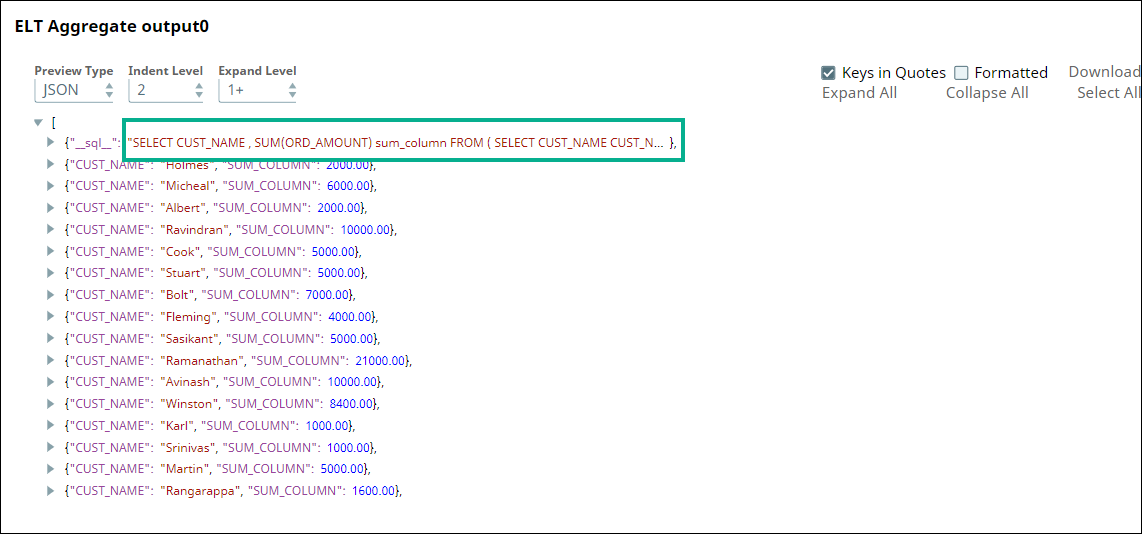
Finally, we use the ELT Merge Into Snap to merge the records into the Target table MERGE_INTO_OUT_01 based on the ON Condition, apply Merge-into statements, update actions, and update expressions.
The ON condition checks for the customer's name - if the customer's name matches, it applies the Merge-into statements and applies conditions as configured below. In this case, if the customer's name matches and if the condition (SUM_COLUMN<5000) is met, then the Snap updates the record with the customer's name. If the customer's name does not match and if the condition (SrcAlias.SUM_COLUMN<5000) is met, then it inserts the customer's name into the record.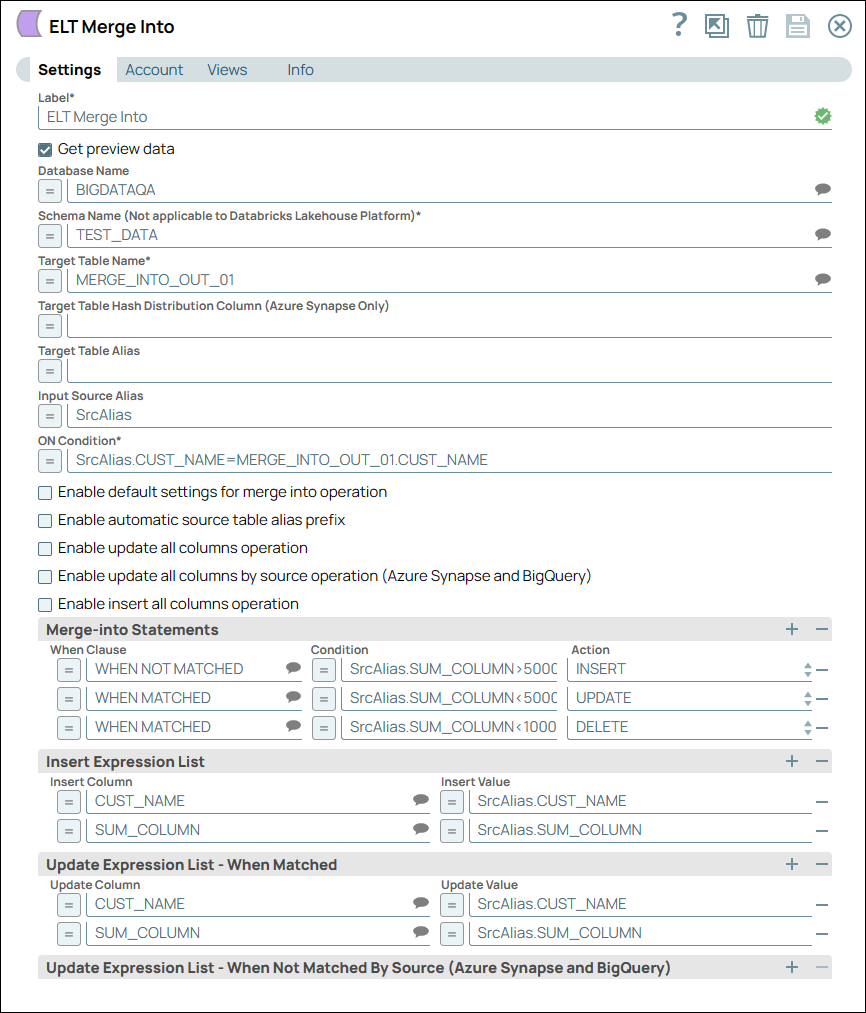 Image Removed
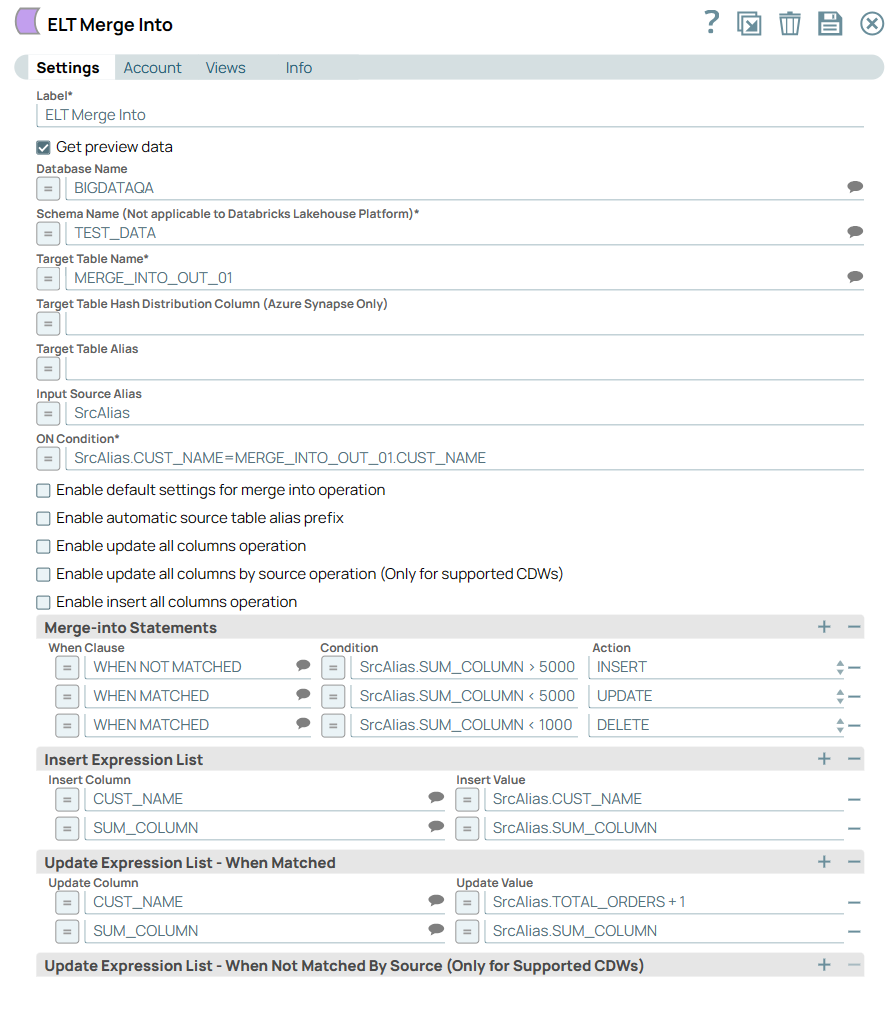 Image Added
Upon successful execution, the Pipeline adds and updates customer records in the Target database table in the configured database.
Download this Pipeline.
Downloads
| Note |
|---|
Important Steps to Successfully Reuse PipelinesDownload and import the Pipeline into SnapLogic. Configure Snap accounts as applicable. Provide Pipeline parameters as applicable.
|
Snap Pack History
Refer to the Snap Pack History table in ELT Snap Pack.
Related Content