In this article
...
By default, SnapLogic enables Cloud Pattern Catalog, and it appears in the Designer > Patterns tab or in the Assets Asset palette.
Standard view:

Asset Pallette:

If you do not see the Pattern Catalog, click the menu next to your profile and select User Settings. Enable the SnapLogic Cloud Pattern Catalog check box, and optionally, the Asset Palette check box.
...
The SnapLogic Cloud Pattern Catalog enables you to search, preview, and import Pattern Pipelines that are provided by SnapLogic. You can also use them in your existing Pipelines by copying the Snaps in the newly-created Pipeline into an existing Pipeline. When you type a keyword in the search box, SnapLogic invokes Iris Integration Assistant, which retrieves all the matching Pattern Pipelines in the SnapLogic Cloud Pattern Catalog and in your Org, displaying them within their respective projects.
| Note |
|---|
|
To search for a Pattern Pipeline:
- Log intoin to SnapLogic Designer and click the Patterns tab or the Patterns button in the Assets Palette. The Pattern Catalog opens.
- In the search box, enter the keyword with which you want to search for Pattern Pipelines. Hit Press the Enter key if you have enabled Asset Palette to begin the Search. Iris now runs a search using the full or partial keyword you specified and separately lists out the number of Pattern Pipelines found in the Cloud Pattern Catalog and within each project space in your Org.

- Expand each project space to view matching or all Pattern Pipelines within your Projects.

- Show Matches Only: Click to see Pattern Pipelines that match the search word.
- title
Show All: Click to view all Pattern Pipelines in the Project that correlate to the search word.
Note 4.23 Asset Palette The Show Matches Only and Show All options only appear in the New Asset Palette. For details, see Defining User Settings.
Mouse over each Pattern Pipeline to view its preview in the Canvas.

Note Pattern Pipeline previews are available only for Pattern Pipelines in the SnapLogic Cloud Pattern Catalog. Regular Pattern Pipelines do not have previews.
- Click the Pattern Pipeline that you want to use to import it.
...
- In SnapLogic Manager, navigate to Project Spaces and select the project space (Patterns, in this example) where you want to create the pattern project.
- Click the arrow next to the Project Space to open project options.
- Click Create Project:

- Enter a name for the Pattern project and select the Pattern Project check box.

- Click Create to create a pattern project in the Patterns tab in Designer:

To share the Pipeline patterns in this folder, assign permissions to users or groups. All pipelines you add to this project automatically appear under the Patterns Catalog within the project space in which they are created.
Assigning Permissions
| Note |
|---|
These permission levels are not applicable to Org Admins. |
Permission Levels
There are five access levels for any SnapLogic project for users. Pattern projects too also follow these access-level requirements:
| Permission Level | View Pipelines | Edit Project | Execute Pipelines | Modify Pipelines | Delete Pipelines |
|---|---|---|---|---|---|
| Read Only | ✓ | ||||
| Read & Write | ✓ | ✓ | ✓ | ||
| Read & Execute | ✓ | ✓ | |||
| Full Access | ✓ | ✓ | ✓ | ✓ | ✓ |
| Owner | ✓ | ✓ | ✓ | ✓ | ✓ |
...
Assigning Permissions to Groups and Individual Users
- In SnapLogic Manager, navigate to the pattern project, open the Project Options menu, and click Permissions.

The Permissions dialog opens:
- In the Add field, enter the group name or user's email address, and select the permission level that you want to assign.
- Click Share & Save. The user is displayed in the access list.
- Click Done.
...
You can add pipelines to your pattern projects or others where you have 'Full Access' permission. You can add pipelines by:
...
- In SnapLogic Designer, at the top-left of the canvas, click Import:

- Select the pipeline to import and click Open.
The Add New Pipeline dialog opens.
- Enter a new Label for the pipeline.
- Select the pattern project's path in the Project field.
- Click Save.
...
- In SnapLogic Designer, at the top left of the canvas, click
 to open the Add buttonNew Pipeline dialog:
- Enter a name for the pipeline in the Label field.
- Select the pattern project in the Projects field.
- Click Save.
The pipeline becomes a part of the pattern project. - You can now build and configure the pipeline as required.
Moving Existing Pipelines to a Pattern Project
- Open the pipeline to move.
- In the Designer toolbar, click Move Pipeline:

The Choose Destination Project for Move dialog opens:
- Enter the pattern project's name in the Destination field. This filters the list of projects displayed.
- Select the target pattern project and click Move. The pipeline is moved to the project and is now visible in the Patterns Catalog.
Viewing and Editing Pattern Pipelines
The behavior associated with viewing and editing Pattern Pipelines varies depending on your access to the Pipelines. If you click on a Pattern Pipeline to which you only have Read access, SnapLogic displays the New Pipeline dialog, which you can use to import the Pipeline into your Project. A Pipeline wizard opens, prompting for the required information, such as accounts. See SnapLogic Intelligent Integration Platform Community for examples of Pattern Pipelines that you can use to build your Pipelines.
Users with Read and Write and Full Access permissions
If you have Read and Write and Full Access permissions to a self-contained Pattern Pipeline, you can open the Pipeline for editing. Typically, these are Pattern Pipelines created within your Org.
Users with Read permissions
If you have only Read permissions on a Pattern Pipeline, you must import it into a project where you have Full Access permissions. All end-users have only Read permissions on Pattern Pipelines in the SnapLogic Cloud Pattern Pipeline Catalog.
When you click a Pattern Pipeline on which you have Read permissions, the Add New Pipeline popup appears. This popup enables you to import and save the Pattern Pipeline to your project:
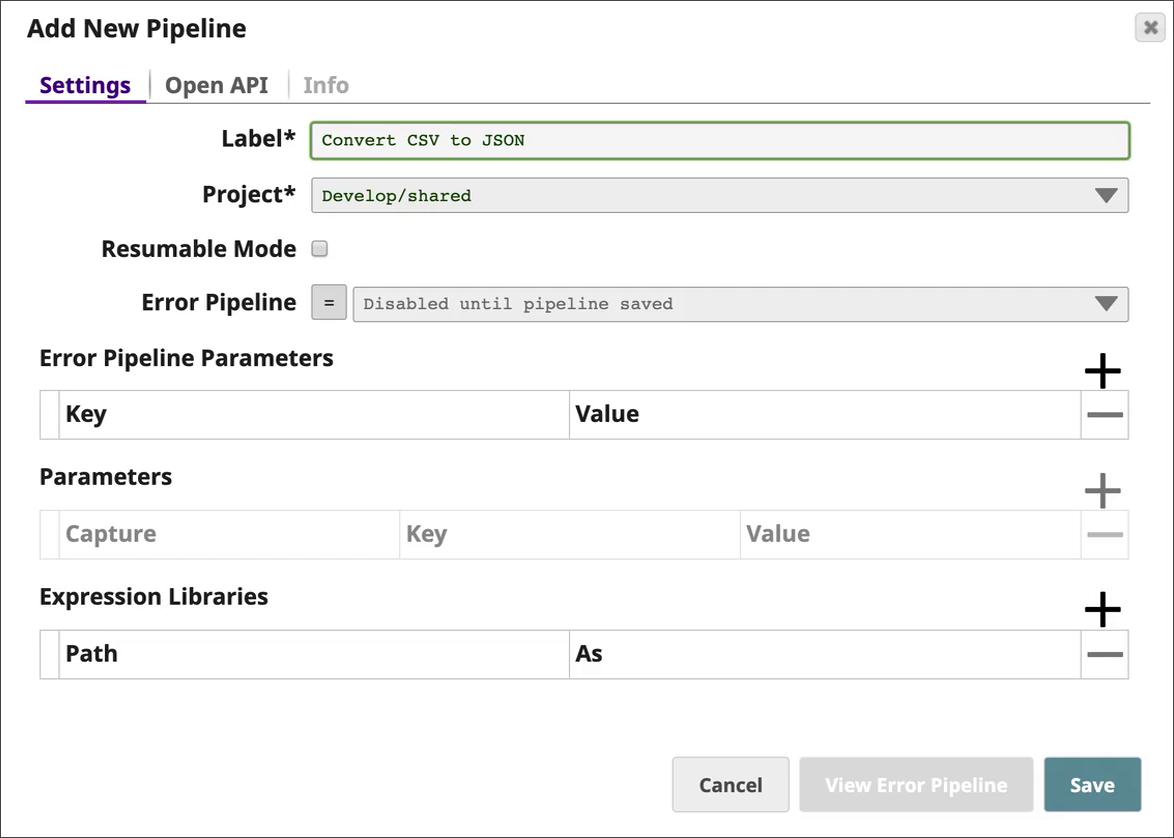
Once you have saved the Pipeline, you can either use it as an independent Pipeline or copy the contents and paste it into another Pipeline.
Users with no access
...
Moving Existing Pipelines to a Pattern Project
- Open the pipeline to move.
- In the Designer toolbar, click Move Pipeline:
The Choose Destination Project for Move dialog opens: - Enter the pattern project's name in the Destination field. This filters the list of projects displayed.
- Select the target pattern project and click Move. The pipeline is moved to the project and is now visible in the Patterns Catalog.