On this page
| Table of Contents | ||||
|---|---|---|---|---|
|
Additional menu and options are added in the SnapLogic Manager upon successful integration with GitHub.
...
A summary of these is as below:
Repository path and commit details.
Additional options in the Project options menu.
Additional options in the File options menu.
GitHub menu in the secondary toolbar.
GitHub Status column in the asset table.
These are covered in detail in the sections that follow.
Repository Path and Other Details
The following is an example of a project window after checking out a GitHub repository:
...
Below is a closer look at the repository path:
...
This is essentially composed of three parts:
...
The path of the GitHub repository. Clicking on the repository's path opens the repository in GitHub.
...
| Info |
|---|
This page is no longer maintained (). For the most current information, go to https://docs.snaplogic.com/cicd/git-integration/git-integration-about.html . |
After you check out a GitHub or GHES repository into a Project, the Assets table banner displays repository information, and the GitHub Status column shows the current status of each Asset:
...
From the banner, you can:
Click the repository path to open the repository in GitHub.
Click the commit ID to open the commit details page in GitHub. This is update updated with each GitHub commit and pull.
Username View the GitHub username of the GitHub account person that made the last commit.
...
The following items are added in the Project options menu:
...
Refer to the GitHub Options and their Functions section below for the functionality of each of the GitHub options in the menu.
...
| title | Opening Project options menu |
|---|
To open the Project options menu:
Hover mouse over the project, a downward arrow appears.
...
Click the arrow, Project options menu opens.
...
Updated File Options
File options menu is expanded to include GitHub-related items:
...
One of the following options is shown in the File options menu based on the GitHub status of the file:
Add to Repository: After a file is added in the project but not committed to the repository.
Remove from Repository: After a file is added in the project and committed to the repository.
Refer to the GitHub Options and their Functions section below for the functionality of each of the GitHub options in the menu.
...
| title | Opening File options menu |
|---|
To open the File options menu:
Hover mouse over the File, a downward arrow appears.
...
Click the arrow, File options menu opens.
...
GitHub Menu
The GitHub icon is added to the Asset table's toolbar. Clicking this icon opens the GitHub menu:
...
The following options are available in the GitHub menuGitHub status can be one of the following:
Tracked: The Asset has been committed and updates are being tracked.
Untracked: The repository is not tracking updates for the Asset.
Added: The Asset has been staged, but not committed.
Removed: The removal has been staged, but not committed.
Unsupported: This type of Asset cannot be tracked in the repository.
You can perform GitHub operations using APIs or from the following menus in SnapLogic Manager:
| Table of Contents | ||||||
|---|---|---|---|---|---|---|
|
Toolbar GitHub Menu
The toolbar above the Assets table includes a GitHub button:
...
The GithHub menu offers the following actions:
Checkout GitHub Repository
Commit to GitHub
GitHub Pull
Add to Repository
Remove from Repository
Refer to the GitHub Options and their Functions section below for the functionality of each of the GitHub options in the menu.
Enhanced Asset Table: GitHub Status Column
The GitHub Status column displays the status of the project asset in the repository.
Each asset has one of the following statuses:
Tracked: Assets are updated in the repository.
Untracked: Assets are not updated in the repository.
Added: Assets are added but not committed in the repository.
Removed: Assets are removed but the file delete is not committed in the repository.
Unsupported: Asset type is not supported.
| Note |
|---|
Assets with GitHub status Untracked, Added and Removed do not show in the GitHub repository unless committed. |
GitHub Options and their Functions
...
Menu Item
...
Location
...
Description
...
Checkout GitHub Repository
...
Project options and GitHub Menu
...
Checkout GitHub repositories. Clicking on this opens the Checkout GitHub Repository dialog box. You can also use GitHub API for this operation.
...
Commit to GitHub
...
Project options and GitHub Menu
...
Commit changes such as file updates in the GitHub repository. Clicking on this opens the Commit Changes dialog box.
...
GitHub Pull
...
Project options and GitHub Menu
...
Fetch updates from the GitHub repository. Clicking on this opens the Pull Messages dialog box. You can also use GitHub API for this operation.
...
Add to Repository
...
File options and GitHub Menu
...
Add asset to the GitHub repository. Clicking on this changes the GitHub status to Added. You will need to commit changes to update the GitHub repository.
...
Remove from Repository
...
File options and GitHub Menu
...
Remove asset from the GitHub repository. Clicking on this changes the GitHub status to Removed. You will need to commit changes to update the GitHub repository.
See Also
...
...
Asset Options Menu
Add or remove an Asset from the GitHub repository using the Asset options menu.
To open the Asset options menu, click the arrow next to the asset name:
...
The menu includes one of the following options, based on the current status of the Asset:
Add to Repository: Available for Assets that have not been added or committed to the repository.
Remove from Repository: Available for Assets that have been added or committed to the repository.
For example, the following screenshot shows the menu for an Asset that has not been added to the repository:
...
After adding or removing an Asset, you must commit it to push the update to the repository.
Project Options Menu
Checkout, pull, and commit Asset updates from the Project Options menu. Open the options menu from the Project Spaces tree, by clicking the arrow next to the Project name:
...
The menu contains the following GitHub options:
...
When a project is checked out, the menu also contains the GitHub Add Tag option.
Project Space Options Menu
You can create a Project in the SnapLogic®️ Manager from a Git repository checkout. In Manager:
In the navigation tree, click the Project Space where you want to create the Project. The Project Space Options menu opens:
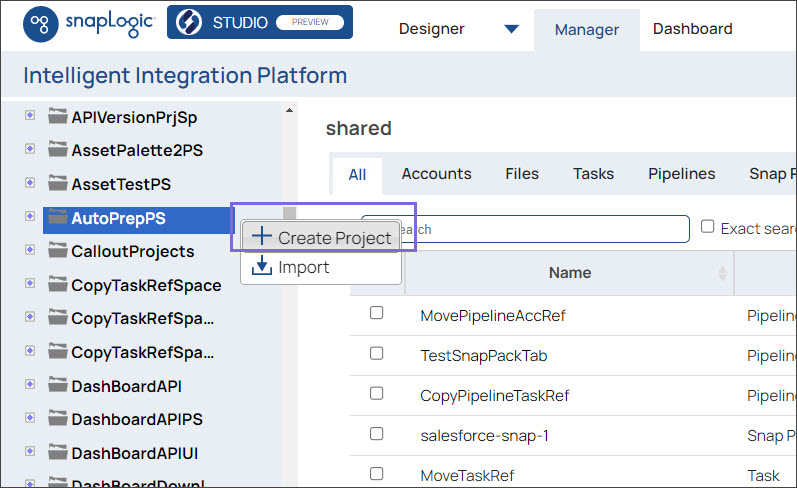
Click Create Project.
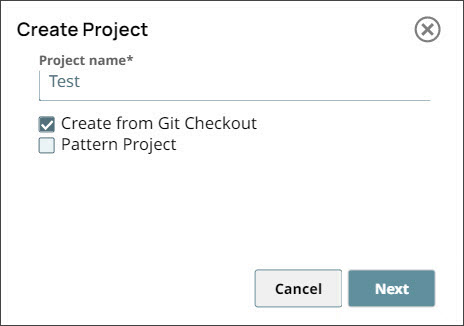
Enter a name in the Project name field.
Select the Create from Git Checkout checkbox to create a project.
Click Next.
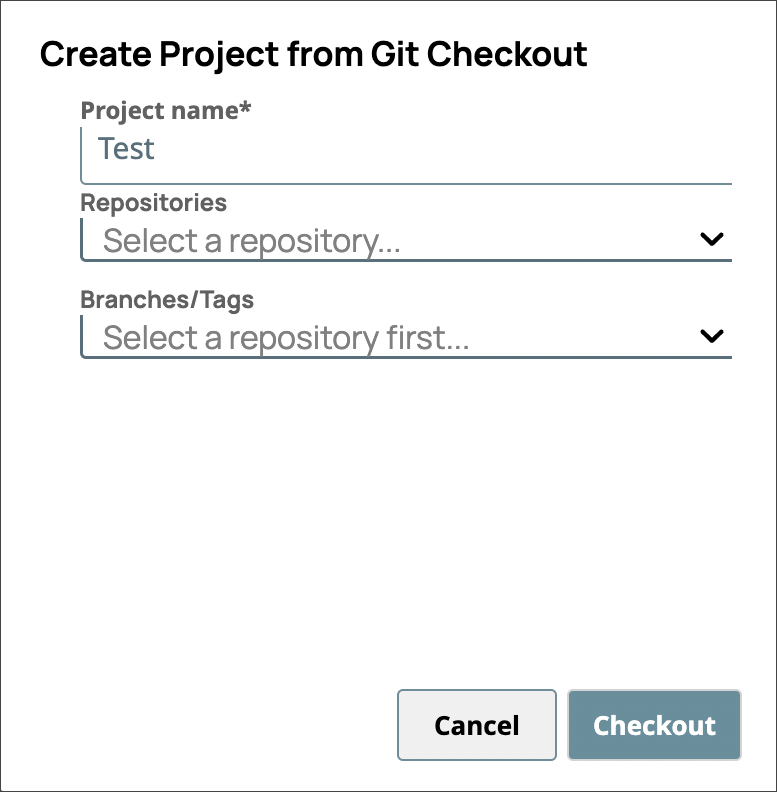
From the Repositories dropdown, select the repository to create the project from.
From the Branches/Tags dropdown, select the branch or tag to use.
Click Checkout to create the new Project.