In this article
Overview
Snaplex is a data processing engine used for Pipeline execution. A Snaplex contains multiple nodes and can be a Cloudplex or a Groundplex.
Prerequisites
- Only an Org Administrator can create a Snaplex.
- The options available for a Snaplex depend on the Snaplex type.
- To create a Snaplex, navigate to the target project in SnapLogic Manager.
- Perform either of the following actions:
- Click
 and from the dropdown list select Snaplex
OR - Click the Snaplex tab in the page that displays the assets for that Project.
The Create Snaplex dialog displays.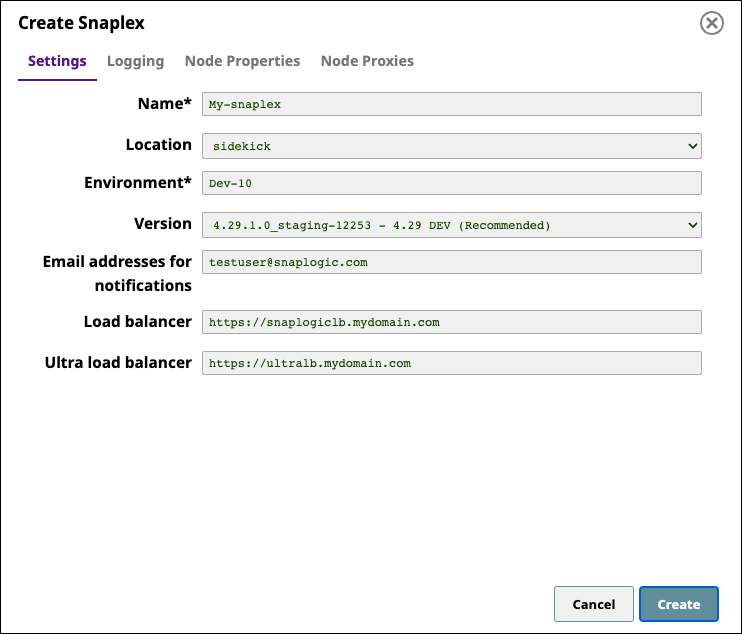
- Click
- Click each tab to configure the Snaplex:
- Click Create.
Support for Notifications through Slack
SnapLogic supports the Slack messaging app within the SnapLogic platform communications, enabling you as an Org admin to add Slack channels and recipients for your SnapLogic communications. If Slack is enabled in Manager > Settings, the Snaplex Settings tab contains fields to add channels and users to receive notifications. Learn more about adding Slack communications to your Org, SnapLogic Notifications through Slack.
Configuring the Snaplex Settings
The Create Snaplex dialog contains the following tabs:
- Settings
- Logging
- Node Properties
- Node Proxies (enabled only for Groundplex nodes).
Settings Tab
| Name | Specify a unique name for the Snaplex. The name must not exceed 100 characters. We recommend you use a descriptive name for your Snaplex, that you can identify it easily. Default Value: None |
|---|---|
| Location | Select the location where the Snaplex must be created. The available options are:
Default Value: Sidekick |
| Environment | Specify the value to configure the Snaplex nodes. Alphanumeric characters and the following special characters are allowed: ( . - + Default Value: None You cannot update the environment value if there are nodes running in the Snaplex. You must stop the Snaplex nodes first before updating the environment value. |
| Version | Specify the version of the SnapLogic Platform on which you want the Snaplex to run. By default, all new Snaplexes are configured to work with the latest version of the SnapLogic platform. To update your Snaplex version, from the Version list, select the SnapLogic Platform version (such as mrc216) that you want to use with the Snaplex. Once you save the Snaplex, a rolling restart of the nodes in the Snaplex is initiated. Sequentially each node in the Snaplex is put offline, and no new Pipelines are sent to the node. The node waits for a maximum of 15 minutes for currently running Pipelines to complete their execution. It then restarts itself with the specified version of the Snaplex binaries. Once these restarts are done, the Dashboard displays the updated nodes to be running with the specified version. Default value: Default |
Minimum nodes per Snaplex | The minimum number of nodes that must be kept alive even when there is no activity in the Snaplex. This property ensures that when a Pipeline that runs on the Snaplex is validated, at least one node is available to perform the validation. Minimum value: 1 Default Value: 1 |
| Email address for notifications | List the email addresses to notify if one of the Snaplex nodes does not respond for fifteen minutes. Default Value: N/A |
| Slack Channel for notifications | Specify the name of Slack channels (separated by commas) to notify if one of the Snaplex nodes does not respond in fifteen minutes. Default Value: None |
| Slack user for notifications | Enter the Slack recipients (separated by commas) to notify if one of the Snaplex nodes does not respond for fifteen minutes. Default Value: N/A |
| Load balancer | Specify the URL for the load balancer for Triggered Task execution requests. The load balancer URL has to be fully qualified, including the protocol. When you save the Load balancer URLs in the Snaplex settings, these details are used for Snaplex Trigger URL. Default Value: None |
Ultra load balancer | Specify the URL of the FeedMaster load balancer for Ultra Pipeline execution requests. This property is available only to Orgs that have subscribed to Ultra Pipeline Tasks. Default Value: None |
Snaplex Configuration changes
Snaplex nodes are typically configured using a slpropz configuration file, located in the $SL_ROOT/etc folder.
If you use the slpropz file as your Snaplex configuration, then:
- After a Snaplex node is started with the slpropz configuration, subsequent configuration updates are applied automatically.
- Changing the Snaplex properties in Manager causes each Snaplex node to download the updated slpropz and do a rolling restart with no downtime on Snaplex instances with more than one node.
- Some configuration changes, such as an update to the logging properties do not require a restart and are applied immediately.
- Some configuration properties like the Environment cannot be changed without doing manual updates for the slpropz files on the Snaplex nodes.
Older Installations
If you have an older Snaplex installation and its configuration is defined in the global.properties file, then the Environment value must match the jcc.environment value In the JCC global.properties file. To migrate your Snaplex configuration to the slpropz mechanism, see Migrating Older Snaplex Nodes.
You should always configure your Snaplex instances using the slpropz file because you do not have to edit the configuration files manually. Changes to the Snaplex done through Manager are applied automatically to all nodes in that Snaplex.
Load Balancer Settings
For Snaplex triggered pipeline and for Ultra API calls, a load balancer needs to be configured. SnapLogic will provision the load balancer for Cloudplexes when the Ultra feature is enabled. For Groundplexes, the customer has to provision the load balancer. After the load balancer is provisioned, the load balancer URL needs to be configured in the Snaplex properties. This will ensure that task details show the load balancer URLs rather than pointing to the Snaplex nodes.
For Snaplexes that have FeedMasters, the load balancer should point to the FeedMaster nodes. The "Ultra load balancer" property should be updated to point to the load balancer URL. This will ensure that all tasks details will point to this load balancer. This includes ultra and triggered tasks.
For Snaplexes that do not have FeedMasters, the load balancer should point to the JCC nodes. The "Load balancer" property should be updated to point to the JCC load balancer URL. The triggered tasks details page will point to this load balancer.
The load balancer is recommended to be configured with HTTPS enabled. If the load balancer URL is configured with HTTP instead of HTTPS, then the task details page will point to the load balancer for the HTTP URLs only. The HTTPS URLs will point to the Snaplex nodes rather than pointing to the load balancer.
Check Groundplex Requirements#LoadBalancerGuidelines for more details about the load balancer configuration guidelines.
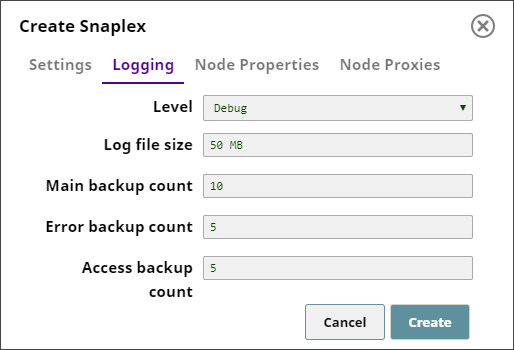
Logging Tab
Click the Logging tab to configure logs associated with the Snaplex that you want to create.
Note that the load balancer details are not populated for triggered tasks though provided in the Snaplex settings.
| Level | Specify the minimum level of logging–or the kind of details–that you want to enable for the new Snaplex. Available values:
Default Value: Debug |
|---|---|
| Log file size | The maximum size of the log file to be created for the Snaplex. Default Value: 50 MB We recommend that you use a descriptive name for your Snaplex, so that you can identify it easily. |
| Main backup count | The number of backup main log files that SnapLogic must maintain for the Snaplex. Default Value: 10 |
| Error backup count | The number of backup error log files that SnapLogic must maintain for the Snaplex. Default Value: 5 |
| Access backup count | The number of backup access log files that SnapLogic must maintain for the Snaplex. Default Value: 5 |
Node Properties Tab
Click the Node Properties tab to configure the nodes associated with the Snaplex that you want to create.
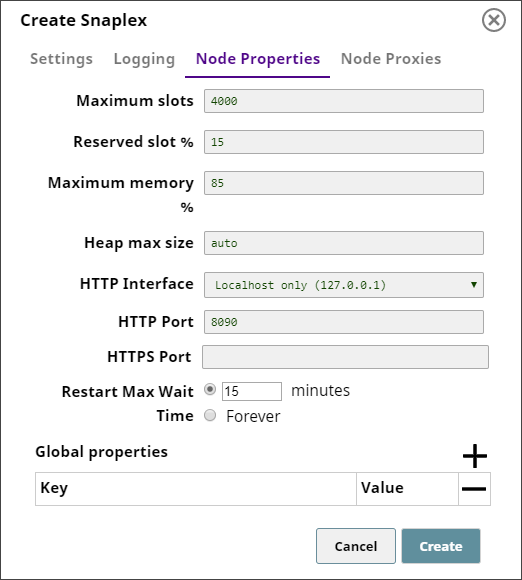
| Maximum slots | Each Snap in a Pipeline consumes a slot; so Pipelines can only be executed on nodes where the number of slots in use is below this threshold. Otherwise, they will fail or queued, depending on how they were executed. The number of slots in use corresponds to the number of active threads on a node, which can be viewed in the Snaplex Health dashboard. Default Value: 4000 A heuristic to use is that 2000 slots can be allocated per 8GB of RAM available on each Snaplex node. So for nodes with 16GB of RAM, use 4000 as the slot count. Reserved slots are used when a Pipeline or validation is executed manually from SnapLogic Designer. If no slots are reserved, then these interactive Pipeline executions—Pipeline executions run from Designer for testing or validation purposes—can be blocked by long running executions. You can adjust this setting based on your experience if the default value is not optimal. To reserve more slots for interactive sessions, set your value lower. If the Snaplex is not being used for interactive Pipeline building, set this value higher. |
|---|---|
| Reserved slot % | The percentage of slots that you want to reserve on a node for Pipelines executed through the Designer tab. Pipelines executed using Tasks or the ForEach Snap will not have access to these slots. Changes made to this setting do not require a restart. Default Value: 15 |
| Maximum memory % | The memory threshold at–and above–which no more Pipelines can be assigned to a node. Changes made to this setting do not require a restart. Default Value: 85 |
| Heap max size | Groundplex only. The maximum JVM heap size. Default Value: auto (meaning that SnapLogic will automatically set the max heap size based on the available machine memory). |
| HTTP Interface | Groundplex only. Specify the location from which the Snaplex node can accept HTTP network connections. The following options are available:
Default Value: Localhost only (127.0.0.1) |
| HTTP Port | Groundplex only. The HTTP port on which the Snaplex node listens for connections. Default Values: 8090 for a JCC node and 8091 for a FeedMaster. |
| HTTPS Port | Groundplex only. The HTTPS port on which the Snaplex node listens on for connections. Default Values: 8081 for a JCC node and 8084 for a FeedMaster. |
| Restart Maximum Wait Time | The maximum wait time before restarting a node. Default Value: 15 minutes |
| Global Properties (Key/Value pairs) | Groundplex only. Internal configuration options. Do not edit these values without contacting SnapLogic Customer Support. Default Value: None |
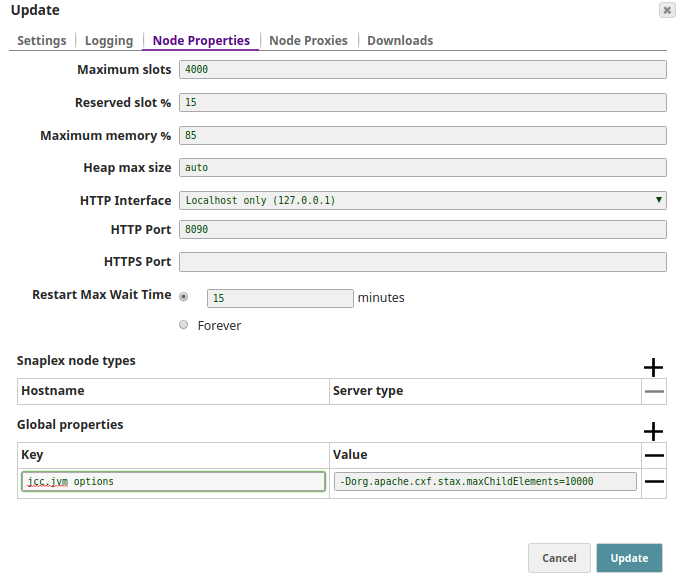
If you receive the following error: "reach the innerElementCountThreshold:50000", perform one of the following tasks:
- Configure the Global Properties of the Groundplex in the global.properties file ("/opt/snaplogic/etc/global.properties" in Linux; "c:\opt\snaplogic\etc\global.properties" in Windows) to increase the threshold value:
jcc.jvm_options = -Dorg.apache.cxf.stax.maxChildElements=<value>where 'value' is 1000000 or higher. OR - Add the same line as a global property in the node.
These properties are available only in a Groundplex.
Node Proxies Tab
Use the Node Proxies tab to control how the nodes communicate with an HTTP/HTTPS proxy server to communicate with the outside world. The Groundplex nodes must have been setup to use an .slpropz configuration file before changes to these properties will take effect. If you make changes that affect the software configuration, but there are nodes in the Snaplex that are not setup to use a .slpropz configuration file, a warning dialog will appear with a listing of the unmanaged nodes. See the Downloads section in Updating a Snaplex for more information on setting up a node to use this configuration mechanism.
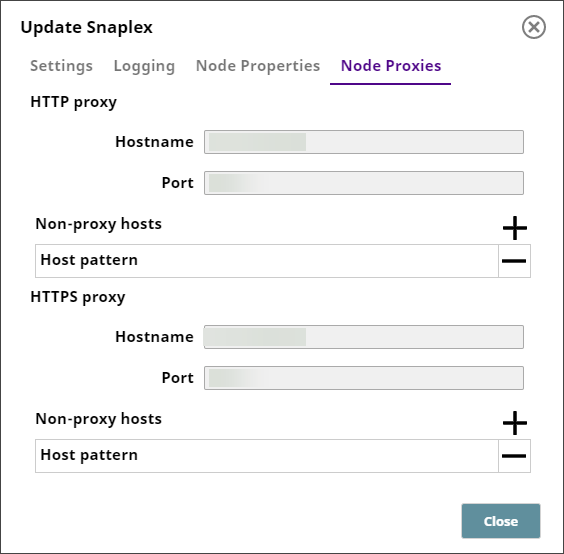
| HTTP proxy | Configuration details associated with the HTTP proxy server. |
|---|---|
| Hostname | The URL of the HTTP proxy host. Default Value: N/A. |
| Port | The port number on which the HTTP proxy host listens. Default Value: N/A |
| Non-proxy hosts: Host pattern | The hostnames or IP addresses that should be contacted directly instead of through the proxy. Patterns may start or end with a * for wildcards. |
| HTTPS proxy | Configuration details associated with the HTTPS proxy server. |
| Hostname | The URL of the HTTPS proxy host. Default Value: No default value. |
| Port | The port number on which the HTTPS proxy host listens. Default Value: N/A |
| Non-proxy hosts: Host pattern | The hostnames or IP addresses that should be contacted directly instead of through the proxy. Patterns may start or end with a * for wildcards. |