In this article
Overview
SnapLogic support for the Groundplex (also known as an on-premise Snaplex) on a Docker container empowers customers to optimize IT infrastructure costs while benefiting from containerized technology.
The latest SnapLogic Docker image is based on AlmaLinux. Since we host the Docker image in the Docker Hub, you need to perform a pull operation to retrieve the latest Docker image.
For Docker-based Snaplex installation, updating the Docker images updates the JRE version.
We recommend installing the latest JRE 11 version available at https://adoptium.net/temurin/releases/?version=11.
If you are running with 11.0.10 onwards, endpoint connections to TLS 1.0 and 1.1 are disabled by default. We recommend that you update the endpoint to support TLS 1.2 or higher, for security.
Prerequisites
Familiarity with the SnapLogic Snaplex installation process.
Review the Groundplex requirements.
Depending on your OS, review Groundplex installation for Linux or Windows.
Installing Groundplex in a Dockerized Container
Retrieve the latest Docker image from Docker Hub using the following pull command:
docker pull registry.hub.docker.com/snaplogic/snaplex:main-<build number>>
In SnapLogic Manager, navigate to your target Groundplex instance and click it to display the Update dialog.
In the Downloads tab, click
 in the Configuration option to download the
 slpropzfile for your Groundplex node.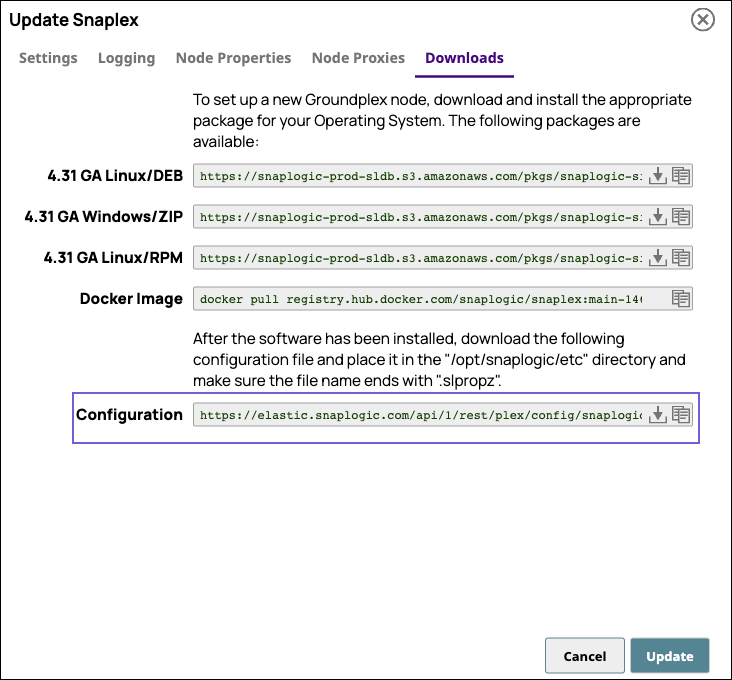
After downloading the configuration file, you are ready to launch your Groundplex as a Docker container.
Running a Snaplex Node from Docker
To run the Snaplex node from Docker:
Create a local directory <Configuration_Path>/etc, and add the
slpropzconfiguration file to the folder, ensuring that the file extension is .slpropz.Create an empty log folder <Log_Path>/log. The JCC logs are written to this directory.
Enter the following command to create and run the latest version of the Docker container image:
docker run -itd -h <Container_Host_Name> \
-p 8090:8090 -p 8081:8081 \
-v <CONFIG_PATH>/etc:/opt/snaplogic/etc \
-v <LOG_PATH>/log:/opt/snaplogic/run/log \
snaplogic/snaplex:latest
where:
-p enables port mapping, so that you can use the local dashboard and FeedMaster. You can also use other Docker networks, if required.
-v enables you to specify the Docker volume to use. Store the <Snaplex_Name>.slpropz in the /opt/snaplogic/etc directory.
For this command to work, you need to complete the following tasks:
Expose ports 8090 and 8081 for standard Snaplex nodes.
Expose port 8084 for FeedMaster nodes.
Mount the configuration file to the /opt/snaplogic/etc directory.
Example

Depending on how you install Docker, you may need to use sudo. For more information on the Docker run command, see Docker Run.