...
In this article
| Table of Contents | ||||
|---|---|---|---|---|
|
Overview
The API Policy Manager enables you to apply a range of authentication/authorization, traffic management, request transformation, and request validation policies to APIs. You can configure these API policies to be applicable at different levels in the hierarchy in the API Manager console, APIs, and API version. The API policies can also be applied to Org, the shared folder in a Project Space, and
...
Project folders. For example, when you apply a Request Size Limit policy to a Project, the
...
policy validates
...
any request with a request body sent to the Tasks
...
in that Project that does not exceed the limit
...
.
In addition to validating requests, you can use API policies to authenticate and authorize requests using various authentication methods. Without the API Policy Manager, an API can only be invoked by a user registered with the
...
SnapLogic® platform or by using a bearer token. With an APIM authenticator policy, clients can be authenticated through an OAuth2 server or a REST service,
...
and also other available authentication policies.
APIM supports OpenID Connect (OIDC) as an authentication method for your Generic OAuth2 API policy. Multiple Identity Providers are supported. When you set up Generic OAuth2 as the authorization agent with OIDC, your OIDC application becomes the authentication provider for the API.
Policies Snap Pack
API Policies are available
...
in your Org when you subscribe to the APIM feature and Policies Snap Pack. Despite its name, the Policies Snap Pack does not contain Snaps, but it does function like other Snap Packs.
You can configure Snap Pack to use one of the two following distributions:
Stable contains policies that have been available for a few releases. This distribution is updated quarterly release.
Latest contains the newest policies and policy features. This distribution is typically updated every month.
The distributions are determined by the Snaplex version updates, which coincide with the monthly and quarterly releases.
The following resources provide more information about the SnapLogic release process:
Learn more about Snap Packs
Learn more about Snaplex versions
Learn more about the SnapLogic Release Calendar
Policies Snap Pack Settings in Classic Manager
You can change Snap Pack versions in the Snap Packs page, which includes a View distribution menu. Options include:
New: This option shows Snap Pack choices (Latest or Stable) for an updated Snaplex.
Old: This option shows Snap Pack choices (Latest or Stable) for a deprecated Snaplex.
You can set the View Distribution and Policies Snap Pack version here.
...
Policies Snap Pack Settings in Admin Manager
You can change the View Distribution and Policies Snap Pack settings in Admin Manager. Learn More.
Supported API Policies
Authentication and Authorization
These policies manage the authorization and authentication of the API caller. The Generic OAuth2 policy is the most common. It requires a third-party service in its setup. You can also use OpenID Connect provider with Generic OAuth2. The OAuth 2.0 Client Credentials policy is a variation on OAuth 2.0 workflow where the authentication flow is based on the Client Credential flow from Okta. The API Key Authenticator provides another authentication mechanism in its use of a key that serves as a license for using the API. The Callout Authenticator provides an alternative to the Generic OAuth2 authentication flow.
Authentication Policy Requirement
All authentication policies require the Authorize By Role policy to authenticate the API caller.
Anonymous Authenticator: Allows anonymous access to a Task. The user’s roles are taken from the Anonymous Authenticator API policy configuration.
API Key Authenticator: Authenticates a client using API keys passed as a header or query parameter.
Authorize By Role: Authorizes a request based on the role associated with the client. If a request is not authorized, it is rejected with a
403 Forbiddenerror.Callout Authenticator: Authenticates a client by calling out to a REST service to validate a token in the request and then authenticating the user.
Generic OAuth2: Authenticates requests from users registered in an existing identity provider.
JWT Validator: Authenticates a request with a token.
OAuth 2.0 Client Credentials: Authenticates users with a token in your OAuth 2.0 environment.
Inbound/Outbound
These policies provide authentication and enhanced security for inbound and outbound traffic across your Snaplexes and 3rd-party endpoint servers.
Inbound TLS: Use this policy with APIM Proxies to ensure that inbound endpoints are verified by TLS certificates during API processing. Supported by Groundplexes only.
Outbound Basic Auth: Use the Outbound Basic Auth Policy to set up a Basic Authentication account for verification at a proxy endpoint level when you establish a connection with a service or a system.
Outbound OAuth2: Use this policy to set specific OAuth2 parameters such as authorization URL's which are generated through access tokens with client credentials (client ID and client secret) to enforce OAuth2 authentication for upstream API calls.
Outbound TLS: Use this policy with APIM Proxies to ensure that outbound endpoints are verified by TLS certificates during API processing.
Validation
Validation policies apply validation criteria during the process of policy application. Some policies provide additional layers of security, for example, the SQL Threat Detector and Request Size Limit policies. Other policies, such as JSON and XML validator policies, enforce compliance. The Early and Authorized Request policies provide generic mechanisms for enforcing compliance. For example, if a request must contain a specific HTTP header, you can configure either of these policies to reject the request if it does not contain the header.
Authorized Request Validator: Validates
...
a request after authorization and returns a customized response.
...
Early Request Validator: Validates a request before authentication and returns a customized response.
JSON Validator: Validates a request against a JSON schema
SQL Threat Detector: Protects APIs against SQL commands injected in the header, path, query, and payload of incoming HTTP requests.
XML XSD Validator: Validates a request against an XML XSD schema.
XML DTD Validator: Validates a request against an XML DTD schema.
Traffic Shaping
These policies enable the manipulation of incoming request traffic. You can use these policies to protect your API gateways from being overloaded with too many requests (Request Size Limit) or even eliminate traffic from specific sources (IP Restriction). The HTTP Redirect policy allows you to divert requests by customizing the HTTP 300 codes when your API is down because of maintenance.
Client Throttling: Limits Task invocations for a
...
specific client
...
during a
...
specific time period by throttling or rejecting requests from that client.
...
Install this API policy
...
to help protect a Snaplex from being overloaded by too many requests.
...
...
Size Limit: Limits the size of each request.
IP Restriction: Restricts access based on the client IP address of the request. If the request does not meet the configured requirements, it is rejected with a 403 Forbidden error.
...
CORS Restriction: Sets the appropriate headers for requests coming from a different domain so that the response is not blocked by the browser.
HTTP Redirect: Manages HTTP redirection for API requests.
HTTP Response Cache: Use this policy for highly reoccurring and static responses to manage latency and response times, which can reduce the load on the upstream API as well as the proxy server.
HTTP Retry: Use this policy to set up retry logic for requests made to your Proxy and Proxy endpoints.
Transformation
These policies enable you to change the requests or responses based on criteria. You can use these policies to add or modify headers.
...
Request Transformer: Transforms a request before it is passed onto the remaining API policies and, finally, the Pipeline to be executed.
...
| title | Authentication Policy Requirement |
|---|
Response Mapper: Transforms the response body. The policy controls provide expression/target path mappings and a Pass Through option for unaffected mappings.
Response Transformer: Transforms the response headers of the API. You can use this policy to add, remove, or modify response headers.
SnapLogic Expression Language Support
All API policies leverage
...
the SnapLogic Expression Language. Every policy has an expression-enabled field
...
![]() for the When
for the When
...
this policy should be applied setting, where you can create an expression using the built-in operators in the platform.
...
Clicking ![]() displays the selector for various operators, document values, and arrow functions, providing greater flexibility to use conditional logic to apply the policy. Several API policies also support expression-enabled fields for their settings.
displays the selector for various operators, document values, and arrow functions, providing greater flexibility to use conditional logic to apply the policy. Several API policies also support expression-enabled fields for their settings.
Additionally, you can also use API
...
Manager Functions to create an expression based on the asset, Snaplex, or request itself. When the expressions field icon is disabled (
...
)
...
, you can enter a string.
API Policy Manager Asset Support
You can use the API Policy Manager to apply API policies to the following SnapLogic assets.
Org: Select the Shared folder under your Org to apply API policies at the Org level (only Org admins have this access).
API: Apply API policies at the API level API Manager console.
Version: Apply API policies at the version level in the API Manager console.
Project Space: Select the shared folder in your Project Space to apply API policies at the Project Space level in Manager.
Project: Select the project to apply API policies at the project level in Manager.
Applying Policies at the Org level
In Manager, click the shared folder for your Org (also known as the global shared folder), then click Manage API Policy to view the API Policy Manager -shared dialog window, which displays a list of existing API policies and their status.
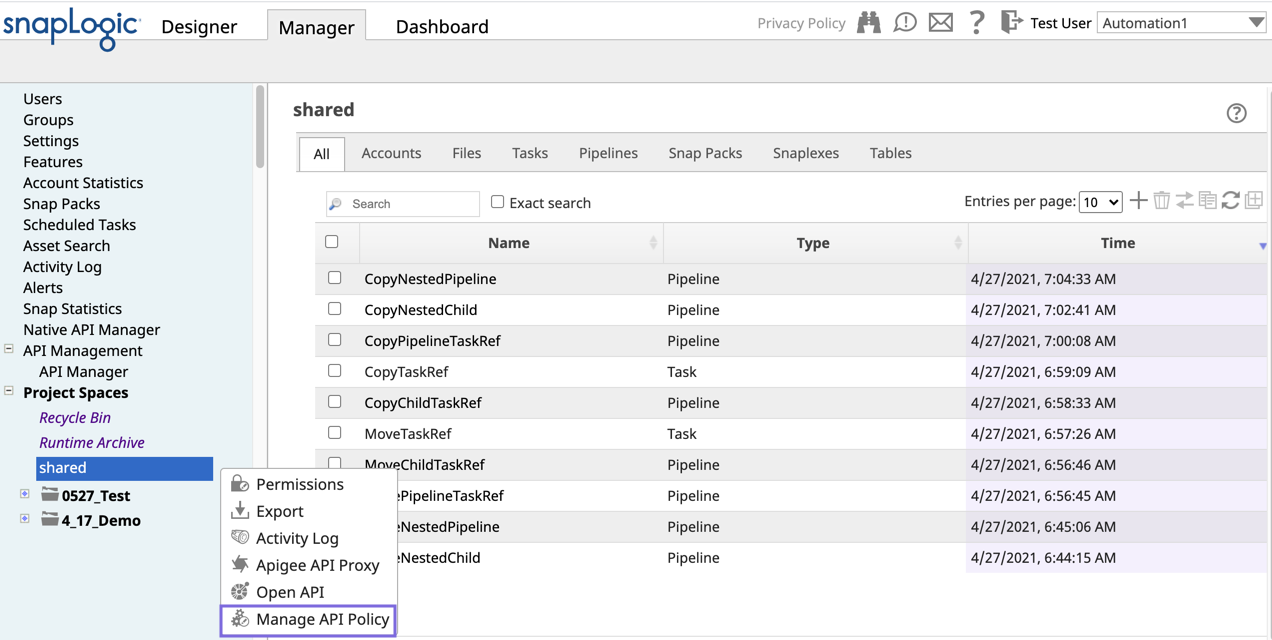
In the API Policy Manager -shared dialog window, click Add Policy to view list of policies.
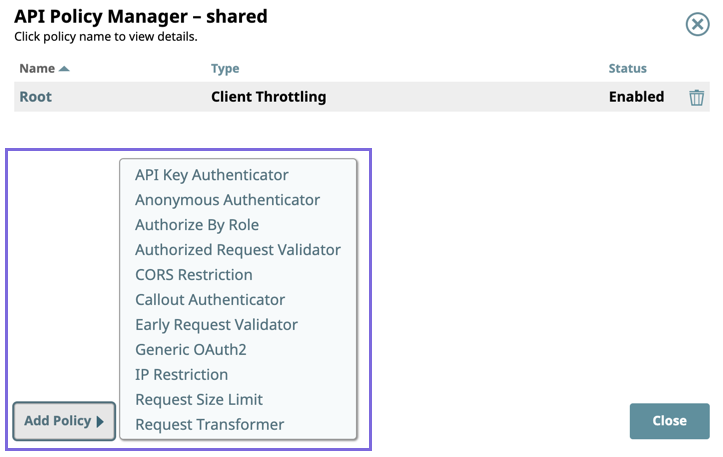
Select a policy from the list of policies to display the settings dialog window.
Enter/modify the fields to configure the policy as required, then click Validate and Save.
The policy settings dialog window closes and your policy is displayed in the API Policy Manager-shared dialog window.
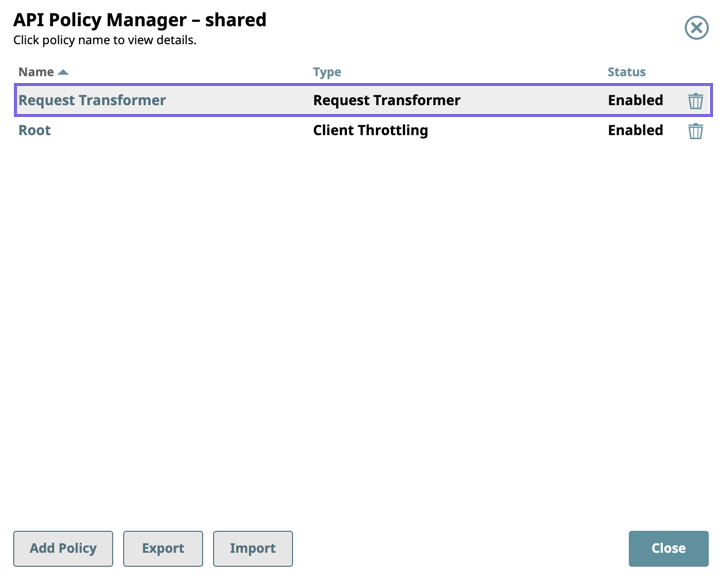
You can also import and export policies in the API Policy Manager-shared dialog window.
Applying Policies in the API Manager console
You can apply policies at the API and API version level.
Adding API Policies to APIs
In SnapLogic Manager, click Settings > API Management > API Manager.
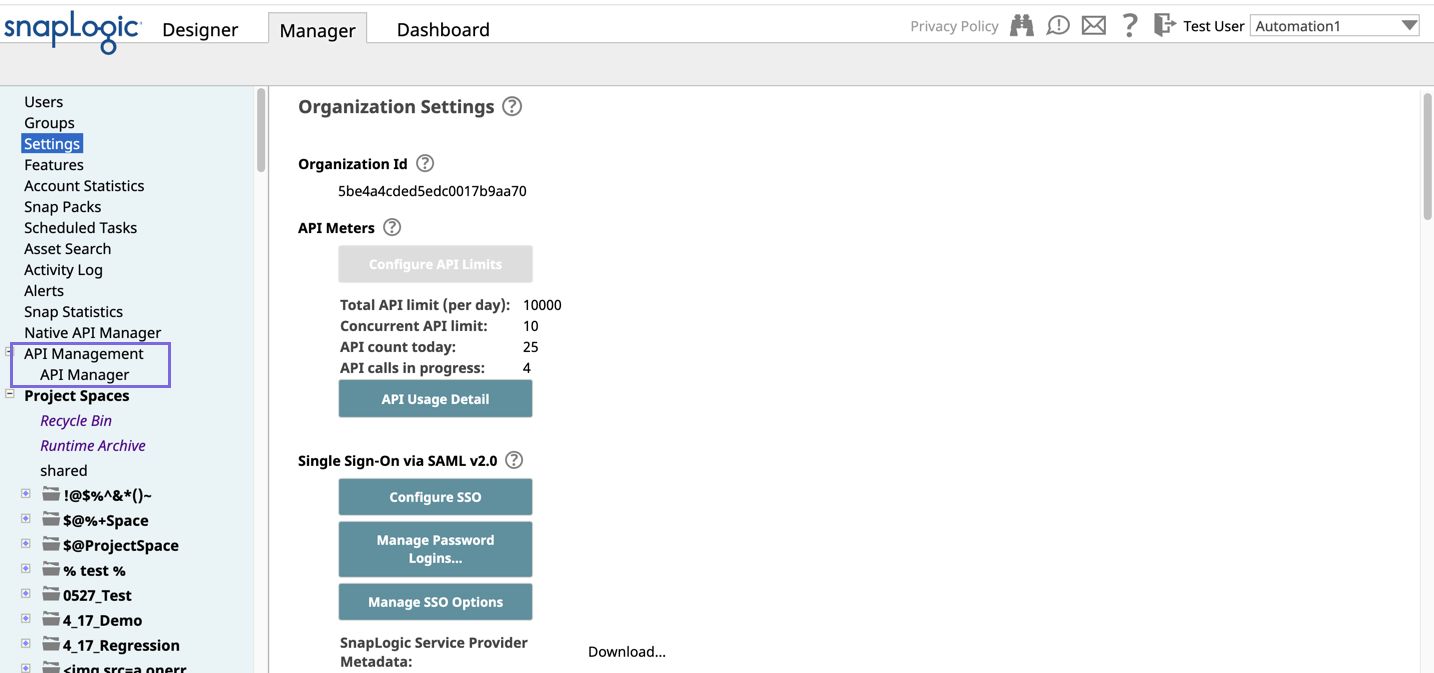
The API Manager page is displayed.
...
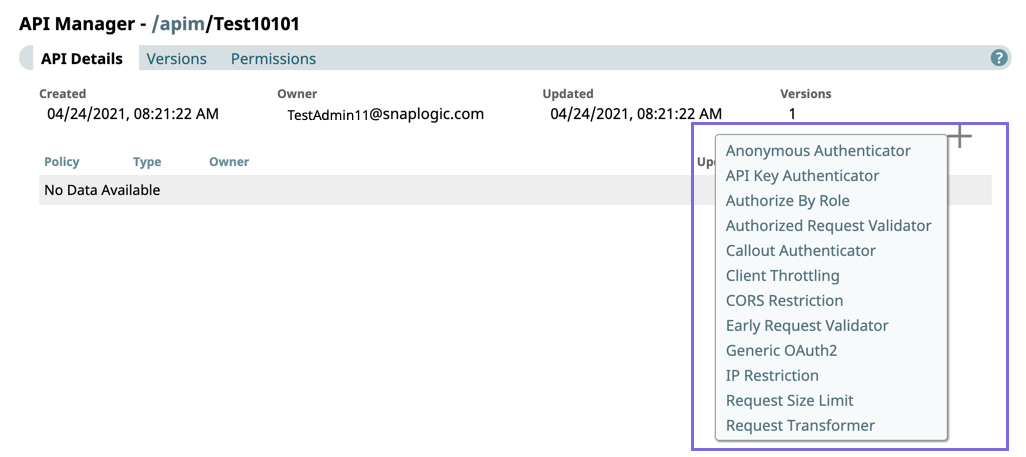
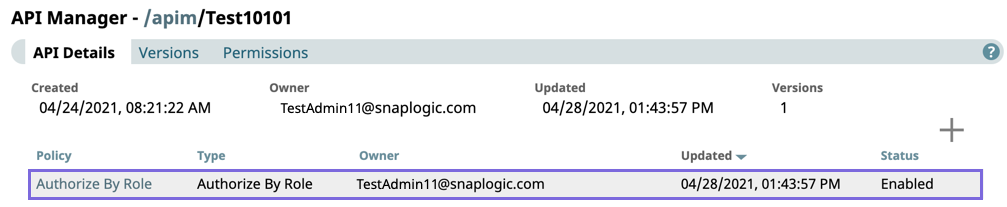
Click the target API to display the API Details page, and click ![]() to display the list of API policies.
to display the list of API policies.
...
Click Validate and Save.
The policy settings dialog window closes, and your policy is displayed on the API Details page.
Adding API Policies to API Versions
In SnapLogic Manager, click Settings > API Management > API Manager.
The API Manager page is displayed.
...
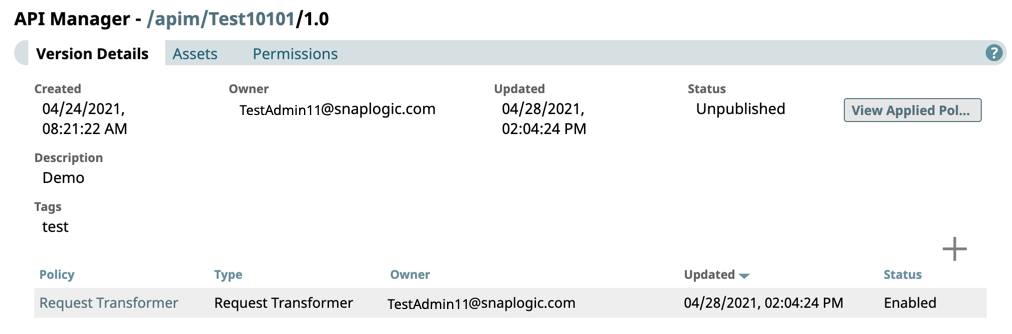
In the API Details page, click the Versions tab, then click the target API version to view the Version Details page.
...
Click Validate and Save.
The policy settings dialog window closes, and your policy is displayed in the API Details page.
Adding API Policies to Project Spaces/Projects in Manager
| Note |
|---|
For projects and Project Spaces, all API policies applied at a hierarchy level are automatically applied to all Tasks at that level. For example, an API policy applied at the Project Space level automatically applies to all Tasks within all the Projects inside that Project Space. If the same API policy type is applied at a Project Space and a Project, then the configuration of the lower-level API policy is used. |
In Manager, select the target Project Space/project, click ![]() to display the dropdown list, and select Manage API Policy to display the API Policy Manager dialog window.
to display the dropdown list, and select Manage API Policy to display the API Policy Manager dialog window.
...
Click Add Policy. A list of all the API policy types appears.
...
Click the API policy that you want to add. The settings dialog window for that policy is displayed.
...
Click Close to close the API Policy Manager dialog.
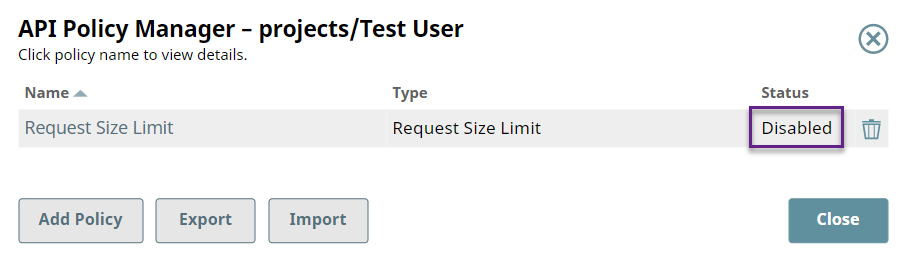
Enabling/Disabling Policies at the Org and Project Level
Open the API Policy Manager dialog.
Click the target API policy to open its settings.
Change the value of the Status field.
Click Validate & Save. You can confirm the Status of the API policy is updated. To enable the API policy, repeat steps 2 through 4.
| Note |
|---|
Adding the same API policy type at a lower-level in the hierarchy automatically overrides all API policies of the same type at higher levels. For example, if a Callout Authenticator API policy is added at an Org-level and also at the project-space-level, the Org-level is automatically overridden as far as the Tasks within that Project Space are concerned. |
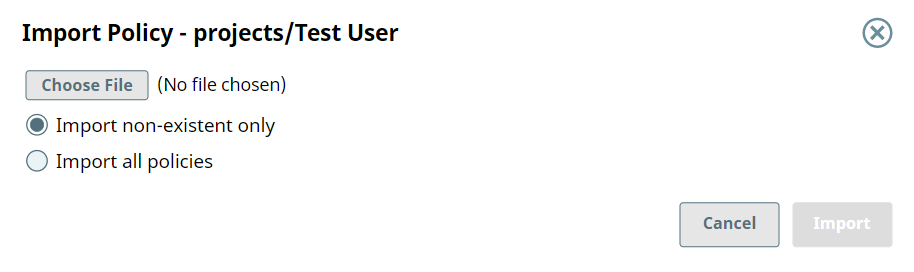
Importing Policies in Manager
| Note |
|---|
The policies in the API Policy Manager are SnapLogic Assets that share the same permissions as those described in Migrating Accounts. Policies can be imported only between trusted Orgs. |
...
Select Choose File and navigate to the target file.
Import non-existent only: (Default) Only uploads API policies in the selected file that do not already exist in the Project Folder.
Import all policies: Imports all API policies in the selected file.
...
Click Import. The Import Policy Result popup appears with the following Status:
Added: The API policies added to the Project Folder.
Overwritten: The existing API policies overwritten by the imported ones.
Ignored: The existing API policies not overwritten by the imported ones.
Viewing Policies for a Task
...
Click ![]() to display the Tasks menu, then select Related API Policy.
to display the Tasks menu, then select Related API Policy.
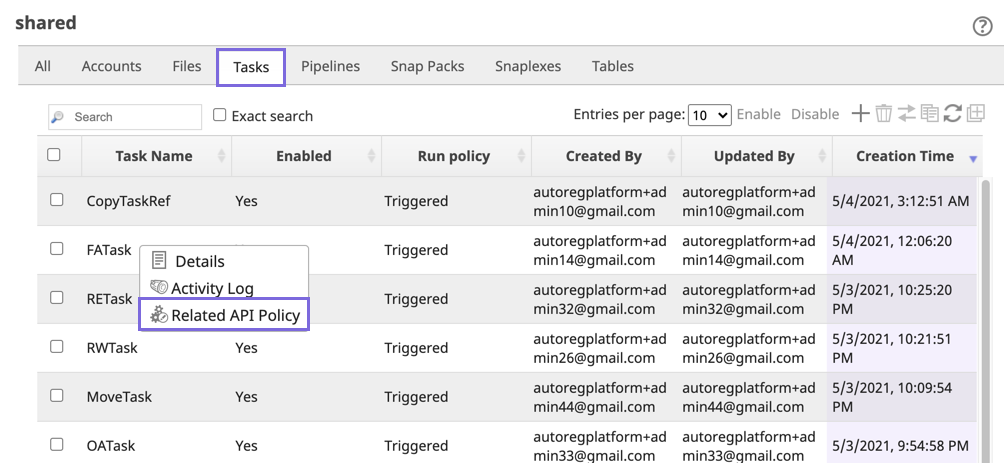
The Related Policies dialog window for the target Task is displayed.
...
Click the Hierarchy tab to display the policy hierarchy.
...
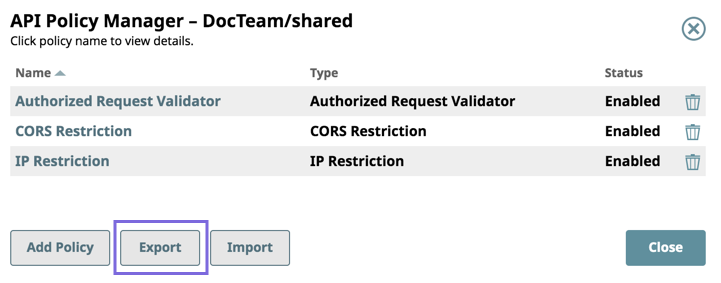
Exporting Policies
Navigate to the target Project Space or project in SnapLogic Manager.
Right-click on the project folder to display the dropdown menu, and click Manage API Policy.
When the API Policy Manager dialog appears, click Export. The API policies are downloaded to the specified folder (the default is the Downloads folder on your machine).
Deleting Policies in Manager
Open the API Policy Manager dialog.
Click the
 button for the API policy to delete.
In the confirmation prompt, click Delete. The API policy is deleted.
Editing Policies
You can edit an API Policy by clicking it to display its settings.
...
Depending on the asset associated with the API policy, choose one of the following methods to view the settings dialog window for an API policy.
- For an Org:
- Navigate to the Org-level shared folder in Manager, and place the cursor over the target Project Space/project,
- Click
 to view the dropdownlist and select Manage API Policy.
- For a Project Space or project,
- Navigate to the target asset in Manager, and place the cursor over the target Project Space/project,
- Click to view the dropdownlist and select Manage API Policy.
- For the API Management space, click the target API policy at one of the following levels:
- Org-level shared folder.
- API Details page
- Version Details page
...
Open ID Connect Support
OpenID Connect (OIDC) is an authentication protocol that operates with the OAuth 2.0 protocol to allow clients to authenticate end-users and obtain basic user profile information. In conjunction with OAuth 2.0, OIDC verifies users' identity across multiple websites without needing to create a separate password for each site. It builds upon the OAuth 2.0 protocol, which was designed for authorization. In simpler terms, while OAuth 2.0 lets applications get permission to access resources on behalf of a user, OpenID Connect confirms who the user is.
In the APIM workflow where OIDC and OAuth 2.0 are implemented for authorization and authentication, the API consumer calls your API through a browser, also known as the client, which sends you to the Identity Provider (IdP) to sign in. This service could be Google, Azure, or any organization that supports OIDC through an identity provider. Then, the API consumer logs into the IdP, if not already logged in. If the consumer is calling the API for the first time using this service for the website, the IdP might ask prompt the caller to share certain information with the website. Once the consumer is authenticated and given any necessary consent, the IdP sends an ID token back to the browser. This ID token is a secure piece of data confirming your identity. The browser reads this ID token and confirms your identity.
To keep things secure, the system has several checks and measures in the background. For example, tokens have expiration times, and the information in the tokens is encoded to prevent tampering.
See the following diagram for a representation of the authorization and authentication flow using OIDC with SnapLogic APIM:
...
OIDC Components
Here's a simplified overview of how OIDC works:
Authentication Request: A web application (also known as the client) directs the user to the OIDC IdP, requesting authentication. This is typically done through a browser redirect.
Authentication: The IdP prompts the user to authenticate by entering a username and password.
Authorization: If the user hasn't already granted the client permission to access their data, the IdP asks them for consent.
Authentication Response: After successful authentication and authorization, the IdP redirects the user back to the client. This redirect includes an authorization code, which is passed in the URL.
Token Request: Using the authorization code, the client makes a request directly to the IdP to exchange the code for an ID token and an access token.
Token Response: The IdP sends the ID token and access token to the client.
ID Token: The JSON Web Token (JWT) that contains information about who the user is, when they are authenticated, and how long the token is valid.
Access Token: This is a bearer token that the client can use to access protected resources on behalf of the user. For OIDC, it often allows the client to retrieve more information about the user from the IdP.
Discovery Document: A document that contains all the endpoints provided by OpenID Connect Providers. It always has the suffix
.well-known/openid-configurationUserInfo Endpoint: Optionally, the client can use the access token to request additional user information from the IdP's UserInfo endpoint.
OIDC has been adopted by many leading technology companies and platforms because it offers a standardized and secure way of doing user authentication across different services and applications.
Workflow for Setting up OIDC
The following steps represent a generic workflow for setting up OIDC to work with your Generic OAuth2 API policies.
Register Your Application:
Create a new application or client in the OIDC provider's UI.
Ensure that you set the redirect URI to point back to your application where the OIDC Provider can send the authentication response.
OpenID Connect Discovery Document URL. Add your domain to the discovery URL.
Integrate OIDC in your client:
Authentication Request: When a user needs to authenticate, redirect them to the OIDC provider's authorization endpoint. The URL could include parameters such as client_id, response_type, scope, and redirect_uri.
Handle Authentication Response: After the user authenticates and authorizes your application, the OIDC provider will redirect back to your specified redirect URI. This will include an authorization code.
Token Exchange: Your application then exchanges this authorization code for an ID token and access token by making a POST request to the OIDC provider's token endpoint.
ID Token Verification: Verify the ID token's signature and validate its claims to ensure the token’s validity.
Protect Your API Endpoints with the following:
Token Inspection: When a client sends a request to your API with an access token (typically in the Authorization header as a Bearer token), your API should validate the token. This can be done locally if the OIDC Provider uses a public key for signing tokens or by calling an introspection endpoint provided by the OIDC Provider.
Scope Validation: OIDC allows you to define scopes that represent different permissions. Ensure your API policy checks that the provided token has the required scope for the desired operation.
Extract User Information: From a valid ID token or from the UserInfo endpoint provided by the OIDC using the access token.
Best Practices for OIDC Implementation
Implement an Application Logout. Implement a logout mechanism that clears tokens from the client and optionally logs the user out of the OIDC provider.
Secure Your Implementation. Always use HTTPS. Regularly review OIDC best practices and ensure your implementation stays updated. Handle tokens securely by not exposing them unnecessarily and using secure cookie policies and storage mechanisms.
Test Your Implementation. Before going live, thoroughly test the OIDC flow from the user’s perspective, and verify that tokens are validated correctly on your API.
Document the authentication process for users or developers that will consume your API. This should include details on how to obtain tokens, how to use them with your API, and any relevant information about token expiration and renewal.
We recommend that you follow the official documentation of the OIDC Provider and consult security best practices when implementing authentication and authorization mechanisms.