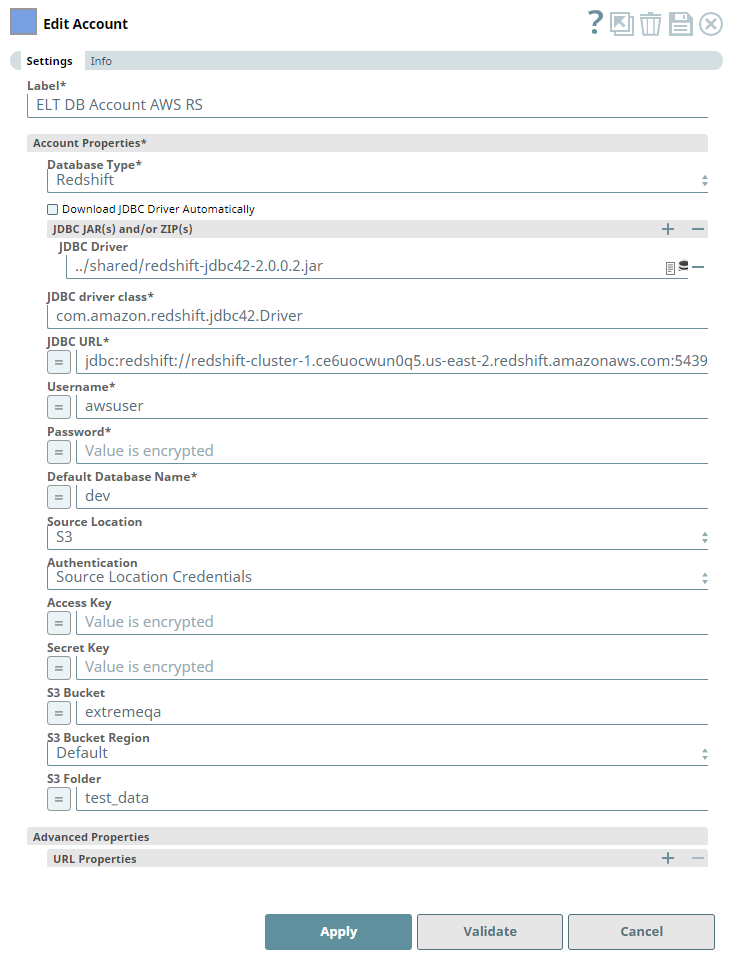
This article explains how to configure an ELT Database Account to connect to a Redshift target database. It assumes that you have selected Redshift as the Database Type.
Account Settings
Click the = (Expression) button in the Account's configuration, if available, to define the corresponding field value using expression language and Pipeline parameters.
Fields marked with an asterisk ( * ) in the table below are mandatory.
| Parameter | Field Dependency | Description | ||
|---|---|---|---|---|
| Label* | None. | Required. Unique user-provided label for the account. Default Value: N/A Example: ELT Account | ||
| Account Properties* | Use this field set to configure the information required to establish a JDBC connection with the account. This field set consists of the following fields:
| |||
| Database Type* | None. | Required. Select the target data warehouse into which the queries must be loaded, Redshift in this case. This selection activates the Source Location field. Default Value: N/A Example: Redshift | ||
| Download JDBC Driver Automatically | Checkbox | Select this checkbox to allow the Snap account to download the certified JDBC Driver based on the Database Type you have selected. The following fields are disabled when this checkbox is selected.
To use a JDBC Driver of your choice, clear this checkbox, upload (to SLDB), and choose the required JAR files in the JDBC JAR(s) and/or ZIP(s): JDBC Driver field. Use of Custom JDBC JAR version You can use different JAR file versions than those listed here. We recommend that you use the listed JAR file versions. See the latest Release Notes for more details. Default Value: Not Selected Example: Selected | ||
| JDBC JAR(s) and/or ZIP(s): JDBC Driver | Required when the Download JDBC Driver Automatically checkbox is not selected. | Upload the JDBC driver and other JAR files that you want to use into SLDB. Click Default Value: N/A Example: redshift-jdbc42-2.0.0.2.jar | ||
| JDBC driver class* | Required when the Download JDBC Driver Automatically checkbox is not selected. | Specify the driver class to use for your application. We recommend that you use amazon.redshift.jdbc42.Driver for Redshift as other classes and methods may change due to future enhancements. Default Value: N/A Example: amazon.redshift.jdbc42.Driver | ||
| JDBC URL* | None. | Required. Enter the JDBC driver connection string that you want to use for connecting to a Redshift instance. Use the appropriate syntax provided below.
Alternatively, you can make use of the Username, Password, and Database Name fields, along with the Advanced Properties > URL Properties field set to provide the parameters required for building your JDBC URL. See Passing your JDBC URL for more information. Avoid passing Password inside the JDBC URL If you specify the password inside the JDBC URL, it is saved as it is and is not encrypted. We recommend passing your password using the Password field provided, instead, to ensure that your password is encrypted. Default Value: N/A Example: jdbc:redshift://redshift-cluster-1.ce6uocwun0q5.us-east-2.redshift.amazonaws.com:5439 | ||
| Username* | None. | Enter the username provided for your database account. Default value: N/A Example: Bigdatasnaplogic | ||
| Password* | None. | Enter the password for the username specified above. Default value: N/A Example: <Encrypted> | ||
| Default Database Name* | String | Enter the name of the database to use by default. This database is used if you do not specify one in the ELT Select, ELT Insert-Select, or ELT Merge Into Snaps. Default value: N/A Example: EMPLOYEEDB | ||
| Source Location* | Database Type is Redshift. | Select the source data warehouse from which to load data into the target database. You must configure this field if you want to use the ELT Load Snap. Available options are:
Default value: None Example: S3 | ||
| Authentication | Source Location is S3. | Select the authentication method to use for the loaded data. Available options are:
Default value: Source Location Credentials Example: IAM Role | ||
| IAM Role | Source Location is S3 and Authentication is IAM Role. | Enter the IAM role associated with the target Redshift cluster. See Create an IAM Role for details on creating and associating IAM Role with your Redshift cluster. Default value: N/A Example: myiamrole | ||
| Access Key | Source Location is S3 and Authentication is Source Location Credentials. | Enter the access key ID associated with your AWS S3 account. Default value: N/A Example: ABCDEFGHIJKL1MNOPQRS | ||
| Secret Key | Source Location is S3 and Authentication is Source Location Credentials. | Enter the client secret key associated with your AWS S3 account. Default value: N/A Example: aBcdeFGhiJKLM/N1OPQRS/tUvWxyZABCDEFGHIJKLMN | ||
| Session Access Key | Source Location is S3 and Authentication is Source Location Session Credentials. | Enter the access key ID associated with your AWS S3 account. Default value: N/A Example: ABCDEFGHIJKL1MNOPQRS | ||
| Session Secret Key | Source Location is S3 and Authentication is Source Location Session Credentials. | Enter the client secret key associated with your AWS S3 account. Default value: N/A Example: aBcdeFGhiJKLM/N1OPQRS/tUvWxyZABCDEFGHIJKLMN | ||
| Session Token | Source Location is S3 and Authentication is Source Location Session Credentials. | Enter the session token value when the authorization to access the S3 folder is based on Security Token Service (STS) based temporary credentials. Default value: N/A Example: A%1DEFGH1Ijk2Lm3noI3OlWTjEg2tYkboXr1P9ZUXDtkk%3D | ||
| S3 Bucket | Source Location is S3. | Enter the name of the bucket from which to load the data. Default value: N/A Example: employeedata | ||
| S3 Bucket Region | Source Location is S3. | Select the region of your Redshift cluster if it is different from the region of the S3 bucket. Available options are:
Default value: Default Example: us-east-1, us-east-2 | ||
| S3 Folder | Source Location is S3. | Enter the name of the folder in the S3 bucket specified above where the source files are located. Default value: N/A Example: hrdepartment | ||
| Advanced Properties | Other parameters that you want to specify as URL properties. See the following resources for a list of parameters that can be specified in this field set. This field set consists of the following fields:
| |||
| URL Properties | String/Integer | The account parameter's name and its corresponding value. Click + to add more rows. Add each URL property-value pair in a separate row. Specify the name of the parameter in the URL Property Name field and its value in the URL Property Value field. Default value: N/A Example: MAX_CONCURRENCY_LEVEL: 3 | ||
Click Validate after entering the required details to ensure that all fields have been filled accurately. Click Apply to save the settings.
Passing your JDBC URL
Order of Precedence
The parameter values for the URL used to connect to your target database are governed by the following order of precedence:
- JDBC URL field
- Snap Properties (including Advanced Properties)
- Default values
Default Properties set internally
The following properties are passed in the URL internally, by default:
| Parameter | Value |
|---|---|
tcpKeepAlive | true |
Specific Scenarios
When setting default values for the Database Name, Username, and Password fields:
As a best practice, ensure that the Default Database Name provided in the Snap's properties and the database name in the JDBC URL field match.
Else, make sure that both the database names exist.
However, the username and password from the JDBC URL take precedence over the values provided in the respective fields.
Locating the JDBC URL for Redshift database
Perform the following steps to locate and use the JDBC URL for your Redshift database instance.
- Log into your AWS Console.
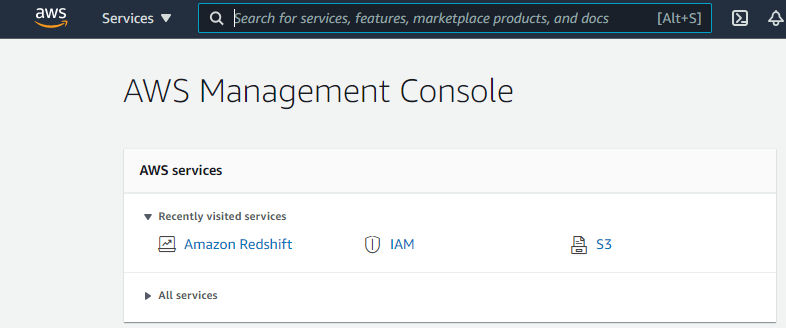
- Click Amazon Redshift.
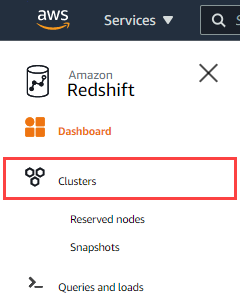
- Click Clusters in the left navigation menu. Ensure that your IT administrator has provided access to the Redshift cluster that you want to use.
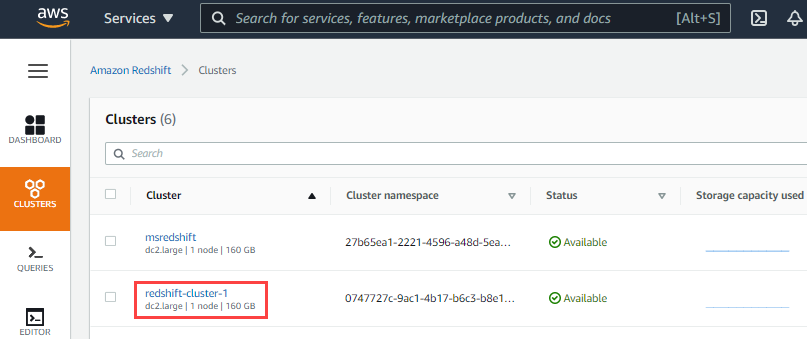
- Click the Cluster name hyperlink in the list of clusters provided.
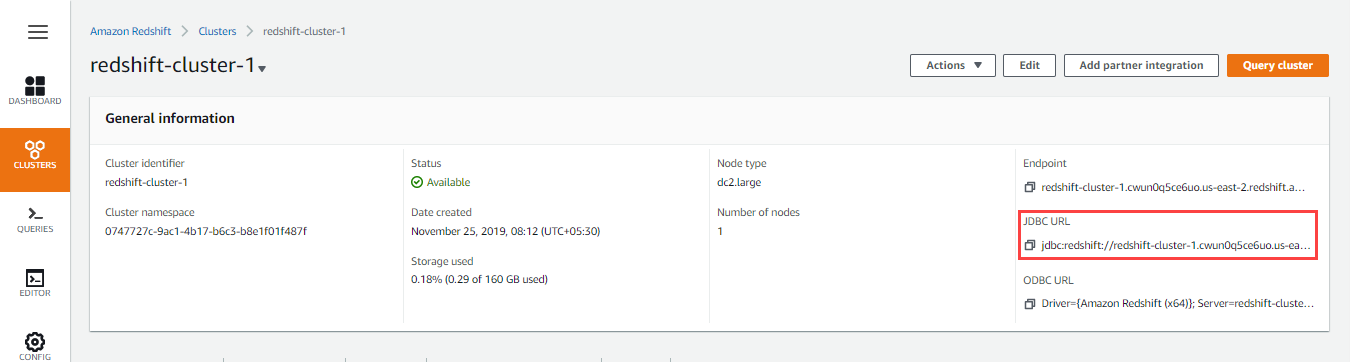
- Click
 next to the JDBC URL to copy the JDBC URL displayed. Paste this URL in your Snap's account settings.
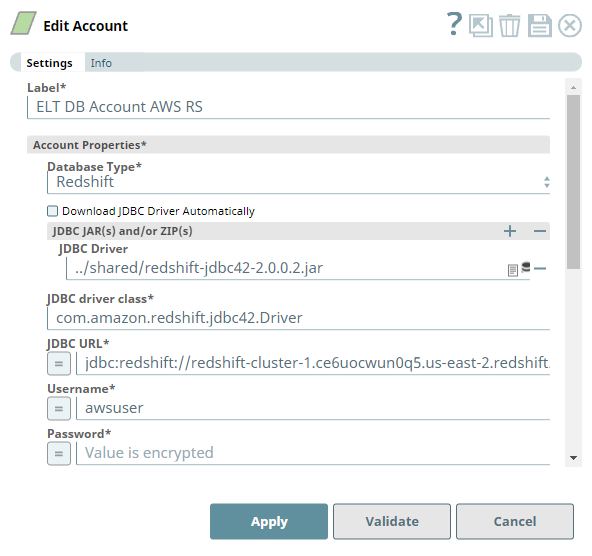
Troubleshooting
None.
Example
Configuring the ELT Database Account for connecting to a Redshift Database
The following Pipeline is designed to extract data from a CSV file residing in the S3 bucket and load it into a new table in the Redshift database.
Snap Settings
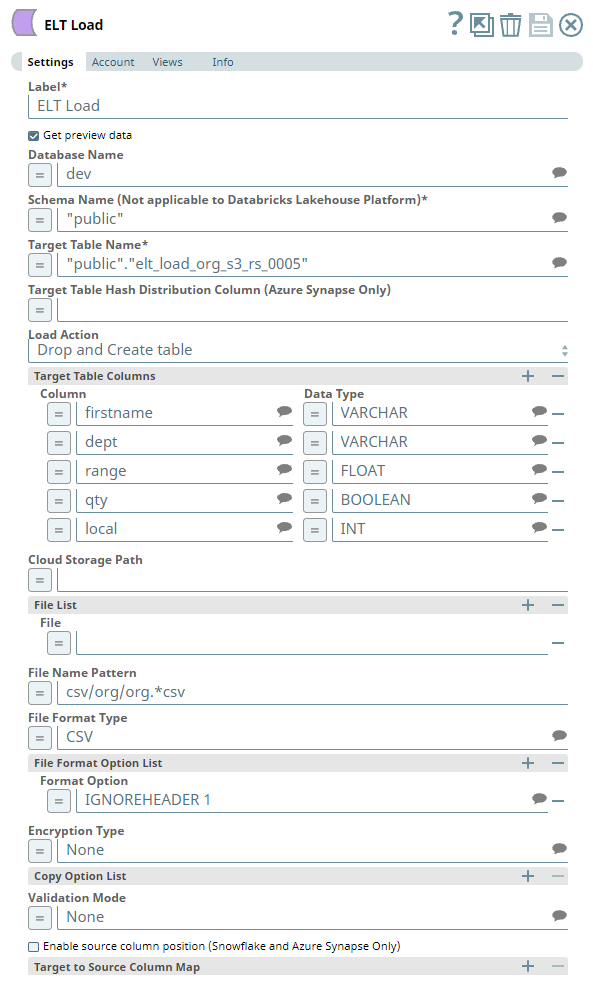
The Pipeline uses an ELT Load Snap to define the source CSV file in the S3 location and is configured to perform the following functions.
- Create a new table elt_load_org_s3_rs_005 in the specified target database (Redshift).
- Load the data from CSV file to this newly-created target table based on the table columns specified.
Account Settings
The Pipeline accesses the CSV file using the Source Location Credentials mode of authentication.
See Also