Versions Compared

Key

  • This line was added.
  • This line was removed.
  • Formatting was changed.

In this article

Table of ContentsmaxLevel2absoluteUrl

In this article

Table of Contents
maxLevel2
absoluteUrltrue
excludeOlder Versions|Additional Resources|Related Links|Related Information

Overview

This account is used by the Snaps in the JMS Snap Pack.

You can create an account from Designer or Manager. In Designer, when working on pipelines, every Snap that needs an account prompts you to create a new account or use an existing account. The accounts can be created in or used from:

  • Your private project folder: This folder contains the pipelines that will use the account.
  • Your Project Space’s shared folder: This folder is accessible to all the users that belong to the Project Space.
  • The global shared folder: This folder is accessible to all the users within an organization in the SnapLogic instance.

Supported JMS Versions

This Snap Pack is must create JMS accounts to connect to data sources that you want to use in your Pipelines. You can configure your Slack accounts in SnapLogic using either the Designer or the Manager.

Supported JMS Versions

This Snap Pack is tested against ActiveMQ, ApolloMQ, HornetQ,and IBM MQ.

Snap-Account

Configuration

In Manager, you can navigate to the required folder and create an account in it (see Accounts). To create an account for JMS: 

  1. Click Create, then select JMS and the appropriate account type.

    1. JMS Account (For JMS providers, such as ApolloMQ, HornetQ, and so on. For detailed information on configuring each of these account types, see the guidance provided below.)
    2. SQS Account (Specifically for Amazon SQS Service only)
  2. Supply an account label.

  3. Supply the necessary information.

  4. (Optional) Supply additional information on this account in the Notes field of the Info tab.
  5. Click Apply.

Account Types

SQS Account

Expand
titleAccount Settings

Amazon Simple Queue Service (SQS) is a fully managed message queuing service that enables you to decouple and scale microservices, distributed systems, and serverless applications.

 - Source: Amazon Simple Queue Service

Note
  • For SQS use cases, we recommend you to use the SQS Snap Pack, which is feature-rich and robust.
  • For JMS Snaps using Amazon SQS accounts, SQS is not JMS and only supports queues in synchronous mode with auto-acknowledgment. SQS accounts do not support asynchronous mode, client acknowledgment, or topics. 

If you're using a JMS Snap Pack, CLIENT-ACK, with a SQS account instead of a JMS account, then you must specify a STANDARD SQS queue. It will fail if you specify a FIFO SQS queue.

Account Settings

Label*

Specify a unique name for the account instance.

Default Value: None
Example: SQS_Account

AWS access key ID*

Specify the AWS access key ID part of AWS authentication. 

Default Value: N/A
Example: NMKL983m009fa21

AWS secret key*

Specify the AWS secret key part of AWS authentication. 

Default Value: N/A
Example: MIEPL0934GHB

AWS end point*

Specify the AWS end point URL. Refer to http://docs.aws.amazon.com/general/latest/gr/rande.html#sqs_region

Default Value: N/A
Example: 89.234.567.21

AWS Region

Specify the AWS region the application is running in. Allowed values are:

  • us-gov-west-1
  • us-east-1
  • us-west-1
  • us-west-2
  • eu-west-1
  • eu-central-1
  • ap-southeast-1
  • ap-southeast-2
  • ap-northeast-1
  • sa-east-1
  • cn-north-1

Default Value: N/A
Exampleus-west-2

Account Encryption

Standard Encryption

If you are using Standard Encryption, the High sensitivity settings under Enhanced Encryption are followed.

Enhanced Encryption

If you have the Enhanced Account Encryption feature, the following describes which fields are encrypted for each sensitivity level selected for this account.

Account:

  • High:
  • Medium + High
  • Low + Medium + High

JMS Account

Expand
titleAccount Settings

Label*

Specify a unique label for the account instance.

Default Value: N/A
Example: JMS_Account

Username

Specify a username necessary to create the connection to the JMS provider.

Default Value: N/A
Example: admin@snaplogic.com

Password

The password associated with the JMS username.

Default Value: N/A
Example: NAo93@$$!

Connection Factory*

A JNDI name for the JMS connection factory.

Default Value: N/A
Example: Test_Connection

JNDI Properties*

Use this field set to specify additional JNDI properties for connecting to the JMS server.

Default Value: N/A
Example:

Property name

Enter the name of the JNDI property.

Default Value: [None]
Example: java.naming.factory.initial, java.naming.provider.url

Property value

Enter the value of the JNDI property.

Default Value: N/A
Example: org.jnp.interfaces.namingcontextfactory

Note

HTTPS protocol is not supported for this field.

Jar files*

Supply the necessary JAR files related to the JMS provider to produce and consume messages.

Note

You must include all ActiveMQ dependencies in the JAR files list to avoid errors upon execution of the Pipeline.

Popular vendors are:

You can find the JAR files associated with each vendor / provider from their web page.

Default value: [None]
Example: http://activemq.apache.org/download.html

Account Encryption

Standard Encryption

If you are using Standard Encryption, the High sensitivity settings under Enhanced Encryption are followed.

Enhanced Encryption

If you have the Enhanced Account Encryption feature, the following describes which fields are encrypted for each sensitivity level selected for this account.

Account:

  • High: Password
  • Medium + High: Username, password
  • Low + Medium + High:
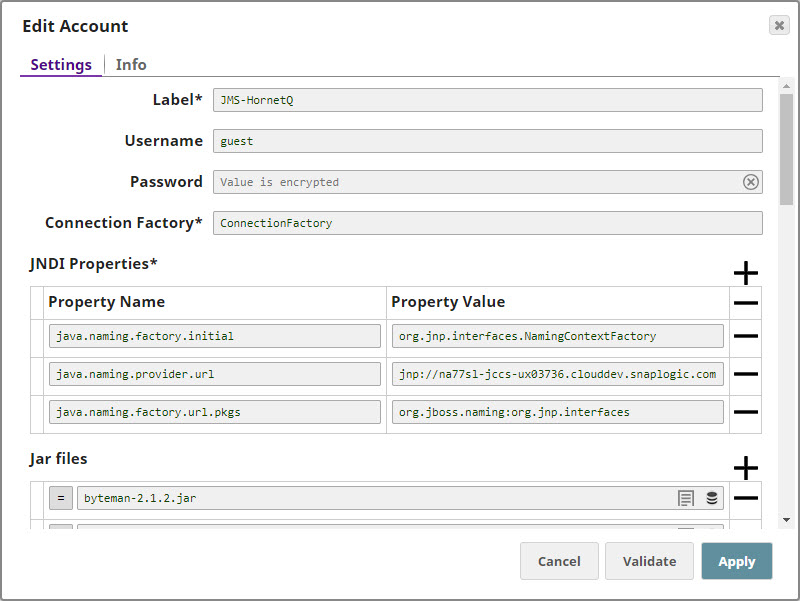
 Username, password, Connection Factory, JNDI Property values
We have provided the settings required for working with the following popular vendors

Compatibility

Snaps in the JMS Snap Pack work with different accounts and protocols per the following table.


Configuring JMS Accounts Using SnapLogic Designer

Drag a JMS Snap to the Canvas and click the Snap to open its settings. Click the Account tab. You can now either use an existing account or create a new one.

Selecting an existing account

SnapLogic organizes and displays all accounts to which you have access, sorting them by account type and location. To select an existing account:

  1. In the Account tab, click the  icon to view the accounts to which you have access, and select the account that you want to use.

  2. Click Save.

Creating an account

  1. In the Account tab, click Add Account below the Account Reference field.

  2. Select the Location in which you want to create the account, select the Account Type, and click Continue. The Add Account dialog window associated with the account type is displayed.

  3. Enter the required account details. For detailed guidance on how to provide information required for each account type, see the following articles:

    Info

    Enter additional information on this account in the Notes field of the Info tab. This will help you–and other users–understand the purpose of the account, especially if there are multiple accounts of the same type.


  4. Click Validate to verify the account, if the account type supports validation.

  5. Click Apply to complete configuring the JMS account.


Configuring JMS Accounts Using SnapLogic Manager

You can use Manager to create accounts without associating them immediately with Pipelines.

Info

Accounts in SnapLogic are associated with projects. You can use accounts created in other projects only if you have at least Read access to them.

  1. In the left pane, browse to the project in which you want to create the account and click Image Added > Account JMS, followed by the appropriate account type. The Create Account dialog associated with the selected account type is displayed.

  2. Repeat the steps numbered 3 through 5 in the Creating an account section.

    Info

    Avoid updating account credentials while Pipelines using that account are executing. Doing so may lead to unexpected results, including your account getting locked.


Expand
titleAccount Settings

Here are some settings required for working with the following popular endpoints:

Expand
titleHow to configure JMS for ActiveMQ without SSL

Configuring JMS for ActiveMQ

Property Name

Property Value

java.naming.factory.initial

org.apache.activemq.jndi.ActiveMQInitialContextFactory 

java.naming.provider.url

tcp://localhost:61616

topic.jms/topic/dataTopic

TOPIC.DATATOPIC

topic.jms/topic/controlTopic

TOPIC.CONTROLTOPIC

queue.jms/queue/dataQueue

QUEUE.DATAQUEUE

queue.jms/queue/controlQueue 

QUEUE.CONTROLQUEUE

connectionFactoryNames

connFact


Note
 jms/topic/dataTopic is the JNDI name for the data topic while TOPIC.DATATOPIC is the physical name. They must be taken from Tomcat configuration file.


Expand
titleHow to Configure JMS for Connecting to ActiveMQ via SSL

Configuring JMS for Connecting to Active MQ via SSL

  1. Add Active MQ server's certificate to plex's trust store.

  2. Attach the .bindings file that is created by the Active MQ SME and is provided with the server's certificate.
    The Connection Factory property fetches the value from the .bindings file.

    Note

    Each client has unique .bindings, and the Active MQ SME of the customer creates the .bindings file. 

    An Active MQ SME provides the following JNDI properties:

    • Multiple queueManager hostnames separated by commas, which are resolvable by the Groundplex.
    • The value for JNDI URL property, java.naming.provider.url, which is the path of the folder on the Groundplex where the .bindings file is stored.
      The file must be called .bindings, and the Groundplex user (snap user) must have read permission to access it.


  3. Provide all the necessary JAR files belonging to the Active MQ client, or it might fail to validate.
    Each version of the Active MQ client uses different JRE levels. If the version of Active MQ is 5.15.10, use the 5.15.10 JRE files.

    Include the following JAR files while configuring the account: 

    Panel
    • activemq-all-5.15.10.jar
    • commons-logging-1.2.jar
    • commons-codec-1.9.jar
    • httpclient-4.5.2.jar
    • httpcore-4.4.4.jar
    • xtream-1.4.11.1.jar


  4. Upload these libraries(JAR files) to the Shared project for the JMS account.

  5. Configure the following JVM options, and then start the JCC.

    Note

    Each client has unique .xml, and the Active MQ SME of the customer creates the .xml file. 

    An Active MQ SME provides the following JNDI properties:

    • jcc.jvm_options = -Djavax props-Djavax.net.ssl.trustStore=/path/to/broker.ts -Djavax.net.ssl.trustStorePassword=changeit
    • ACTIVEMQ_SSL_OPTS = -Djavax.net.ssl.keyStore=/path/to/broker.ks -Djavax.net.ssl.keyStorePassword=password


Property NameProperty Value
java.naming.factory.initialorg.apache.activemq.jndi.ActiveMQInitialContextFactory
java.naming.provider.urlhttps://<machine_name>:8443


Expand
titleHow to configure JMS for ApolloMQ

Configuring JMS for ApolloMQ

Property Name

Property Value

java.naming.factory.initial

org.apache.activemq.jndi.ActiveMQInitialContextFactory 

java.naming.provider.url

tcp://localhost:61613

topic.jms/topic/dataTopic

topic.dataTopic

topic.jms/topic/controlTopic

topic.controlTopic

queue.jms/queue/dataQueue

queue.dataQueue

queue.jms/queue/controlQueue 

queue.controlQueue

connectionFactoryNames

connFact

 
Note: ApolloMQ is REST based. It can be configured using Web Console. While creating a topic/queue, we must provide just name. This name is used both as the property name and property value.


Expand
titleHow to set up JMS for JBoss HornetQ without SSL

Configuring JMS for JBoss HornetQ

Note

Before you start configuring your HornetQ account in SnapLogic, you must first unzip the HornetQ Setup ZIP file and install HornetQ on the server that you want to use with SnapLogic. Details required in the Account Settings popup for HornetQ will require information that will become available to you only after you install HornetQ.


Configuring the HornetQ Account

Update the Account popup with the following settings:

Label

Required. Enter a label for the new account.

Default value: None.

Username

Enter the username associated with your HornetQ account.

Default value: None.

Password

Enter the password associated with the username entered in the Username field.

Default value: None.

Connection Factory

Required. This is the Java Naming and Directory Interface (JNDI) name for the JMS connection factory. you can find this information in the configuration file associated with the HornetQ installation.

Default value: None.

JNDI Properties

Required. Enable you to specify details, such as the JNDI server name, which will enable SnapLogic to connect to HornetQ. You need to configure these are pairs of Property Name and Property Value.

These properties and values must be configured as shown below:

Paste code macro
 
java.naming.factory.initial=org.jnp.interfaces.NamingContextFactory 
java.naming.provider.url=jnp://<server_address>:1099 
java.naming.factory.url.pkgs=org.jboss.naming:org.jnp.interfaces


Property Name

Required. This is the name of the JNDI property required for JNDI to work. These names can be picked up from the JNDI configuration file.

Default value: None.

Property Value

Required. This is the location of the package that contains information related to this property.

Default value: None.

Jar files

Required. These are the JAR files that must be present; else HornetQ will not work.

Default value: None.

The typical list of JAR files associated with HornetQ are as follows. These files are available once HornetQ is installed on your server. You need to navigate to the directory where you installed HornetQ and upload these files to SLDB:

Paste code macro
 
byteman-2.1.2.jar 
byteman-submit-2.1.2.jar 
hornetq-commons-2.4.0.Final.jar 
hornetq-core-client-2.4.0.Final.jar 
hornetq-jms-client-2.4.0.Final.jar 
hornetq-jms-server-2.4.0.Final.jar 
hornetq-journal-2.4.0.Final.jar 
hornetq-native-2.4.0.Final.jar 
hornetq-server-2.4.0.Final.jar 
javax.inject-1.jar 
jboss-as-build-config-7.1.2.Final.jar 
jboss-common-core-2.2.10.GA.jar 
jboss-connector-api_1.5_spec-1.0.0.Final.jar 
jboss-ejb-api-3.0.0.CR2.jar 
jboss-ejb-client-1.0.0.Final.jar 
jboss-jaxrpc-1.0.4.GA.jar 
jboss-jms-api-1.1.0.GA.jar 
jbossjts-jacorb-4.17.13.Final.jar 
jboss-logging-3.3.2.Final.jar 
jboss-logmanager-1.2.2.GA.jar 
jboss-marshalling-1.3.14.GA.jar 
jboss-marshalling-river-1.3.14.GA.jar 
jboss-remote-naming-1.0.3.Final.jar 
jboss-remoting-3.2.7.GA.jar 
jboss-sasl-1.0.1.Final.jar 
jboss-transaction-api-1.0.1.CR2.jar 
jcommon-1.0.12.jar jfreechart-1.0.9.jar 
jgroups-3.3.4.Final.jar 
jnpserver-5.0.3.GA.jar 
netty-3.6.2.Final.jar 
netty-all-4.0.13.Final.jar 
xnio-api-3.0.3.GA.jar 
xnio-nio-3.0.3.GA.jar


Expand
titleHow to set up JMS for JBoss HornetQ via SSL

Configuring JMS for Connecting to HornetQ via SSL

  1. Import HornetQ server's certificate to plex's trust store by using the following command:

    -import -file ~/client.cer -keystore broker.ts1 -storepass

  2. Attach the hornetq-configuration.xml file that is created by the HornetQ SME and is provided with the server's certificate.

  3. Edit the hornetq-configuration.xml file that you imported from the server.

    1. Edit connectors.

      Paste code macro
      <connector name="netty-ssl-connector">
              <factory-class>org.hornetq.core.remoting.impl.netty.NettyConnectorFactory</factory-class>
              <param key="host" value="192.168.30.131" />
              <param key="port" value="5500" />                      
              <param key="ssl-enabled" value="true" />
              <param key="key-store-path" value="/home/test/artifacts/Apps/hornetq-2.4.0.Final/ssl/broker.ks" />
              <param key="key-store-password" value="hornetqexample" />
           </connector>


    2. Edit acceptors.

      Paste code macro
      <acceptor name="netty-ssl-acceptor">***
              <factory-class>org.hornetq.core.remoting.impl.netty.NettyAcceptorFactory</factory-class>
              <param key="host" value="192.168.30.131" />
              <param key="port" value="5500" />                      
              <param key="ssl-enabled" value="true" />
              <param key="key-store-path" value="/home/test/artifacts/Apps/hornetq-2.4.0.Final/ssl/broker.ks" />
              <param key="key-store-password" value="hornetqexample" />
              <param key="trust-store-path" value="/home/test/artifacts/Apps/hornetq-2.4.0.Final/ssl/broker.ts1" />
              <param key="trust-store-password" value="hornetqexample" />
           </acceptor>


  4. In the JMS.xml file, add one Connection Factory.

    Paste code macro
    <connection-factory name="NettySslConnectionFactory">***
         <xa>false</xa>
         <connectors>
            <connector-ref connector-name="netty-ssl-connector"/>***
         </connectors>
         <entries>
            <entry name="/ConnectionFactorySsl"/>
         </entries>
      </connection-factory>


    The Connection Factory property fetches the value from the JMS.xml file.

    Note

    Each client has unique .xml, and the HornetQ SME of the customer creates the .xml file. 

    A HornetQ SME provides the following JNDI properties:

    • jcc.jvm_options = -Djavax props
    • Djavax.net.ssl.trustStore=/usr/lib/jvm/java-1.8.0-openjdk.x86_64/jre/lib/security/cacerts -Djavax.net.ssl.trustStorePassword=changeit


  5. Optionally, create a simple pipeline with a File Reader Snap to verify that you can access the .xml file.

  6. Provide all the necessary JAR files belonging to the HornetQ client, or it might fail to validate.

    Each version of the HornetQ client uses different JRE levels. If the version of HornetQ is 1.8, use the 1.8 JRE files.

    The typical list of JAR files associated with HornetQ are as follows. These files are available once you install HornetQ on your server. You need to navigate to the directory where you installed HornetQ and upload these files to SLDB:

    Paste code macro
     
    byteman-2.1.2.jar 
    byteman-submit-2.1.2.jar 
    hornetq-commons-2.4.0.Final.jar 
    hornetq-core-client-2.4.0.Final.jar 
    hornetq-jms-client-2.4.0.Final.jar 
    hornetq-jms-server-2.4.0.Final.jar 
    hornetq-journal-2.4.0.Final.jar 
    hornetq-native-2.4.0.Final.jar 
    hornetq-server-2.4.0.Final.jar 
    javax.inject-1.jar 
    jboss-as-build-config-7.1.2.Final.jar 
    jboss-common-core-2.2.10.GA.jar 
    jboss-connector-api_1.5_spec-1.0.0.Final.jar 
    jboss-ejb-api-3.0.0.CR2.jar 
    jboss-ejb-client-1.0.0.Final.jar 
    jboss-jaxrpc-1.0.4.GA.jar 
    jboss-jms-api-1.1.0.GA.jar 
    jbossjts-jacorb-4.17.13.Final.jar 
    jboss-logging-3.3.2.Final.jar 
    jboss-logmanager-1.2.2.GA.jar 
    jboss-marshalling-1.3.14.GA.jar 
    jboss-marshalling-river-1.3.14.GA.jar 
    jboss-remote-naming-1.0.3.Final.jar 
    jboss-remoting-3.2.7.GA.jar 
    jboss-sasl-1.0.1.Final.jar 
    jboss-transaction-api-1.0.1.CR2.jar 
    jcommon-1.0.12.jar jfreechart-1.0.9.jar 
    jgroups-3.3.4.Final.jar 
    jnpserver-5.0.3.GA.jar 
    netty-3.6.2.Final.jar 
    netty-all-4.0.13.Final.jar 
    xnio-api-3.0.3.GA.jar 
    xnio-nio-3.0.3.GA.jar


  7. Upload these libraries(JAR files) to the Shared project for the JMS account.


Expand
titleHow to set up a JMS account for IBM WebSphere MQ without SSL

Configuring JMS for IBM WebSphere MQ

  • Enter the Username and Password, if required. 

    Note

    If you do not have the JMS server installed locally, you must provide the Username and Password values associated with the remote JMS server to which you want to connect.


  • The value for the Connection Factory comes from the .bindings file that the WebSphere MQ SME creates
  • The .bindings is unique per client and the WebSphere MQ SME of the customer creates the .bindings file 
    • Provide the following JNDI properties:
      • Provide the Username and Password (if set) values for the respective JNDI properties as java.naming.security.principal and java.naming.security.credential
      • Specify multiple queueManager hosts by adding a comma separated hostnames and ensure that they are resolvable by the Groundplex
      • The value for JNDI URL property,  java.naming.provider.url  is the path of the folder on the Groundplex where the .bindings file is stored
      • The file must be called .bindings and the Groundplex user (snapuser) must have read permission to access it. Do create a simple pipeline with a File Reader Snap to verify that you can access the .bindings file
    • Provide all the jar files as displayed in the screenshot or it might fail to validate.
    • Ensure that you are using the JAR files belonging to the WebSphere Client. Each version of the WebSphere MQ client uses different JRE levels. If the version of WebSphere MQ is 1.8, use the 1.8 JRE files.
    • Upload these libraries(Jar files) to the Shared project for the JMS Account to work as expected.


Property Name

Property Value

java.naming.factory.initial

com.sun.jndi.fscontext.RefFSContextFactory

java.naming.provider.url

file:///home/ubuntu/JNDI-Directory

java.naming.security.authentication

none

hostname

127.0.0.1

port

1414

queueManager

qManager

channel

mqCientConnChannel

transportType

1

clientReconnectTimeout2
clientReconnectOptions0

Jar Files

Include the following JAR files while configuring the account: 

  • com.ibm.mq.defaultconfig.jar
  • com.ibm.mq.postcard.jar
  • providerutil.jar
  • fscontext.jar
  • com.ibm.mq.traceControl.jar
  • com.ibm.mqjms.jar
  • com.ibm.mq.jmqi.jar
  • com.ibm.mq.pcf.jar
  • com.ibm.mq.headers.jar
  • bcpkix-jdk15on.jar
  • bcprov-jdk15on.jar
  • com.ibm.mq.tools.ras.jar
  • com.ibm.mq.commonservices.jar
  • com.ibm.mq.jar
  • com.ibm.mq.allclient.jar


Expand
titleHow to set up a JMS account for IBM WebSphere MQ via SSL

Configuring JMS for Connecting to IBM WebSphere MQ via SSL

  1. Add IBM MQ server's certificate in plex's trust store.

  2. Attach the .bindings file that iscreated by the WebSphere MQ SME and is provided with theserver's certificate.
    The Connection Factory property fetches the value from the .bindings file.

    Note

    Each client has unique .bindings, and the WebSphere MQ SME of the customer creates the .bindings file. 

    A WebSphere MQ SME provides the following JNDI properties:

    • Multiple queueManager hostnames separated by commas, which are resolvable by the Groundplex.
    • The value for JNDI URL property, java.naming.provider.url, which is the path of the folder on the Groundplex where the .bindings file is stored.
      The file must be called .bindings, and the Groundplex user (snap user) must have read permission to access it.


  3. Optionally, create a simple pipeline with a File Reader Snap to verify that you can access the .bindings file.

  4. Provide all the necessary JAR files belonging to the WebSphere MQ client, or it might fail to validate.
    Each version of the WebSphere MQ client uses different JRE levels. If the version of WebSphere MQ is 1.8, use the 1.8 JRE files.

    The typical list of JAR files associated with WebSphere MQ are as follows. These files are available once you install WebSphere MQ on your server. Navigate to IBMMQ/MQServer/lap/jre/ibm-java-x86_64-80/jre/lib, where you installed WebSphere MQ, and upload these files to SLDB:


    Paste code macro
     
    com.ibm.mq.defaultconfig.jar
    com.ibm.mq.postcard.jar
    providerutil.jar
    fscontext.jar
    com.ibm.mq.traceControl.jar
    com.ibm.mqjms.jar
    com.ibm.mq.jmqi.jar
    com.ibm.mq.pcf.jar
    com.ibm.mq.headers.jar
    bcpkix-jdk15on.jar
    bcprov-jdk15on.jar
    com.ibm.mq.tools.ras.jar
    com.ibm.mq.commonservices.jar
    com.ibm.mq.jar
    com.ibm.mq.allclient.jar


  5. Upload these libraries(JAR files) to the Shared project for the JMS account.

  6. Configure the following JVM options, and then start the JCC.

    • com.ibm.mq.cfg.useIBMCipherMappings: false

    • javax.net.ssl.trustStore: <Path of the truststore containing the server certificate>

    • javax.net.ssl.trustStorePassword - <truststore password>


Property Name

Property Value

java.naming.factory.initial

com.sun.jndi.fscontext.RefFSContextFactory

java.naming.provider.url

file:///home/ubuntu/JNDI-Directory

java.naming.security.authentication

none

hostname

127.0.0.1

port

1414

queueManager

qManager

channel

mqCientConnChannel

transportType

1

clientReconnectTimeout2
clientReconnectOptions0


Insert excerpt
JMS Snap Pack
JMS Snap Pack
nopaneltrue

Related Links:

Amazon Simple Queue Service