Configuring JMS Accounts
Kalpana Malladi
Aparna Tayi (Unlicensed)
Ankur Parekh
In this article
Overview
You must create JMS accounts to connect to data sources that you want to use in your Pipelines. You can configure your Slack accounts in SnapLogic using either the Designer or the Manager.
Snap-Account Compatibility
Snaps in the JMS Snap Pack work with different accounts and protocols per the following table.
Configuring JMS Accounts Using SnapLogic Designer
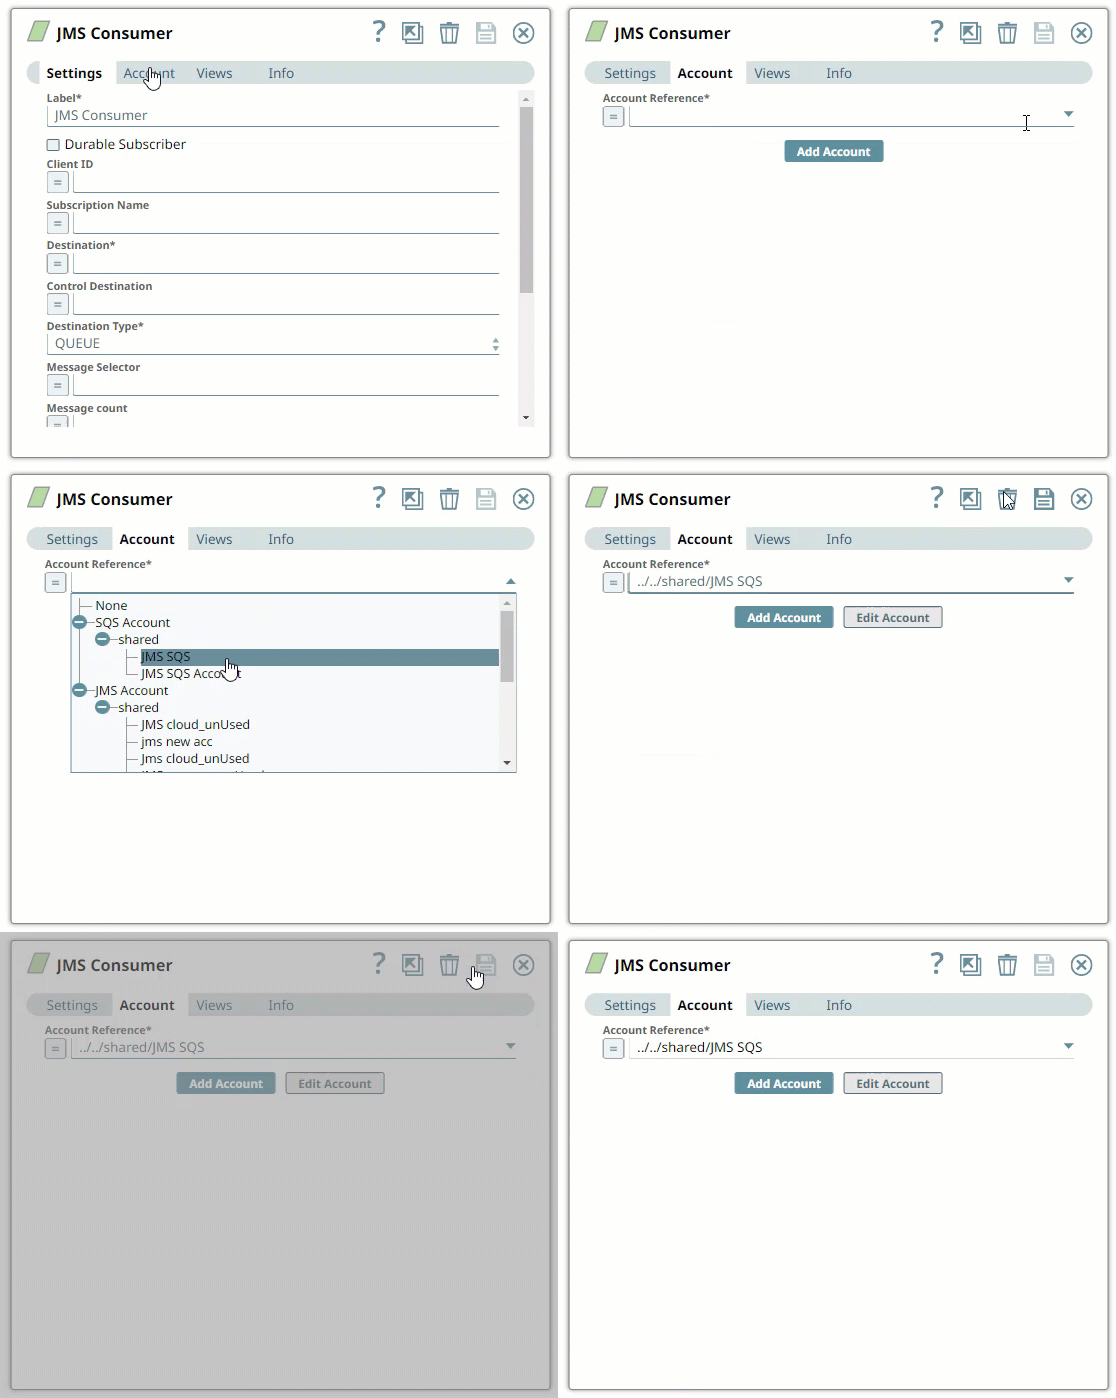
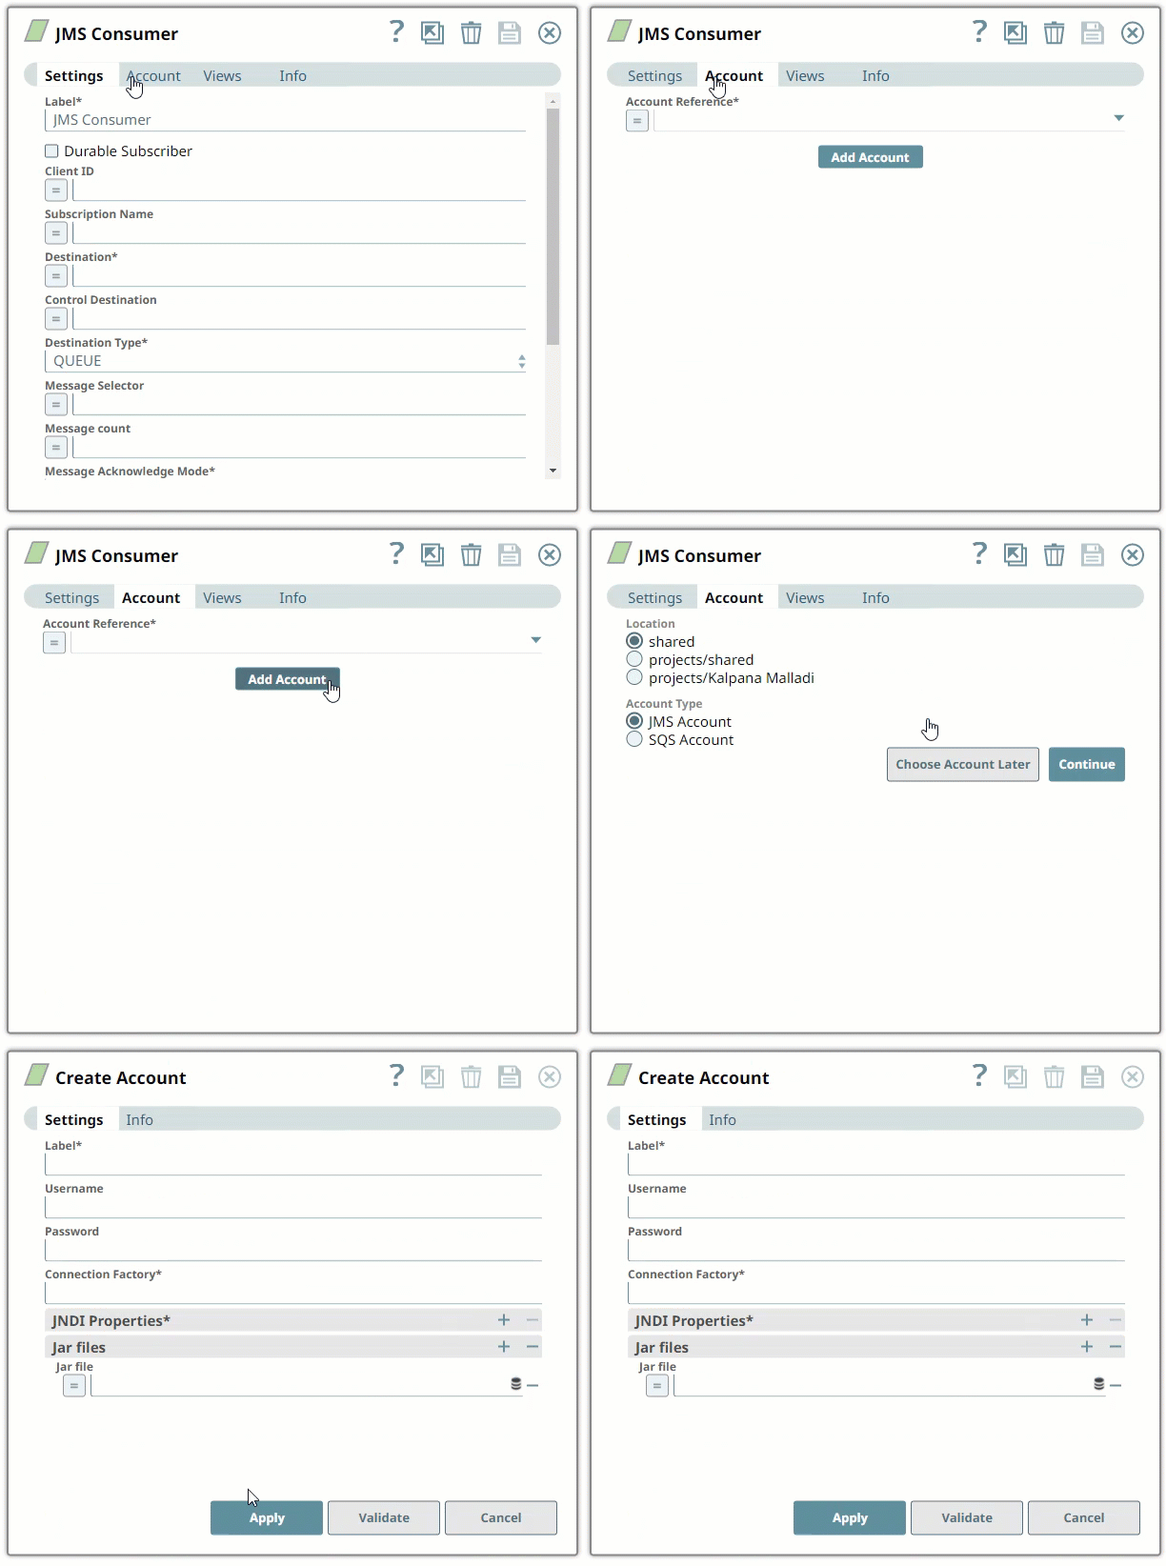
Drag a JMS Snap to the Canvas and click the Snap to open its settings. Click the Account tab. You can now either use an existing account or create a new one.
Selecting an existing account
SnapLogic organizes and displays all accounts to which you have access, sorting them by account type and location. To select an existing account:
In the Account tab, click the icon to view the accounts to which you have access, and select the account that you want to use.
Click Save.

Creating an account
In the Account tab, click Add Account below the Account Reference field.
Select the Location in which you want to create the account, select the Account Type, and click Continue. The Add Account dialog window associated with the account type is displayed.

Enter the required account details. For detailed guidance on how to provide information required for each account type, see the following articles:
Enter additional information on this account in the Notes field of the Info tab. This will help you–and other users–understand the purpose of the account, especially if there are multiple accounts of the same type.
Click Validate to verify the account, if the account type supports validation.
Click Apply to complete configuring the JMS account.
Configuring JMS Accounts Using SnapLogic Manager
You can use Manager to create accounts without associating them immediately with Pipelines.
Accounts in SnapLogic are associated with projects. You can use accounts created in other projects only if you have at least Read access to them.
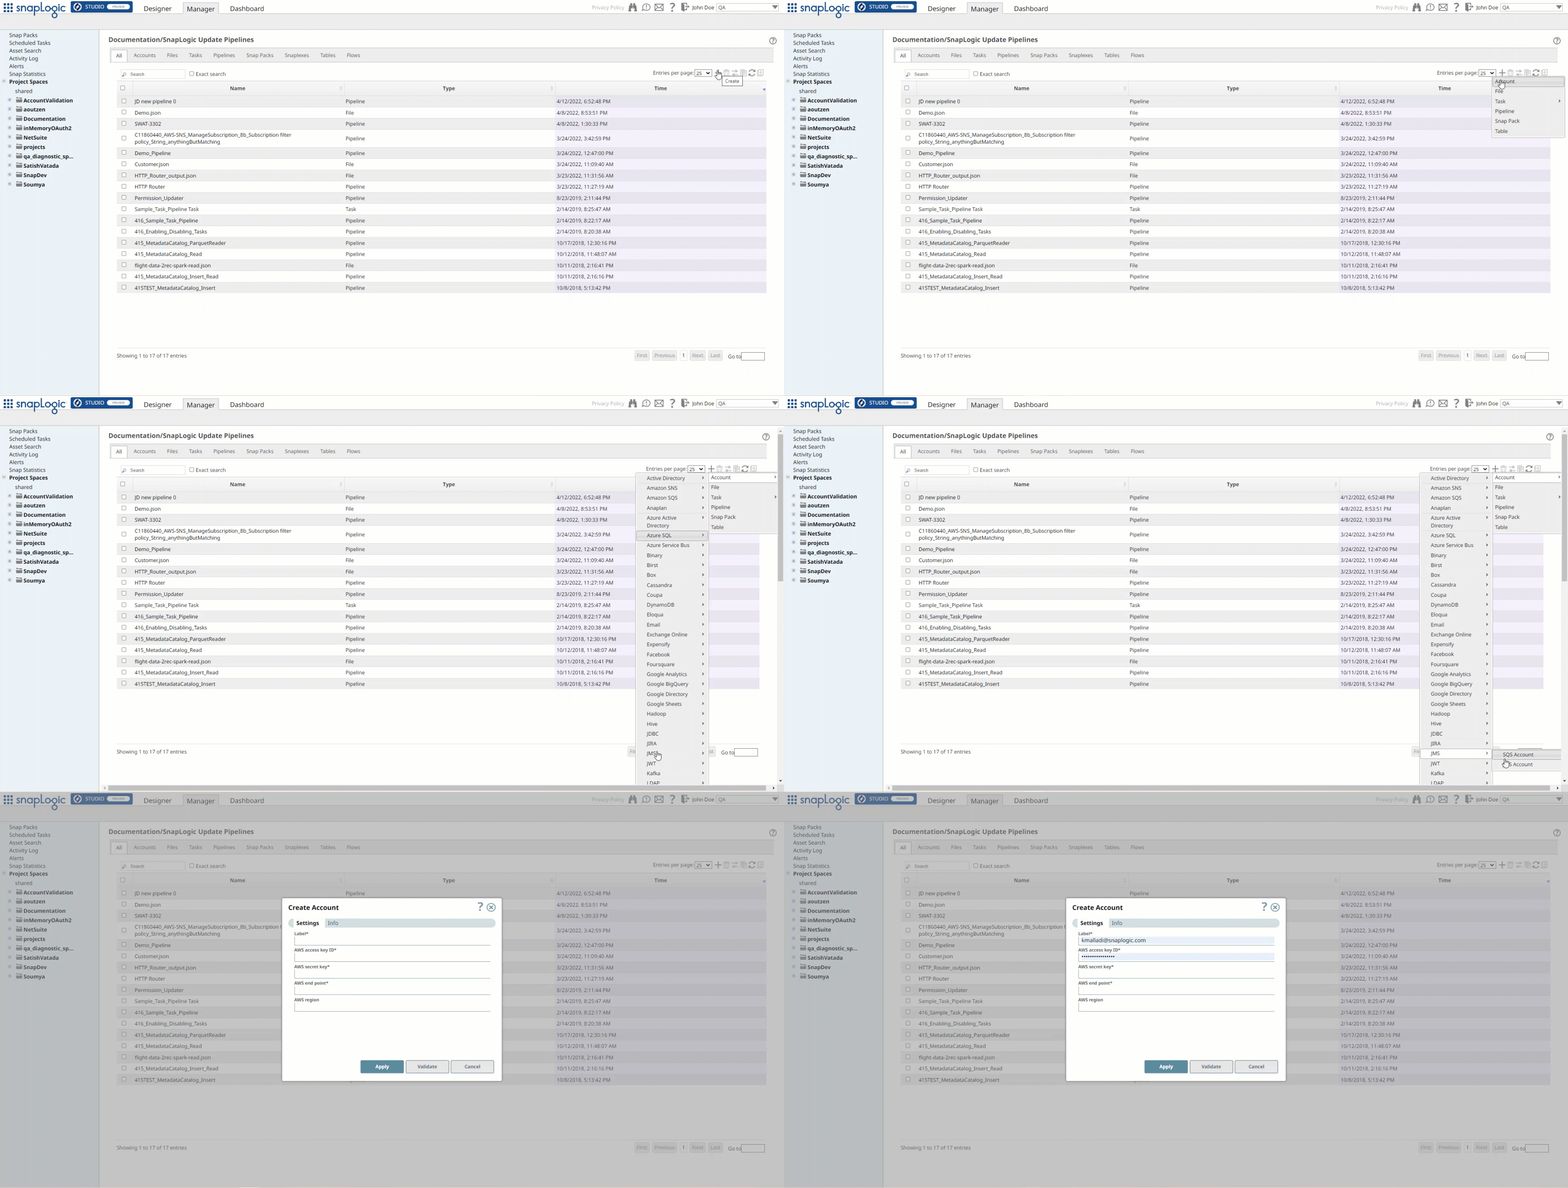
In the left pane, browse to the project in which you want to create the account and click
> Account > JMS, followed by the appropriate account type. The Create Account dialog associated with the selected account type is displayed.

Repeat the steps numbered 3 through 5 in the Creating an account section.
Avoid updating account credentials while Pipelines using that account are executing. Doing so may lead to unexpected results, including your account getting locked.
Here are some settings required for working with the following popular endpoints:
Configuring JMS for ActiveMQ
Property Name | Property Value |
|---|---|
java.naming.factory.initial | org.apache.activemq.jndi.ActiveMQInitialContextFactory |
java.naming.provider.url | |
topic.jms/topic/dataTopic | TOPIC.DATATOPIC |
topic.jms/topic/controlTopic | TOPIC.CONTROLTOPIC |
queue.jms/queue/dataQueue | QUEUE.DATAQUEUE |
queue.jms/queue/controlQueue | QUEUE.CONTROLQUEUE |
connectionFactoryNames | connFact |
Configuring JMS for Connecting to Active MQ via SSL
- Add Active MQ server's certificate to plex's trust store.
Attach the .bindings file that is created by the Active MQ SME and is provided with the server's certificate.
The Connection Factory property fetches the value from the .bindings file.Each client has unique .bindings, and the Active MQ SME of the customer creates the .bindings file.
An Active MQ SME provides the following JNDI properties:
- Multiple queueManager hostnames separated by commas, which are resolvable by the Groundplex.
- The value for JNDI URL property, java.naming.provider.url, which is the path of the folder on the Groundplex where the .bindings file is stored.
The file must be called .bindings, and the Groundplex user (snap user) must have read permission to access it.
- Multiple queueManager hostnames separated by commas, which are resolvable by the Groundplex.
Provide all the necessary JAR files belonging to the Active MQ client, or it might fail to validate.
Each version of the Active MQ client uses different JRE levels. If the version of Active MQ is 5.15.10, use the 5.15.10 JRE files.
Include the following JAR files while configuring the account:- activemq-all-5.15.10.jar
- commons-logging-1.2.jar
- commons-codec-1.9.jar
- httpclient-4.5.2.jar
- httpcore-4.4.4.jar
- xtream-1.4.11.1.jar
- Upload these libraries(JAR files) to the Shared project for the JMS account.
Configure the following JVM options, and then start the JCC.
Each client has unique .xml, and the Active MQ SME of the customer creates the .xml file.
An Active MQ SME provides the following JNDI properties:
jcc.jvm_options = -Djavax props-Djavax.net.ssl.trustStore=/path/to/broker.ts -Djavax.net.ssl.trustStorePassword=changeitACTIVEMQ_SSL_OPTS = -Djavax.net.ssl.keyStore=/path/to/broker.ks -Djavax.net.ssl.keyStorePassword=password
| Property Name | Property Value |
|---|---|
| java.naming.factory.initial | org.apache.activemq.jndi.ActiveMQInitialContextFactory |
| java.naming.provider.url | https://<machine_name>:8443 |
Configuring JMS for ApolloMQ
Property Name | Property Value |
|---|---|
java.naming.factory.initial | org.apache.activemq.jndi.ActiveMQInitialContextFactory |
java.naming.provider.url | tcp://localhost:61613 |
topic.jms/topic/dataTopic | topic.dataTopic |
topic.jms/topic/controlTopic | topic.controlTopic |
queue.jms/queue/dataQueue | queue.dataQueue |
queue.jms/queue/controlQueue | queue.controlQueue |
connectionFactoryNames | connFact |
Note: ApolloMQ is REST based. It can be configured using Web Console. While creating a topic/queue, we must provide just name. This name is used both as the property name and property value.
Configuring JMS for JBoss HornetQ
Before you start configuring your HornetQ account in SnapLogic, you must first unzip the HornetQ Setup ZIP file and install HornetQ on the server that you want to use with SnapLogic. Details required in the Account Settings popup for HornetQ will require information that will become available to you only after you install HornetQ.

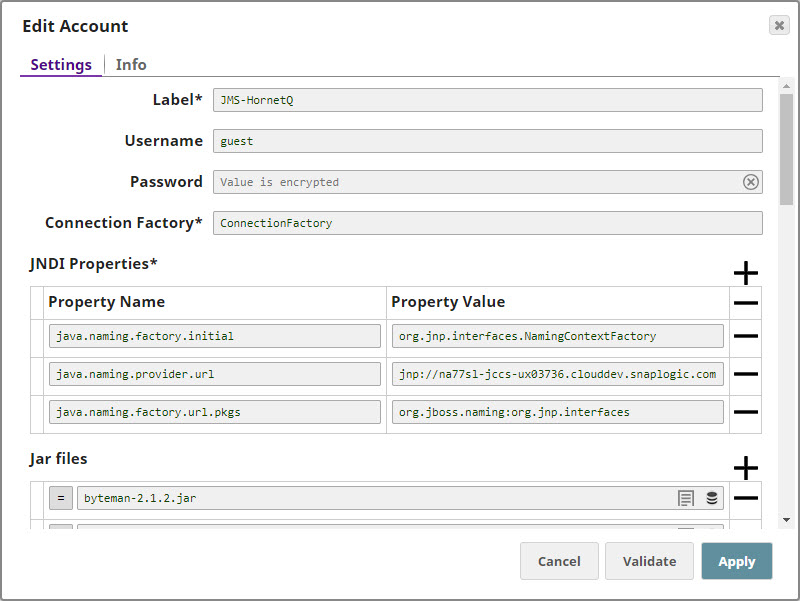
Configuring the HornetQ Account
Update the Account popup with the following settings:
| Label | Required. Enter a label for the new account. Default value: None. |
|---|---|
| Username | Enter the username associated with your HornetQ account. Default value: None. |
| Password | Enter the password associated with the username entered in the Username field. Default value: None. |
| Connection Factory | Required. This is the Java Naming and Directory Interface (JNDI) name for the JMS connection factory. you can find this information in the configuration file associated with the HornetQ installation. Default value: None. |
| JNDI Properties | Required. Enable you to specify details, such as the JNDI server name, which will enable SnapLogic to connect to HornetQ. You need to configure these are pairs of Property Name and Property Value. These properties and values must be configured as shown below: |
| Property Name | Required. This is the name of the JNDI property required for JNDI to work. These names can be picked up from the JNDI configuration file. Default value: None. |
| Property Value | Required. This is the location of the package that contains information related to this property. Default value: None. |
| Jar files | Required. These are the JAR files that must be present; else HornetQ will not work. Default value: None. The typical list of JAR files associated with HornetQ are as follows. These files are available once HornetQ is installed on your server. You need to navigate to the directory where you installed HornetQ and upload these files to SLDB: |
Configuring JMS for Connecting to HornetQ via SSL
- Import HornetQ server's certificate to plex's trust store by using the following command:
-import -file ~/client.cer -keystore broker.ts1 -storepass - Attach the hornetq-configuration.xml file that is created by the HornetQ SME and is provided with the server's certificate.
Edit the hornetq-configuration.xml file that you imported from the server.
Edit connectors.
Edit acceptors.
In the JMS.xml file, add one Connection Factory.
The Connection Factory property fetches the value from the JMS.xml file.
Each client has unique .xml, and the HornetQ SME of the customer creates the .xml file.
A HornetQ SME provides the following JNDI properties:
jcc.jvm_options = -Djavax propsDjavax.net.ssl.trustStore=/usr/lib/jvm/java-1.8.0-openjdk.x86_64/jre/lib/security/cacerts -Djavax.net.ssl.trustStorePassword=changeit
- Optionally, create a simple pipeline with a File Reader Snap to verify that you can access the .xml file.
Provide all the necessary JAR files belonging to the HornetQ client, or it might fail to validate.
Each version of the HornetQ client uses different JRE levels. If the version of HornetQ is 1.8, use the 1.8 JRE files.
The typical list of JAR files associated with HornetQ are as follows. These files are available once you install HornetQ on your server. You need to navigate to the directory where you installed HornetQ and upload these files to SLDB:- Upload these libraries(JAR files) to the Shared project for the JMS account.
Configuring JMS for IBM WebSphere MQ
Enter the Username and Password, if required.
If you do not have the JMS server installed locally, you must provide the Username and Password values associated with the remote JMS server to which you want to connect.
- The value for the Connection Factory comes from the .bindings file that the WebSphere MQ SME creates
- The .bindings is unique per client and the WebSphere MQ SME of the customer creates the .bindings file
- Provide the following JNDI properties:
- Provide the Username and Password (if set) values for the respective JNDI properties as java.naming.security.principal and java.naming.security.credential
- Specify multiple queueManager hosts by adding a comma separated hostnames and ensure that they are resolvable by the Groundplex
- The value for JNDI URL property, java.naming.provider.url is the path of the folder on the Groundplex where the .bindings file is stored
- The file must be called .bindings and the Groundplex user (snapuser) must have read permission to access it. Do create a simple pipeline with a File Reader Snap to verify that you can access the .bindings file
- Provide all the jar files as displayed in the screenshot or it might fail to validate.
- Ensure that you are using the JAR files belonging to the WebSphere Client. Each version of the WebSphere MQ client uses different JRE levels. If the version of WebSphere MQ is 1.8, use the 1.8 JRE files.
- Upload these libraries(Jar files) to the Shared project for the JMS Account to work as expected.
- Provide the following JNDI properties:
Property Name | Property Value |
|---|---|
java.naming.factory.initial | com.sun.jndi.fscontext.RefFSContextFactory |
java.naming.provider.url | |
| java.naming.security.authentication | none |
| hostname | 127.0.0.1 |
port | 1414 |
queueManager | qManager |
channel | mqCientConnChannel |
transportType | 1 |
| clientReconnectTimeout | 2 |
| clientReconnectOptions | 0 |
Jar Files
Include the following JAR files while configuring the account:
- com.ibm.mq.defaultconfig.jar
- com.ibm.mq.postcard.jar
- providerutil.jar
- fscontext.jar
- com.ibm.mq.traceControl.jar
- com.ibm.mqjms.jar
- com.ibm.mq.jmqi.jar
- com.ibm.mq.pcf.jar
- com.ibm.mq.headers.jar
- bcpkix-jdk15on.jar
- bcprov-jdk15on.jar
- com.ibm.mq.tools.ras.jar
- com.ibm.mq.commonservices.jar
- com.ibm.mq.jar
- com.ibm.mq.allclient.jar
Configuring JMS for Connecting to IBM WebSphere MQ via SSL
- Add IBM MQ server's certificate in plex's trust store.
Attach the .bindings file that iscreated by the WebSphere MQ SME and is provided with theserver's certificate.
The Connection Factory property fetches the value from the .bindings file.Each client has unique .bindings, and the WebSphere MQ SME of the customer creates the .bindings file.
A WebSphere MQ SME provides the following JNDI properties:
- Multiple queueManager hostnames separated by commas, which are resolvable by the Groundplex.
- The value for JNDI URL property, java.naming.provider.url, which is the path of the folder on the Groundplex where the .bindings file is stored.
The file must be called .bindings, and the Groundplex user (snap user) must have read permission to access it.
- Multiple queueManager hostnames separated by commas, which are resolvable by the Groundplex.
- Optionally, create a simple pipeline with a File Reader Snap to verify that you can access the .bindings file.
Provide all the necessary JAR files belonging to the WebSphere MQ client, or it might fail to validate.
Each version of the WebSphere MQ client uses different JRE levels. If the version of WebSphere MQ is 1.8, use the 1.8 JRE files.
The typical list of JAR files associated with WebSphere MQ are as follows. These files are available once you install WebSphere MQ on your server. Navigate to IBMMQ/MQServer/lap/jre/ibm-java-x86_64-80/jre/lib, where you installed WebSphere MQ, and upload these files to SLDB:- Upload these libraries(JAR files) to the Shared project for the JMS account.
- Configure the following JVM options, and then start the JCC.
com.ibm.mq.cfg.useIBMCipherMappings: false
javax.net.ssl.trustStore: <Path of the truststore containing the server certificate>
javax.net.ssl.trustStorePassword - <truststore password>
Property Name | Property Value |
|---|---|
java.naming.factory.initial | com.sun.jndi.fscontext.RefFSContextFactory |
java.naming.provider.url | |
| java.naming.security.authentication | none |
| hostname | 127.0.0.1 |
port | 1414 |
queueManager | qManager |
channel | mqCientConnChannel |
transportType | 1 |
| clientReconnectTimeout | 2 |
| clientReconnectOptions | 0 |
Snap Pack History
| Release | Snap Pack Version | Date | Type | Updates |
|---|---|---|---|---|
February 2025 | main29887 | | Stable | Updated and certified against the current SnapLogic Platform release. |
| November 2024 | 439patches29671 | Latest | Fixed an issue with the JMS Consumer Snap that caused it to stop receiving messages by adding a timeout policy around the JMS provider receive() method. | |
| November 2024 | 439patches29329 | Latest | Fixed an issue with the JMS Consumer Snap that displays ExecutionException when the Snap captures a connection error. Now, it routes the connection error to the error view. | |
| November 2024 | main29029 | Stable | Updated and certified against the current SnapLogic Platform release. | |
| August 2024 | main27765 | Stable | Updated and certified against the current SnapLogic Platform release. | |
| May 2024 | main26341 | Stable | Updated and certified against the current SnapLogic Platform release. | |
| February 2024 | main25112 | Stable | Updated and certified against the current SnapLogic Platform release. | |
| November 2023 | main23721 | Stable | Updated and certified against the current SnapLogic Platform release. | |
| August 2023 | main22460 | Stable | Updated and certified against the current SnapLogic Platform release. | |
May 2023 | main21015 | Stable | Upgraded with the latest SnapLogic Platform release. | |
| February 2023 | 432patches20479 | Latest | Fixed an issue where the JMS Producer Snap was previously only writing headers to the WebLogic queue. Now the Snap writes the entire document. | |
| February 2023 | main19844 | Stable | Upgraded with the latest SnapLogic Platform release. | |
| November 2022 | main18944 | Stable | Upgraded with the latest SnapLogic Platform release. | |
| August 2022 | main17386 | Stable | Upgraded with the latest SnapLogic Platform release. | |
| 4.29 | main15993 | Stable | Upgraded with the latest SnapLogic Platform release. | |
| 4.28 | main14627 | Stable | Upgraded with the latest SnapLogic Platform release. | |
4.27 | main12833 | | Stable | Upgraded with the latest SnapLogic Platform release. |
| 4.26 | main11181 | Stable | Upgraded with the latest SnapLogic Platform release. | |
| 4.25 | main9554 | Stable | Upgraded with the latest SnapLogic Platform release. | |
| 4.24 Patch | 4.24patches9098 | Latest | Enhances the JMS account in the JMS Snap Pack by updating the JNDI properties ( | |
| 4.24 Patch | 424patches9104 | Latest | Fixes an issue in the JMS Consumer Snap, where different JMS SQS accounts interfere with each other while running on the same jcc node by using the | |
| 4.24 | main8556 | Stable | Upgraded with the latest SnapLogic Platform release. | |
| 4.23 | main7430 | Stable | Upgraded with the latest SnapLogic Platform release. | |
| 4.22 Patch | 422patches6992 | Latest | Fixes the JMS Snap Pack by replacing JMS class loader for Oracle AQ (Advance Queuing). | |
| 4.22 | main6403 | Stable | Upgraded with the latest SnapLogic Platform release. | |
| 4.21 | snapsmrc542 |
| Stable | Upgraded with the latest SnapLogic Platform release. |
| 4.20 Patch | jms8824 | Latest | Fixes an issue in the JMS Consumer Snap due to which the Snap does not release the memory even after Pipeline termination, leading to huge memory spikes. | |
| 4.20 Patch | jms8810 | Latest | Fixes the connection leak issue in the JMS Producer Snap. | |
| 4.20 Patch | jms8765 | Latest | Fixes an issue with the JMS Consumer Snap that fails to successfully create durable subscribers when run in asynchronous mode. | |
| 4.20 | snapsmrc535 | Stable | Upgraded with the latest SnapLogic Platform release. | |
| 4.19 Patch | jms8420 | Latest |
| |
| 4.19 | snaprsmrc528 | Stable | Upgraded with the latest SnapLogic Platform release. | |
| 4.18 Patch | jms7865 | Latest | Fixed an issue with the JMS Consumer Snap that reinserts failed messages in the JMS queue without checking for duplicate messages. | |
| 4.18 | snapsmrc523 | Stable | Upgraded with the latest SnapLogic Platform release. | |
| 4.17 | ALL7402 | Latest | Pushed automatic rebuild of the latest version of each Snap Pack to SnapLogic UAT and Elastic servers. | |
| 4.17 | snapsmrc515 | Latest | Added the Snap Execution field to all Standard-mode Snaps. In some Snaps, this field replaces the existing Execute during preview check box. | |
| 4.16 | snapsmrc508 | Stable | Upgraded with the latest SnapLogic Platform release. | |
| 4.15 | snapsmrc500 | Stable | Added HornetQ support for the JMS Producer and JMS Consumer Snaps. | |
| 4.14 | snapsmrc490 | Stable | Upgraded with the latest SnapLogic Platform release. | |
| 4.13 | snapsmrc486 | Stable | Upgraded with the latest SnapLogic Platform release. | |
| 4.12 | snapsmrc480 | Stable | Upgraded with the latest SnapLogic Platform release. | |
| 4.11 | snapsmrc465 | Stable | Upgraded with the latest SnapLogic Platform release. | |
| 4.10 | snapsmrc414 | Stable | Upgraded with the latest SnapLogic Platform release. | |
| 4.9 Patch | jms3305 | Latest | Elegant error & resolution messaging for bad ConnectionFactory and bad connectionFactoryNames JNDI property | |
| 4.9 | snapsmrc405 | Stable | Upgraded with the latest SnapLogic Platform release. | |
| 4.8 Patch | jms2702 | Latest | Addressed an issue with the JMS Acknowledge Snap failing to exit in Ultra mode. | |
| 4.8 Patch | jms2883 | Latest | Addressed multiple issues regarding messages being consumed or acknowledged in JMS Consumer and Acknowledge Snaps. | |
| 4.8 | snapsmrc398 | Stable | Upgraded with the latest SnapLogic Platform release. | |
| 4.7 | snapsmrc382 | Stable | Upgraded with the latest SnapLogic Platform release. | |
| 4.6 | snapsmrc362 | Stable | Upgraded with the latest SnapLogic Platform release. | |
| 4.5.1 | snapsmrc344 | Stable | Upgraded with the latest SnapLogic Platform release. | |
| 4.5 | snapsmrc344 | Stable |
| |
| 4.4 | Stable |
|
Related Links:
Have feedback? Email documentation@snaplogic.com | Ask a question in the SnapLogic Community
© 2017-2025 SnapLogic, Inc.