In this Page
Overview
You can set access permissions on projects to limit and control user access.
- Full access permissions allow users to Read, Write, and Execute inside the project. Owner permissions have extra privileges; for example, the ability to modify permissions on the project or change the ownership to another user.
- Org admins can assign permissions to any user or group. Project owners can assign permissions to users or groups.
Permission Types
As an Org admin or project owner, you can set permissions to a project or project space. The permission model has the following permission types:
- Owner: Automatically assigned to the creator of a project or project space.
- Read and Execute: Select to give access to view and execute assets, projects, and project spaces.
- Read Only: Select to give access to view assets, projects, and project spaces.
- Read and Write: Select to give read and write access to assets, projects, and project spaces.
- Full Access: Select to give permissions to view, create, modify, and execute assets, projects, and project spaces.
Managing Project Access Permissions
To assign permissions to a project or project space:
- In Manager, select a project or project space.
- Choose Permissions from the Project context menu. Hover the mouse a few seconds to view the menu.
- Select the Permission you want to Add from the drop down. Permissions include:
- Read Only
- Read & Execute
- Full Access
- Owner
- Select a user or group.
- Click Done.
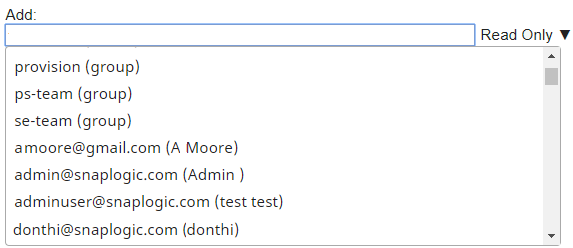
To quickly select a group:
- Type "group" to view a list of groups, or
- Start typing the group name.
Apart from the steps listed above, you can also choose to manage access permissions to projects and project spaces programmatically.
This example demonstrates how you can use the SnapLogic Metadata Update Snap to programmatically manage user access or group access permissions to a project or project space. This example helps you create a pipeline which will, when executed, update the access permissions of a specific user or group to a project or project space. Download and open the Permissions_Updater sample pipeline and review its structure to better understand this example. This task primarily involves updating the "acl" (access control list) values associated with the project concerned. To do so, you need to: You can perform all these tasks by creating a permissions manager pipeline. To create a permissions manager pipeline: Expression: Enter the following expression: This expression contains the new permission values that you want to add under the "acl" key in the project. Depending on the actual permissions you want to assign to the user, remove 'R', 'W', or 'X'. Once this Pipeline is executed, the project located at _project_path will be updated with the revised permissions specified in the Mapper Snap in Step 5 above. You can now flexibly update the properties of any project / project space from the same pipeline by changing any of the following values: This example helps you create a pipeline which will, when executed, update the access permissions of multiple users or groups to multiple project spaces. Download and open the Multiple_Permissions_Updater ZIP file and review its structure to better understand this example. This task primarily involves updating the "acl" (access control list) values associated with the project space concerned. To do so, you need to: You can perform all these tasks by creating: To create the parent pipeline: Expression: Enter the following expression: This expression contains the new permission values that you want to add under the "acl" key in each project / project space. Depending on the actual permissions you want to assign to the user / group, remove 'R', 'W', or 'X'. Once this pipeline is executed, each project located at _project_path will be updated with the revised permissions specified in the Mapper Snap in Step 5 above. You can now flexibly update the properties of any project from the same pipeline by changing any of the following values:Managing Access Permissions to Projects and Project Spaces Programmatically
Updating User and Group Access Permissions to a Project or Project Space Programmatically
Now that your pipeline is created, you need to specify the variables–and corresponding values–that you plan to use in the pipeline Snaps. In this scenario, you have two variables: the email ID of the user or group whose permissions you need to specify, and the project or project space to which you want to grant access. To specify these variables: button on the Pipeline Toolbar to display the Pipeline Properties popup.
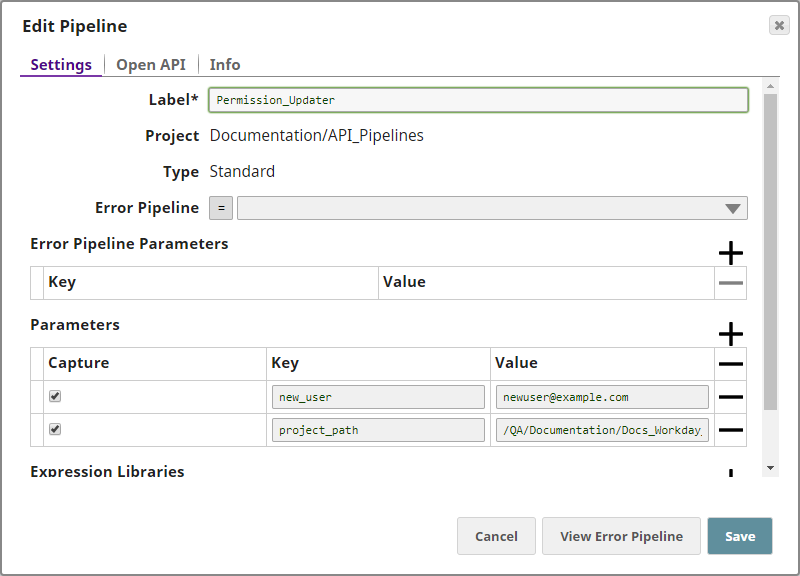
You have now listed out the email ID of the user / group whose permissions you want to update, and you have identified the project / project space on which these permissions must be applied. You now add a Snap that will read the identified project's existing user permissions. To do so:
Save your changes and close the popup. button before adding the value.) _project_path. This is a reference to the pipeline parameter that we created in Step 3 above.
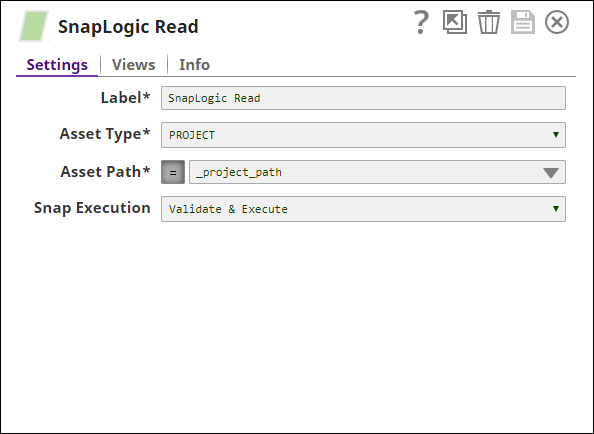
When this Snap is executed, it retrieves all the data related to the project / project space, including its permission details.
You now need to append new permissions to the existing ones. To do so:
Save your changes and close the popup.
You can see in the screenshot above that while the Input preview data field lists only one set of permissions, the Output preview data lists two permission sets. The second one is the new permission set added.
You now have all the details needed to update the project properties retrieved using the SnapLogic Read Snap. To update the project: button before adding the value.) _project_path
Save your changes and close the popup.
Location Variable Description Pipeline Parameters new_user The email ID whose permissions need to be managed. project_path The path of the project / project space to which you want to assign permissions. Mapper Snap 'R','W','X' The permissions you want to grant to the user defined in new_user. Updating Access Permissions of Multiple Users or Groups to Multiple Projects or Project Spaces Programmatically
Creating the Parent Pipeline
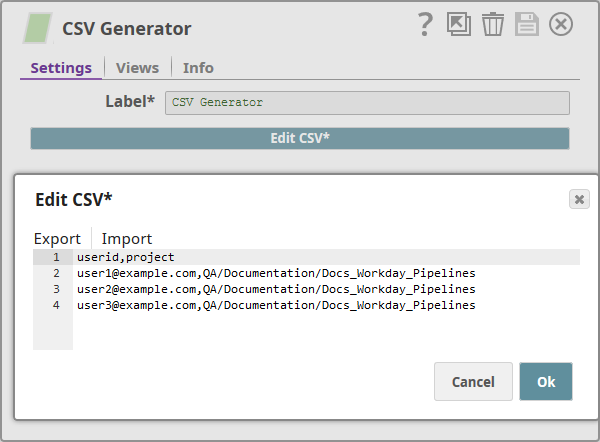
For an example of the CSV data, see the permissions.csv file in the ZIP file you downloaded.
Basically, your configurations trigger a child pipeline called Permission_Updater and pass user and project information from the input CSV file to the child pipeline.Creating the Child Pipeline
Now that your pipeline is created, you need to specify the variables–and corresponding values–that you plan to use in the pipeline Snaps. In this scenario, you have two variables: the email ID of the user whose permissions you need to modify / create, and the project space to which you want to grant access. To specify these variables:
The data in the Values fields are actually placeholders, placed there because Value is a mandatory field. The actual user and project data comes in from the parent pipeline.
You have now configured the new pipeline to take user and permissions input from the parent pipeline. You now add a Snap that will read each project's existing user permissions. To do so:
Save your changes and close the popup. button before adding the value.) _project_path. This is a reference to the pipeline parameter that we created in Step 3 above.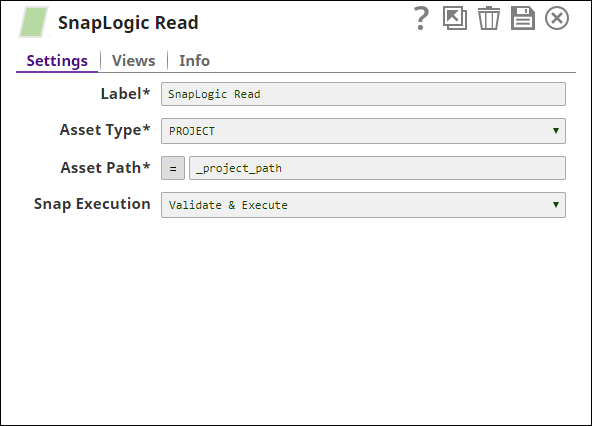
When this Snap is executed, it retrieves all the data related to each project listed out in the parent pipeline CSV file, including its permission details.
You now need to append new permissions to the project. To do so:
Save your changes and close the popup.
You can see in the screenshot above that while the Input preview data field lists only one set of permissions, the Output preview data lists two permission sets. The second one is the new permission set added.
You now have all the details needed to update the project properties received from the parent pipeline. To update each project space with the revised permission details: button before adding the value.) _project_path
Save your changes and close the popup.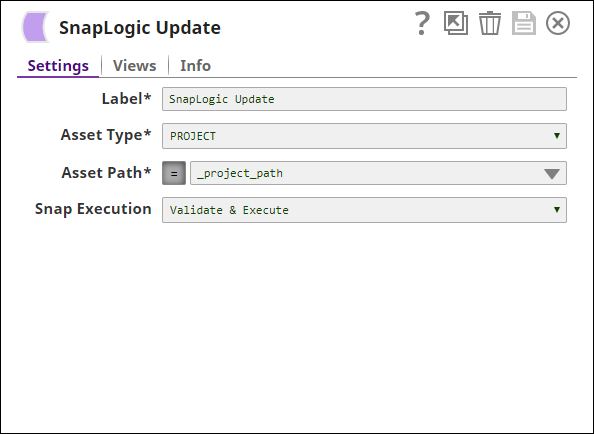
Location Variable Description Pipeline Parameters new_user The email ID whose permissions need to be managed project_path The path of the project to which you want to assign permissions Mapper Snap 'R','W','X' The permissions you want to grant to the user defined in new_user
See Also