In this article
Do not make changes to your configuration without consulting your SnapLogic account manager.
The various configuration options for the Snaplex process are documented here. These options can be added (or the existing value updated) in the Updating a Snaplex dialog. Java Component Container (JCC) configuration updates takes effect when the Snaplex process is restarted by running /opt/snaplogic/bin/jcc.sh restart or c:\opt\snaplogic\bin\jcc.bat restart.
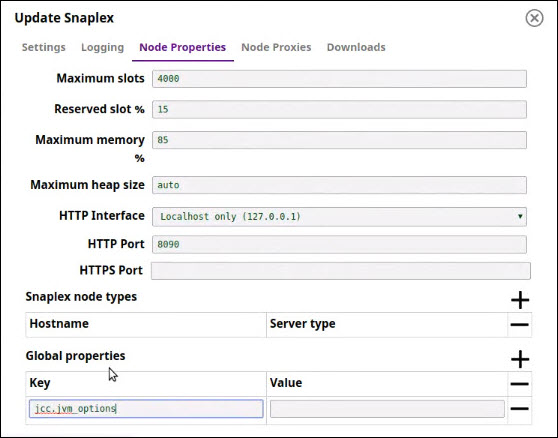
The various configuration options for the Snaplex process are documented in this page. These options can be added (or the existing value updated) using the SnapLogic Manager, Updating a Snaplex dialog, Node Properties tab.
Java Component Container (JCC) configuration updates take effect when the Snaplex is restarted by running the command: /opt/snaplogic/bin/jcc.sh restart OR c:\opt\snaplogic\bin\jcc.bat restart.
Logs
SnapLogic logs are written to the /opt/snaplogic/run/log directory. Two types of processes write events and errors to the logs – JCC and Monitor. The JCC process tracks events, while the Monitor process monitors the health of the JCC. FeedMaster logs are also included.
jcc_json–Main log for tracking SnapLogic application event and error messages.- j
cc_error.json–As errors are encountered, verbose error messages are written to this log. jcc.output.log–As the JCC is booting up, any informational, debugging, and error messages are written to this log.- j
cc_access.log–All requests to the node are written to this log. jcc.status.log–JCC status is periodically written to this log.monitor.log–As the status of the monitor process initializes, events and errors are written to this log during boot up.monitor.json–The main log for tracking the monitoring application.monitor_error.json–Verbose error messages are written to this log, such as the stack traces.plex_Scheduler_stats.json–A debug snapshot available on both Groundplex and Cloudplex. This log file is only generated on demand like a thread dump or other diagnostic/debugging logs.feed_master.json—The log for tracking FeedMaster event and error messages.feed_master_error.json—As errors are encountered, verbose error messages are written to this log.feed_master_access.log—All requests to the node are written to this log.
The logs are rotated based on file size into the /opt/snaplogic/run/log/backup directory.
All logs rotate after they become 50MB in size. The logs are compressed and written to the backup directory. Ten of the latest backup files are maintained, while the older files are automatically deleted.
Understanding Distribution of Data Processing across Snaplex Nodes
When a Pipeline or Task is executed, the work is assigned to one of the JCC nodes in the Snaplex. Depending on a number of variables, the distribution of work across JCC nodes is determined by number of threads in use, the amount of memory available, and the average system load.
To ensure that requests are being shared across JCC nodes, we recommend that you set up a load balancer to distribute the work across JCC nodes in the Snaplex.
Node Cluster
Starting multiple nodes with the JCC service pointing to the same Snaplex configuration automatically forms a cluster of nodes, as long as you follow these requirements for nodes in a Snaplex:
- The nodes need to communicate to each other on the following ports: 8081, 8084, and 8090.
- The nodes should have a reliable, low-latency network connection between them.
- The nodes should be homogeneous in that they should have similar CPU and memory configurations, as well as access the same network endpoints.
Heap Space
To set the maximum heap space used by your Snaplex, set Maximum Heap Size in the Update Snaplex dialog.
Auto Setting
The default is auto, meaning that SnapLogic automatically sets the maximum heap size based on the available memory:
- For RAM up to 4GB, 75% is allocated to JVM.
- For RAM over 4GB and up to 8GB, 80% is allocated to JVM.
- For RAM over 8GB and up to 32GB, 85% is allocated to JVM.
- For RAM over 32GB, 90% is allocated to JVM
The auto setting uses an optimum fraction of physical memory available to the system, while leaving sufficient memory for operating system usage.
Custom Setting
If you are entering your own heap space value, one method is to set the value to approximately 1GB less than the amount of RAM available on the machine.
Guidelines
- Setting it to too high a value can cause the machine to swap memory to disk, degrading performance.
- Setting it to too low a value can cause Pipelines which require higher memory to fail or degrade in performance.
We recommend that you set the heap space setting appropriately for optimum performance of the Snaplex.
Compressed Class Space
In Java, you have Objects and Classes. Objects are instantiations of Classes. In terms of memory allocation, object data is stored on the heap and class data is stored in non-heap space. To prevent Pipeline preparation errors, the default compressed class space size is raised to 2G when the JVM heap space size is more than 10GB. If you get a Pipeline Failed to Prepare error related to compressed class space, add aCompressedClassSpaceSize option to the global.properties file to override the default. For example:
jcc.jvm_options = -XX:CompressedClassSpaceSize=2G
HTTP Proxy Configuration
Refer to the Node Proxies section for information about configuring through an HTTP proxy.
HTTP Port
The HTTP port used by the JCC is configurable in the Update Snaplex dialog, Node Properties tab, HTTP Port property.
Default value is 8090 for JCC, 8091 for FeedMaster.
Updating this option modifies the global.properties file by setting the port number to the following value:
jcc.jetty_port = 8090
HTTPS Port
The HTTPS port is configurable in the Update Snaplex dialog, Node Properties tab, HTTPS Port property.
Default value is 8081 for JCC, 8084 for FeedMaster.
Updating this option modifies the global.properties file by setting the port number to the following value:
jcc.cc_secure_port = 8888
FeedMaster Broker Port
The FeedMaster uses port 8089 by default for the message broker. To change this, add the following entry:
|
in the Update Snaplex dialog, Node Properties tab, Global properties table. The port used should be unique, it cannot be the same as used for the HTTP and HTTPS services.
Temporary Folder
This section explains what data traversing the SnapLogic platform is encrypted or unencrypted. The temporary folder stores unencrypted data.
Encrypted data:
Transit data – Is always encrypted, assuming the endpoint supports encryption.
Preview and Account data – Is always encrypted.
Unencrypted data:
Snaplex – Data processing on Groundplex, Cloudplex, and eXtremeplex nodes occur principally in-memory as streaming, which is unencrypted.
Larger dataset – When larger datasets are processed that exceed the available compute memory, some Snaps like Sort and Join, which process multiple documents, writes Pipeline data to the local disk as unencrypted during Pipeline execution to help optimize the performance. These temporary files are deleted when the Snap/Pipeline execution completes. You can update your Snaplex to point to a different temporary location in the Global properties table of the Node Properties tab in the Update Snaplex dialog:
jcc.jvm_options = -Djava.io.tmpdir=/new/tmp/folder
The following Snaps write to temporary files on your local disk:
Anaplan: Upload, Write
Binary: Sort, Join
Box: Read, Write
Confluent Kafka: All Snaps that use either Kerberos and SSL accounts
Database: When using local disk staging for read-type Snaps
Email: Sender
Hadoop: Read, Write (Parquet and ORC formats)
JMS: When the user provides a JAR file
Salesforce: Bulk Query, Snaps that process CSV data
Script: PySpark
Snowflake: When using internal staging
Teradata: TPT FastExport
Transform: Aggregate, Avro Parser, Excel Parser, Join, Unique, Sort
Vertica: Bulk Load
Workday Prism Analytics: Bulk Load
Data Science (Machine Learning) Snaps: Profile, AutoML, Sample, Shuffle, Deduplicate, Match
Snaplex Network Binding
By default, the Snaplex starts and binds to the localhost network interface on port 8090. Any clients can connect to the JCC only if the client is also running on the same machine. This default is chosen since the Snaplex is not be receiving any inbound requests normally. It instead uses an outbound WebSocket connection to receive its requests from the SnapLogic cloud services. If requests need to be sent to the Snaplex from the customer network, then the Snaplex should be configured to listen on its network interfaces. This would be required when a feed URL Pipeline execution request is done by pointing directly at the Snaplex host instead of pointing at the cloud URL. To do this, set (default is 127.0.0.1):
jcc.jetty_host = 0.0.0.0
in the etc/global.properties by adding it to the Update Snaplex dialog, Node Properties tab, Global properties table.
If the hostname used by the Snaplex needs to be configured to be a different value than the machine name (for example newname.mydomain.com), add:
jcc.jvm_options = -DSL_INTERNAL_HOST_NAME=newname.mydomain.com -DSL_EXTERNAL_HOST_NAME=newname.mydomain.com
in the etc/global.properties by adding it to the Update Snaplex dialog, Node Properties tab, Global properties table.
Automatic Updates
The Snaplex process automatically updates itself to run the same version as running on the SnapLogic cloud. If there is a mismatch in the versions, the Snaplex cannot be used to run Pipelines.
When the Snaplex service is started, two Java processes are started. First is the Monitor process, which then starts the actual Snaplex process. The Monitor keeps track of the Snaplex process state, restarting it in case of failure. The Snaplex by default upgrades itself to run the same binaries as running on the SnapLogic cloud. The monitor process continues running always, running from the binary which was used when the Monitor was originally started. Running jcc.sh restart or jcc.bat restart restarts both the Monitor and the Snaplex processes.
In case a custom Snaplex patch is provided for a customer, it is provided as a jcc.war file. If this is copied into the /opt/snaplogic/run/lib directory and the JCC is restarted, the JCC again downloads the latest version of the war file. To prevent the Snaplex from going back to the default binaries, the Snaplex can be setup to disable downloading the current version from the SnapLogic cloud. To do this, check the value of build_tag as returned by https://elastic.snaplogic.com/status. For example, if the build tag is mrc27, adding
jcc.skip_version = mrc27
in etc/global.properties prevents the Snaplex from downloading the mrc27 version from the cloud. When the next release is available on the cloud and the custom patch is no longer required, the Snaplex automatically downloads the next version.
The download of latest binaries and automatic updates can be disabled on the Snaplex. If so, the next time there is a new version available on the SnapLogic cloud, the Snaplex is no longer be usable since there would be a version mismatch. The automatic download would have to be re-enabled for the Snaplex to be usable again. To avoid such issues, the skip_version approach above is the recommended method to run with a custom version of the Snaplex binaries.
To prevent the new binaries from being downloaded, set (default is True):
jcc.enable_auto_download = False
To disable the automatic restart of the Snaplex after new binaries are downloaded, set (default is True):
jcc.auto_restart = False
JCC Debug
If the Snaplex is being used for Snap development and needs to be put in debug mode, the monitor process can be configured to start the JVM with debug options enabled. To do this, set:
jcc.jvm_options = -agentlib:jdwp=transport=dt_socket,server=y,suspend=n,address=8000
in etc/global.properties. This starts the Snaplex process with debug port set to 8000, to which the debugger can be connected. Any Pipeline executions to the Snaplex would hit breakpoints set in the Snap code.
Snaplex Outbound Connections
The Snaplex process creates outbound WebSocket connections to the SnapLogic cloud to be able to process incoming requests from the cloud. If running several nested Pipelines, or Pipelines using ForEach, there could be timeout errors if no connection is available to process an inbound request. By default, 20 connections are created. This can be increased if a higher number of cloud triggered Pipelines need to be run concurrently on the Snaplex node. The maximum allow value is 60. Setting this too high causes increased network overhead. If this has to be set to a larger value, it is an indication that more nodes need to be added to the Snaplex. Pipeline execution requests is automatically be load balanced across the available nodes.
To increase this limit, set (default is 20):
jcc.websocket_connection_count = 30
in the etc/global.properties by adding it to the Update Snaplex dialog, Node Properties tab, Global properties table.
HTTP Connection Pooling
Outbound HTTP connections created to the SnapLogic cloud or to any other HTTP endpoints are placed in a connection pool by default. The properties for the pool can be configured in etc/global.properties by adding it to the Update Snaplex dialog, Node Properties tab, Global properties table.
To increase the maximum number of connection which can be created at a time (default is 100)
jcc.http_client_max_connections = 300
To set the TCP connection timeout for an outbound connection (in seconds, default is 60, zero is infinite timeout)
jcc.http_client_tcp_connection_timeout = 120
To set the inactivity timeout for a socket connection (in seconds, default is 3600, zero is infinite timeout).
jcc.http_client_socket_timeout = 300
The http_client_socket_timeout must be set to higher than the maximum child Pipeline execution time.
Ring Buffer
The size of the buffer between Snaps is configured by setting the jcc.disruptor_ring_buffer_size in the global.properties. The default value is 1024.
Clearing Node Cache Files
A clearcache option is added to the jcc.sh/jcc.bat file to clear the cache files from the node.
You must ensure that the JCC is stopped before running the clearcache command on both Windows and Linux systems.
Configuring BouncyCastle as the first Security Provider
The JCC node contains a list of security providers to enable Snaps to work with SSL or private keys. SUN is the default and the main security provider. However, the SUN provider might not handle some private keys, resulting in an InvalidAlgorithmException error. In such cases, you must ensure that the BouncyCastle security provider is used as the main security provider; otherwise, the Pipelines fail.
You can enable a flag in the node properties to make BouncyCastle the first security provider.
- In the Node Properties tab of your target Snaplex, add the following key/value pair under Global Properties:
- Key:
jcc.jvm_options - Value:
-Dsnaplogic.security.provider=BC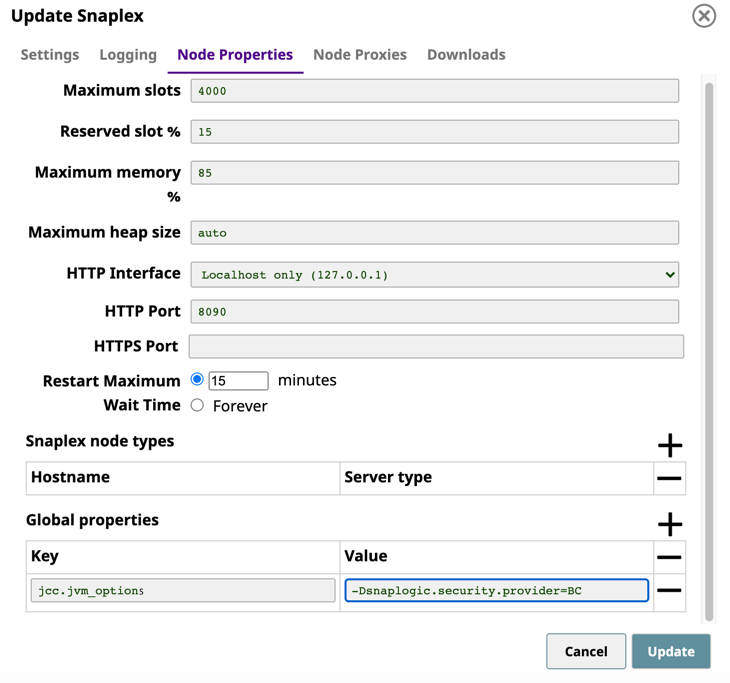
- Key:
- Click Update, and then restart the Snaplex node.
Redshift Accounts with Amazon JDBC Driver
If you switch to BouncyCastle as the main security provider, then Redshift accounts working with Amazon JDBC Driver fail if the driver version is below 2.0.0.4. As a work-around, use the Redshift driver 2.0.0.4 or later and provide the JDBC URL.