| Anchor | ||||
|---|---|---|---|---|
|
To view the list of Proxies:
In SnapLogic Manager, go to API Management > API Manager.
In the API Manager, go to the APIs & Proxies tab.
Set Filter by Type to Proxy and click Search.
| Anchor | ||||
|---|---|---|---|---|
|
| Info |
|---|
|
To create a proxy:
In the API Manager, go to the APIs & Proxies tab.
Click the plus icon (
 ), and select New Proxy from the dropdown.
In Create proxy dialog, choose the source of the OAS 2.0 or 3.0 file.

Upload File. Click Choose File to specify the location of the specification file to upload.
Enter URL. Enter a valid URL pointing to the location of the specification file.
Create empty proxy: Do not reference a specification during proxy creation.
Click Continue.
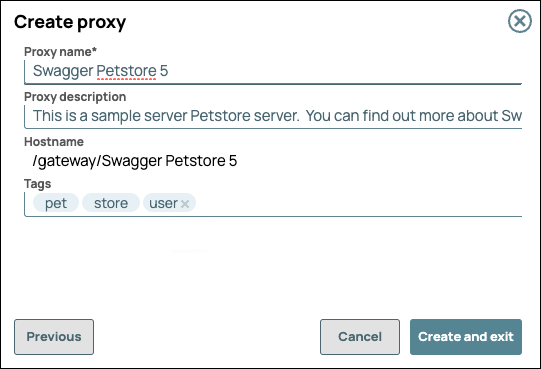
Configure the new proxy, then click Create and exit.
Field | Description |
|---|---|
Proxy Name | The name for your Proxy.
The Proxy name is appended to the Hostname. |
Proxy Description | (Optional) Information about the Proxy. |
Hostname | The prefix |
Tags | (Optional) Tags you can use to organize your proxies. |
API Proxies do not support versioning.
Because a Proxy connects to an implementation of an API, you can simply create new Proxies and endpoints to connect to new implementations.
| Tip |
|---|
To associate endpoints with the new Proxy at this time, click Create with Endpoints. To do so at a later time, click Create and Exit. |
Edit Proxy name
To Rename Proxy name for unpublished proxies:
Navigate to API Manager > Proxy > Proxy details.
Click Edit Details to rename the Proxy:
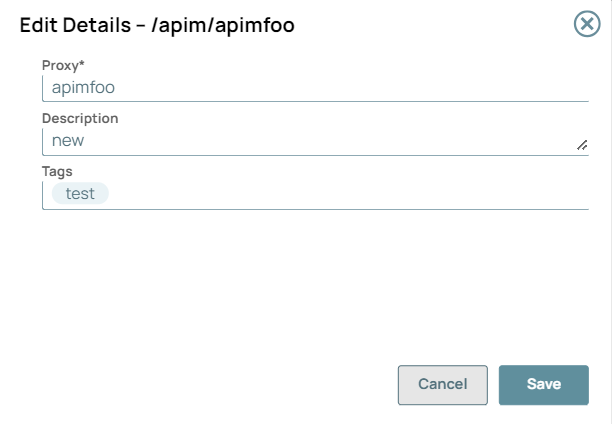
Click Save. A message “Proxy details has been updated successfully” displays in the UI.
Edit Proxy endpoint
Navigate to API Manager > API > Proxy endpoint details.
Select the Proxy endpoint to be edited.
Click Edit Details to edit the Proxy endpoint:
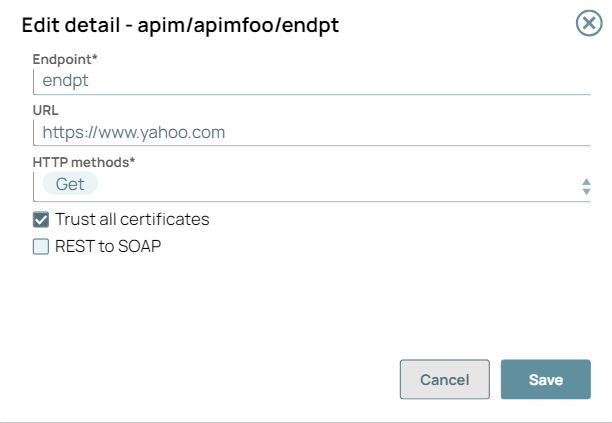
Click Save. A message “Endpoint details has been updated successfully” displays in the UI.
You can only edit the Proxy name or Proxy endpoint of the unpublished APIs.
Unpublish the Proxy to edit the Proxy name or the Proxy endpoint.
Special characters such as |, <, >, [, ], {, },#, ?, /, and \. cannot be used.
Video: Create and Publish a Proxy to your Developer Portal
Watch the following video to learn how to create and publish a Proxy to the Developer Portal.
| Anchor | ||||
|---|---|---|---|---|
|
| Info |
|---|
The June 2023 release supports soft delete operation for API Proxies. When you delete a proxy, it goes to the Recycle Bin in Manager. |
Prerequisite: If a Proxy has endpoints, delete the endpoints before deleting the Proxy.
To delete a Proxy:
In the API Manager, go to the APIs & Proxies tab.
Hover over the row of the Proxy.
Click the trash icon (
) that appears at the end of the row. 
The Delete confirmation prompt opens.

Click Delete.
Verify the deleted Assets by navigating to the Manager Recycle Bin for your Org.
To delete forever:
Select the Proxy.
Click
to delete it permanently from the Manager Recycle Bin.
