/
Pipeline: Split a CSV File
Pipeline: Split a CSV File
- Kalpana Malladi
- Diane Miller (Deactivated)
- Ruth Stento
Owned by Kalpana Malladi
Last updated: Aug 11, 2023 by Ruth Stento
In this Page
Scenario
I want to take a CSV file and split the data out into two other CSV files. While this is not a typical use case for SnapLogic, it does provide examples of how to use several Snaps.
Requirements
Snaps Used
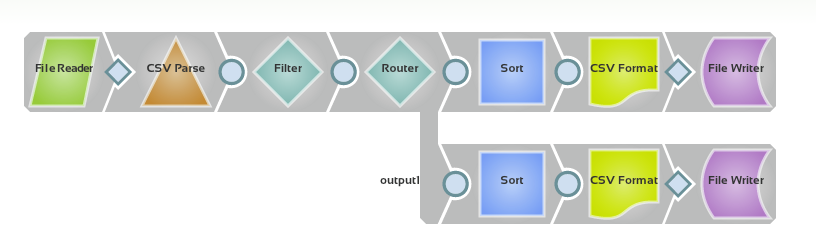
For this scenario, the following Snaps are used:
- File Reader
- CSV Parser
- Filter
- Router
- Sort
- CSV Format
- File Writer
Other Requirements
- A sample CSV file loaded into the SnapLogic file system. This example refers to a employee directory file, directory.csv, that contains the following columns: Name, Location, Extension, Email, Title, Department, Dept ID.
Configuration
- Upload your CSV file to the SnapLogic file system. See the Files Page topic for more information.
- Create a new pipeline by clicking the + button on the left palette tab.
- Add and configure a File Reader Snap.
- For the File field, select the file you uploaded in Step 1. Because you are accessing the file system, no authentication information is needed.
- For the File field, select the file you uploaded in Step 1. Because you are accessing the file system, no authentication information is needed.
- Add a CSV Parser Snap. You will use the default configuration.
- Add and configure a Filter Snap. If your source file is a company directory and you only want data for the Sales team, you would configure the Filter Snap with an expression to restrict the data to just that, for example:
$Department == "Sales"
Be sure to select the expression toggle (=) in front of the field. - Add and configure a Router Snap.
- Determine which information you want to route to each of the two files you will create. In this example, you will filter by the Location column and move some groups to one file and the rest to the other file.
- Add a row for each expression you want to process, for example:
$Location == "Field" to output0
$Location == "HQ" to output1
Be sure to select the field expression toggle (=).
output0 and output1 are the default values for the first two output views. To rename the views, you can edit them on the Views tab.
- (Optional) Add and configure two Sort Snaps, one off of each Router output. If you want to sort the data being written to the files, then you would add a Sort Snap.
- Add a Sort Path and set it to the column you want to sort by. To sort by more than one column, add additional values.
- Set Sort Order to the correct value.
- Add two CSV Format Snaps, one off of each Router output. You will use the default configuration.
- Add and configure two File Writer Snaps, one off of each Router output.
- For each output, set the File Name, including a path if necessary. See File Writer for information on how to write files to different locations. If written to the SnapLogic database, you can access the files through Manager.
- Add the appropriate account type for the location where you want to write the files to.
, multiple selections available,
Have feedback? Email documentation@snaplogic.com | Ask a question in the SnapLogic Community
© 2017-2025 SnapLogic, Inc.