REST Patch
In this article
We highly recommend that you use the HTTP Client Snap instead of REST Snaps to take advantage of the capabilities of HTTP Client Snap. Learn more about migrating from REST Snaps to HTTP Client Snap.
Overview
You can use the REST Patch Snap to execute an HTTP Patch method on a REST API service endpoint to replace business object resources. If the given resource does not exist, the Snap creates the resource.
Prerequisites
None.
Supported Features
Works in Ultra Tasks. We recommend you to set the batch size to 1.
Limitations and Known Issues
None.
Snap Views
| Type | Format | Number of Views | Examples of Upstream and Downstream Snaps | Description |
|---|---|---|---|---|
| Input | Document |
|
| Each input document offers details associated with the file on which the patch action must be performed. |
| Output | Document |
|
| Each output document contains details associated with the status of the patch operation. If the Snap fails during the operation, it sends an error document containing the error, reason, resolution, and stacktrace to the Error view. For this to happen, however, the error view must be enabled. |
| Error | Error handling is a generic way to handle errors without losing data or failing the Snap execution. You can handle the errors that the Snap might encounter while running the Pipeline by choosing one of the following options from the When errors occur list under the Views tab:
Learn more about Error handling in Pipelines. | |||
Snap Settings
| Field Name | Field Type | Description |
|---|---|---|
| Label* | String | Specify a name for the Snap. You can modify this to be more specific, especially if you have more than one of the same Snap in your pipeline. Default Value: REST Patch |
Service URL* | URL | Specify the service endpoint URL of REST API. You can provide the URL in one of the following ways:
For example:
For example: For Snaps using AWS Signature V4 accounts, you can use the canonical name (CNAME) for the URI so it's not necessary for the URL to end with amazonaws.com or have the region and service provided in it. However, if you are using the CNAME you must provide it in the AWS Region and Service Name fields in the AWS Signature V4 account. The hostname in the CNAME must be equal to the bucket name. For example: New URI with CNAME: Here, the bucket name is The Snap finds the value at the JSON path $.widget.id in the input data and replaces "%s" in the Service URL with the value. You can connect File Reader and JSON Parser Snaps upstream of a REST Put Snap and prepare the following JSON file for the File Reader Snap: The Service URL for the REST snap has to be valid. If the Service URL contains any special characters, such as !, =, %21, $, and ^, the Snap throws an exception error. You can escape the special characters (using expression language) using one of the following methods:
We recommend you use the former (encodeURIComponent) method to escape the special characters. Default Value: N/A |
| HTTP Entity | String | Specify the JSON path to the HTTP entity data in the input map data. You can leave this field blank if there is no entity data to send to the service URL. Default Value: $ (the HTTP entity data is at the root of the input map data) |
| Batch size | Integer | The number of documents to be included in a single request. The incoming documents will be accumulated in a list up to the defined batch size before it is submitted to the endpoint Make sure to set the batch size only if your REST endpoint expects a list. Default Value: N/A |
| Show all headers | Checkbox | The REST endpoint may return a response with multiple headers with the same header name.
If any of these objects has a key-value format, it is parsed into the map data. Default Value: Deselected |
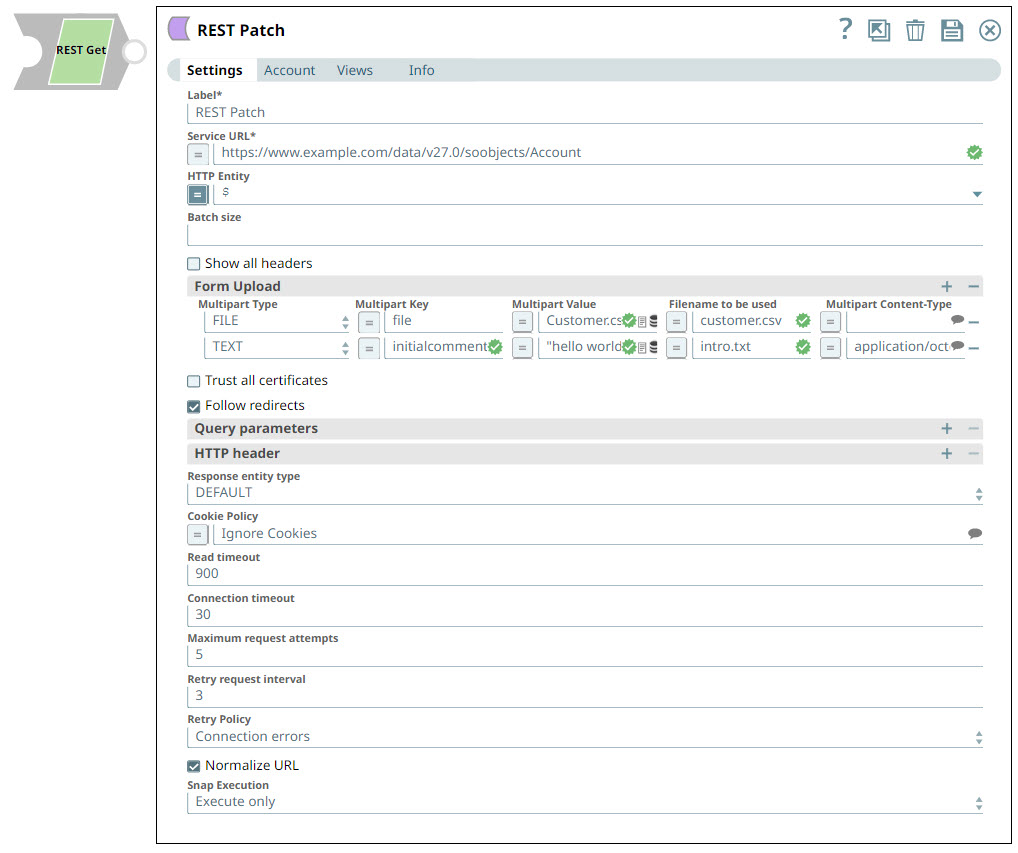
| Form Upload | Use this field set to configure the fields required to upload multiple files and text. Learn more about Multipart Upload. This field set contains the following fields:
Default Value: N/A | |
| Multipart Type | Dropdown list | Choose the type of multipart upload that you want to initiate. The available options are:
|
Multipart Key | String | Specify the key required for the multi-part to upload a file or text as required. HTTP POST uses multi-part entity to achieve the form upload. The form data of its multi-part entity contains key-value pairs. Multipart Key can be anything and it depends on the service endpoint. Default Value: file |
| Multipart Value | String/Expression | Specify the the file or text to be uploaded. If Multipart Type is FILE, the following are applicable:
If Multipart Type is a TEXT, then
For Text part upload using the Form Upload, the Http Entity and Filename to be used fields are ignored. Default Value: N/A
|
Filename to be used | String | Enter the name that you want to use for the file at the endpoint. This property is expression-enabled. For more information on the expression language, see Understanding Expressions in SnapLogic and Using Expressions. For information on Pipeline Parameters, see Pipeline Properties. Default Value: N/A |
Multipart Content- Type | String | Select the content type headers for the data in the body of the multipart HTTP request. This enables the Snap how to read or interpret the input file . The available options are:
If the Multipart Type is TEXT, it is generally not required to specify any value in this field. When you do not specify any value, the API uses the default value
Default Value: N/A |
| Trust all certificates | Checkbox | Select this checkbox to trust all certificates, such as self-signed certificates. Default Value: Deselected |
| Follow redirects | Checkbox | Select this checkbox to enable the Snap to follow redirects.
Default Value: Selected |
| Query parameters | Use this field set to add query parameters to your request. This field set comprises the following fields:
| |
Query parameter | String | Enter the name of the query parameter. Default Value: N/A |
Query parameter value | String | Enter the value that you want to assign to the parameter. Default Value: N/A |
| HTTP Header | Use this field set to create the HTTP header key-value pairs required for defining the headers for different types of input (JSON, PDF, DOCX, and so on). If you want to specify only content-type headers, you can configure the Multipart Content-Type property instead. This field set comprises the following fields:
Configuring HTTP headers helps avoid problems in reading or opening files uploaded using the REST Post Snap. Refer to the Troubleshooting section, below, for more information. | |
Key | String | Enter the name of the HTTP header. This property is expression-enabled. For more information on the expression language, see Understanding Expressions in SnapLogic and Using Expressions. For information on Pipeline Parameters, see Pipeline Properties. Default Value: N/A |
Value | String | Enter the value that you want to assign to the HTTP header. This property is expression-enabled. For more information on the expression language, see Understanding Expressions in SnapLogic and Using Expressions. For information on Pipeline Parameters, see Pipeline Properties. Default Value: N/A |
| Response entity type | String | Select one of the following response entity types you want the Snap to display in the output document.:
If you select TEXT or BINARY, the Snap does not parse the entity content. If you select DEFAULT, the Snap produces the expected result in most cases, but if it fails to process as expected, you can set the Response entity type to TEXT or BINARY. Default Value: DEFAULT |
| Cookie Policy | Dropdown list | Select a Cookie Policy from the following options:
When using a cookie policy, you must select Show All Headers checkbox to view the parsed cookies from the cookie policy specification. Default Value: Ignore Cookies |
| Read timeout | Integer | Specify the number of seconds for which the Snap waits before aborting the request due to a failure to read from the target service.
Default Value: 900 |
| Connection timeout | Integer | Specify the number of seconds for which the Snap waits before aborting the request due to a failure to establish a connection to the target endpoint or service. Default Value: 30 |
| Maximum request attempts | Integer | Specify the maximum number of attempts that the Snap must make to receive a response. If the attempts do not result in a response, the Snap terminates the request. Default Value: 5 |
| Retry request interval | Integer | Specify the time in seconds to wait before retrying the request. Default Value: 3 |
| Retry Policy | String | Select how you want to handle connection and error responses from the following options:
Default Value: Connection errors |
| Normalize URL | Checkbox | Select this checkbox to normalize the Service URL. This enables the Snap to convert double slashes (//) in the URL path to a single slash (/). Deselecting this checkbox reverts the Snap to 4.19 Snaplex behavior, where the URL paths were not normalized by default. In the 4.20 Release, due to the HTTP client upgrade the URL paths were normalized by default. Hence, there was a change in behavior in handling the URL paths in 4.20 release when compared to 4.19. This change in behavior should not impact the existing Pipelines, because most of the websites map URL paths with double or single slashes to the same endpoint. For example, https://snaplogic.com/company/diversity and https://snaplogic.com//company//diversity both URLs are directed to the same endpoint. Hence, we recommend you to select the Normalize URL checkbox. However, an exception to this is when you use non-standard URLs that differentiate the URL paths containing double slashes from those with single slashes and map them to different endpoints, in which case you must deselect Normalize URL checkbox. Default Value: Selected |
| Snap Execution | Checkbox | Select one of the following three modes in which the Snap executes:
Default Value: Validate & Execute |
Troubleshooting
| Error | Reason | Resolution |
|---|---|---|
| Failed to execute HTTP request | Service URL must have a protocol, e.g. http://, https:// You get this error when your service URL does not start with HTTP or HTTPS. | Check the Snap properties. Specifically, check whether your service URL starts with HTTP or HTTPS. |
| status code = 404 | Phrase = NOT FOUND, refer to the error_entity field in the error view document for more details This typically means that your service URL does not point to the endpoint that it should. | Check the values of Snap properties. Specifically, check your service URL. |
| status code = 406 | NOT ACCEPTABLE. This means that the endpoint is not receiving any details coming in from upstream Snaps. | Ensure that you have valid references in the HTTP entity field. |
| status code = 400 | BAD REQUEST You see this error when the data in the HTTP entity field is not a reference. | |
| HTTP entity: $<variable1> is undefined. Perhaps you meant: $<expected_variable> | '<variable1>' was not found while evaluating the sub-expression '$<variable1>' This means that the referenced variable does not exist upstream. | Check the spelling of the property or, if the property is optional, use the get() method (e.g. $.get('<variable1>')) |
| status code = 404 | NOT FOUND, refer to the error_entity field in the error view document for more details This means that SnapLogic could not find the data on which you want the patch call to execute. | Check the values of Snap properties. |
| URL Parse Exception - 403 | The Service URL path might be containing any of the following special characters: !, =, %, #, $, ^&()_¢äâêîôûñç¡¿ÉÙËǨ°¸ðø©¢¾A+²½µ®§÷¶þ | To escape the special characters, use the global function encodeURIComponent on any variables that might contain special characters so that they are encoded properly. |
| Too many Requests - 429 | There are too many requests to REST endpoint. | Wait for the retry to succeed. Rest related Snaps extract the response header and automatically retry when they encounter status 429. By default, the retry interval (Retry-After) is specified in the HTTP response header. If no value is available for Retry-After, then the Snap’s Retry Interval value is used. |
Examples
Removing SnapLogic Users from Groups
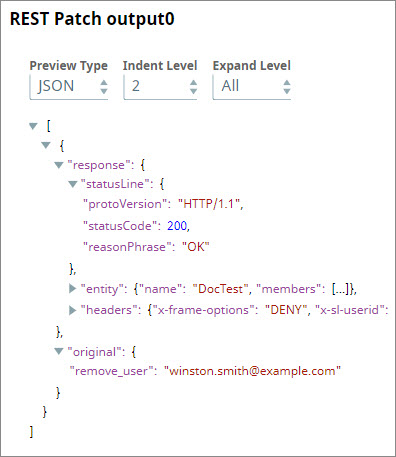
In this example, we use the REST Patch Snap to connect to SnapLogic's public APIs and remove a user from a group.
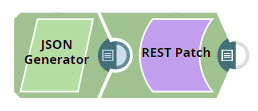
Design the Pipeline using a JSON Generator and REST Patch Snap.
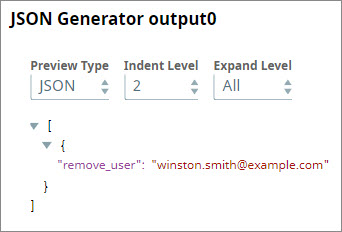
- Click the JSON Generator Snap and configure it to supply the email ID that you want to remove from a SnapLogic Org, say DocTest.
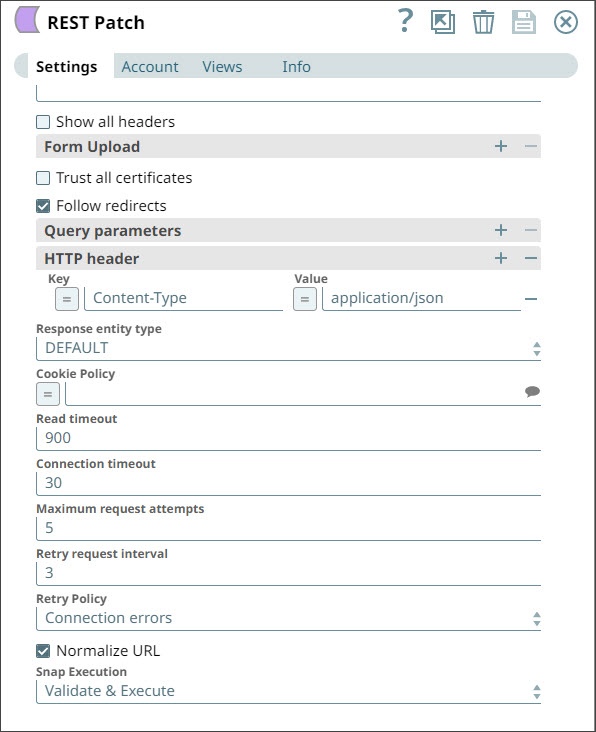
- Configure the REST Patch Snap to send the user details retrieved from the JSON Generator Snap to the service URL documented in /wiki/spaces/AP/pages/1438218. You must also specify in the HTTP Headers section that the content type used in this REST call is "application/json".
- In this Snap:
- The Service URL is set to the API path for the group you are modifying, such as https://elastic.Snaplogic.com/api/1/rest/public/groups/<organization>/<groupname>
- HTTP entity has the express toggle enabled and is set to $.
- An HTTP header is created with a Key of Content-Type and a Value of application/json.
- For the Account, use a REST Basic Auth account with your SnapLogic credentials. For information on setting up your account see REST Basic Auth Account.
- When you run the Pipeline, the user listed in the JSON Generator Snap is removed from the group you specified in the service URL.
Downloads
Important steps to successfully reuse Pipelines
- Download and import the pipeline into the SnapLogic application.
- Configure Snap accounts as applicable.
- Provide pipeline parameters as applicable.
Snap Pack History
See Also
Have feedback? Email documentation@snaplogic.com | Ask a question in the SnapLogic Community
© 2017-2025 SnapLogic, Inc.
