Atlassian uses cookies to improve your browsing experience, perform analytics and research, and conduct advertising. Accept all cookies to indicate that you agree to our use of cookies on your device. Atlassian cookies and tracking notice, (opens new window)
You can use this account type to connect REST Snaps with data sources that use OAuth1 accounts.
Prerequisites
None.
Limitations
This account currently works only with Xero API.
Account Settings
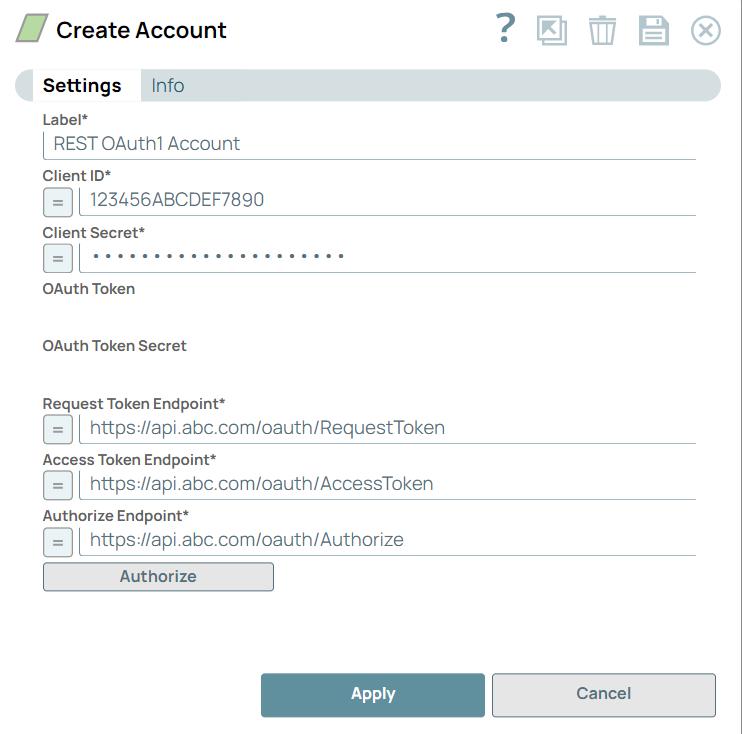
To create your REST OAuth1 account in SnapLogic, you must provide at least your Client ID, Client secret, Request Token Endpoint,Access Token Endpoint, and Authorize Endpoint, and click Authorize.
Field Name
Field Type
Description
Label
String
Required. Specify the name for the account. We recommend that you update the account name if there is more than one account of the same account type in your project.
DefaultValue: N/A Example: REST OAuth1 Account
Client ID
String
Required. Specify the client ID associated with your account. You can create the client ID as advised by your application provider.
Required. Specify the client secret associated with your account. You can create the client secret as advised by your application provider.
DefaultValue: N/A Example: N/A
OAuth Token
String
Auto-generated after authorization. Specify the token that SnapLogic uses to make API requests on behalf of the user associated with the client ID.
DefaultValue: N/A Example: N/A
OAuth Token Secret
String
Auto-generated after authorization. Specify the refresh token associated with your account. If the refresh token is stored, then the access token can be refreshed automatically before it expires.
DefaultValue: N/A Example: N/A
Request Token Endpoint
String
Specify the endpoint from where the application can retrieve the request token required for the account.
Click this button to authorize the REST OAuth1 account using the credentials provided in the Client ID, Client secret, Request Token Endpoint,Access Token Endpoint, and Authorize Endpoint fields.
DefaultValue: N/A Example: N/A
Onauthorization, SnapLogic places a call-back to the concerned application API. On validation of the details you have entered, the target application grants access to the API and generates the required OAuth token and secret key. The App Details page for the instance appears.
In the App Details page, enter the following details:
In App name, enter the name of the app.
InCompany or Application Url, enter the URL of the application to which you want access.
In OAuth1.0a Callback Domain, enter the callback domain for your account. For example: "https://elastic.snaplogic.com/api/1/rest/admin/oauth2callback/rest"
ClickSave.
On validation of the details, a page appears requesting access to your data. Click Allow access for 30 minutesto enable the account to access your data for the specified period of time.
Once you grant access, theOAuth Token and OAuth Token Secretfields in the Create Account popup are auto-populated, and your account is ready.
When you start configuring a REST Snap, you must provide the Service URL associated with the data that you want. You can get the URL associated with the data from the application to which you want to connect.
For example, in Xero you can retrieve the service URLs you need by selecting the Endpoint you need from the Xero Developer Platform:
SnapLogic sends your account details to the OAuth1 endpoint specified and populates the Access token, Refresh token, and Access token expiration fields using the details received from that endpoint.
Troubleshooting
Error
Reason
Resolution
One or more required field is blank
You click Authorize in the account dialog window, but one or more of the following fields is blank:
Label
Client ID
Client secret
Request Token Endpoint
Access Token Endpoint
Authorize Endpoint
Insert valid details into the following fields and click Authorize.
Label
Client ID
Client secret
Request Token Endpoint
Access Token Endpoint
Authorize Endpoint
You attempted to authorize your account, but authorization failed. Thus, the following fields are empty:
OAuth Token
OAuth Token Secret
You still click Apply.
Snap Pack History
Click to view/expand
Release
Snap Pack Version
Date
Type
Updates
February 2025
main29887
Stable
Updated and certified against the current SnapLogic Platform release.
November 2024
main29029
Stable
Updated and certified against the current SnapLogic Platform release.
August 2024
main27765
Stable
Upgraded the org.json.json library from v20090211 to v20240303, which is fully backward compatible.
May 2024
437patches26522
Latest
Enhanced the REST OAuth2 Account with Snaplex support for executing OAuth2 operations.
May 2024
main26341
Stable
Updated and certified against the current SnapLogic Platform release.
February 2024
main25112
Stable
Updated and certified against the current SnapLogic Platform release.
November 2023
main23721
Stable
Updated and certified against the current SnapLogic Platform release.
August 2023
main22460
Stable
Updated and certified against the current SnapLogic Platform release.
February 2023
main21015
Stable
Upgraded with the latest SnapLogic Platform release.
February 2023
432patches20054
Latest
For Snaps using AWS Signature V4 accounts, DNS canonical names are now supported for S3 buckets.
February 2023
main19844
Stable
Upgraded with the latest SnapLogic Platform release.
November 2022
main18944
Stable
Upgraded with the latest SnapLogic Platform release.
September 2022
430patches17851
Latest
The REST Post Snap now works without displaying any errors when the Show all headers checkbox is selected and the Content-type is text/xml or application/xml.
August 2022
430patches17684
Latest
The REST AWS Sig v4 Account is now enhanced with the AWS Region and Service Name fields that enable the Snap to support Virtual Private Cloud (VPC) endpoint.
August 2022
main17386
Stable
You can set cookie policy specifications using the Cookie Policy dropdown list in REST Snaps .
Support for auto-retries where the REST Snaps automatically retry when they encounter 429 HTTP status code - Too Many Requests error.
Passing AWS Security Token Service (STS) temporary credentials in the Security Token field.
Expression values for Access-key ID and Secret Key fields.
Improved the performance of REST Snaps when the Snaps encounter Unauthorized (401) or Forbidden (403) errors even when the user credentials are available in the organization and the account type is OAuth2.
4.29 Patch
429patches17084
Latest
Enhanced the following REST Snaps with Cookie Policy dropdown list to set the cookie policy specifications. This field is case-insensitive:
Cookie Policy: The Cookie Policy to select from the following options:
BROWSER COMPATIBILITY: This policy is compatible with different servers even if they are not completely standards-compliant. If you are facing issues while parsing cookies, you should try using this policy.
IGNORE COOKIES: This cookie policy ignores all cookies. You should use this policy to prevent HTTP Client from accepting and sending cookies.
RFC STRICT: All servers that handle version 1 cookies should use this policy.
RFC LAX: The original cookie specification which formed the basis for RFC2109.
Added a new field Security Token in the REST AWS Sig v4 Account to support AWS Security Token Service (STS) for using temporary credentials.
Enhanced the REST AWS Sig v4 Account to support expression values for Access-key ID and Secret Key fields.
4.29 Patch
429patches16076
Latest
Enhanced the REST Snaps with support for auto-retry where the Snap retries automatically when the Snap encounters 429 HTTP status code - Too many requests error.
Improved the performance of REST Snaps when the Snaps encountered errors due to Unauthorized (401) or Forbidden (403) statuses though the user credentials are available in the organization and the account type is OAuth2.
4.29
main15993
Stable
Added the REST In-memory OAuth2 Account type with Client Credentials Grant Type that supports and stores the access token in memory for reuse until it expires. When the Snap encounters 401 or 403 errors, this account generates a new token after refreshing the cache.
4.28 Patch
428patches15172
Latest
Fixed an issue that caused REST SSL accounts to fail when the username in the REST SSL Account was null and the Enhanced Encryption level was low, medium, or high.
4.28
main14627
Stable
Enhanced the REST Post, REST Put, and REST Patch Snaps with the Multipart Type list to support multipart (files and text) upload.
Renamed the following fields:
Upload File(s) field set to Form Upload
Upload-file key to Multipart Key
Upload file to Multipart Value
4.27 Patch
427patches12750
Latest
Enhanced the REST Put Snap with the Upload Transfer Request Type field to support encoding of chunked transfer and calculating content length.
4.27
main12989
Stable and Latest
Fixed an issue in the REST OAuth2 account that caused a new feature, OAuth Password Grant Type to be excluded from the GA version. The latest deployed build includes this feature.
4.27
main12833
Stable
Enhanced REST OAuth2 accounts with a new option password for Grant Type to obtain an access token through user credentials. On selecting password, the Snap populates the Username and Password fields to enter the credentials.
4.26
426patches12749
Latest
Fixed an issue with theREST PostSnap, where the Snap delayed the fetching of documents, when the batch size is greater than or equal to one.
4.26
426patches11746
Latest
Enhanced the REST Post Snap to display all cookies (securedauthcookies and httponly cookies) from the CookieStore along with headers when you select the Show all headers checkbox.
4.26
main11181
Stable
Upgraded with the latest SnapLogic Platform release.
Enhanced the REST Snap Pack to support Proxy Authentication.
4.25 Patch
425patches9684
Latest
Fixed theREST Post Snap that fails to correctly set the Content-Length header when working with multi-file uploads.
Added Send Client Data as Basic Auth Headercheck box to theOAuth2andOAuth2 SSLaccounts. This check box enables you to includeand pass the client credentials information in the header when connecting to the OAuthendpoint.
Upgraded with the latest SnapLogic Platform release.
4.24
main8556
Stable
Upgraded with the latest SnapLogic Platform release.
4.23
main7430
Stable
Improved the handling of expired access tokens in REST Snaps that use OAuth2 accounts (REST OAuth2 AccountandREST OAuth2 SSL Account). The Snaps can refresh expired access tokens on-demand, through a request to the platform. The Snap reloads the account with the updated/fresh access token before attempting the next retry.
4.22 Patch
422patches7103
Stable
Enhances the Snaps in REST Snap Pack by separatingthe retry logic for OAuth account from that of the Snap.
4.22
main6403
Stable
Added a new account type, REST OAuth2 SSL, which enables support for the OAuth2 SSL authentication for REST Snaps with endpoints that require client certificates.
[Docs Update] Applied the enhanced doc template to the Snap Pack's documentation. Improves usability by enhancing Snap field descriptions, functional examples, and use cases.
4.21 Patch
rest8858
-
Latest
Fixed the REST Get and REST Post Snaps that does not parse Content-Encoding and Content-Type headers for gzipped responses.
4.21
snapsmrc542
-
Stable
Upgraded with the latest SnapLogic Platform release.
4.20 Patch
rest8798
-
Latest
Fixed the REST POST Snap that fails when a single file is uploaded in multi-part form using theSingle file uploadSnap settings.
4.20
snapsmrc535
-
Stable
The newMultipart related option in theUpload body typeproperty in theREST PostSnap enables you to post files to the Google Drive API and retain the original names.
The REST Account now has a new Grant TypeoptioncalledClient Credentials. This enables the Snap to obtain an access token to the client ID and client secret through the token endpoint URL.
4.19 Patch
rest8374
-
Latest
Added a drop-down propertyRetry Policyto the REST Snaps to provide users with different retry options for connection and 4xx and 5xx error responses.
Fixed the REST GET Snap that limits the output to five documents, even when more output documents are expected.
Critical fix
If your current or new Pipelines with REST Snaps use the retry functionality, then we recommend you to use this latest patch version as subsequent GA releases may result in Pipeline executions failing. Else, you can continue using your existing Snap Pack version (stable distribution – snapsmrc528).
4.19
snapsmrc528
-
Stable
Fixed a regression issue wherein REST Snaps are unable to handle empty XML responses when Show All Headers is enabled.
4.18
snapsmrc523
-
Stable
Upgraded with the latest SnapLogic Platform release.
4.15 Patch
rest6310
-
Latest
Fixed an issue with the NLTM Rest account connection hanging infinitely.
4.15
snapsmrc500
-
Stable
Upgraded with the latest SnapLogic Platform release.
4.14 Patch
rest6159
-
Latest
Fixed an issue wherein the REST GET and POST Snaps were infinitely trying to connect to endpoint even after pipeline execution abortion.
4.14 Patch
rest5782
-
Latest
Fixed an issue wherein the REST POST Snap was not accepting any blank values from upstream Mapper Snap.
4.14 Patch
rest5719
-
Latest
Fixed an issue where the Ultra task was not producing a valid response while acknowledging documents.
4.14
snapsmrc490
-
Stable
Upgraded with the latest SnapLogic Platform release.
4.13 Patch
NA
-
Latest
REST POST Snap: New properties: Multipart Content-Type, and Filename to be used added.
4.13
snapsmrc486
-
Stable
Upgraded with the latest SnapLogic Platform release.
4.12 Patch
rest4917
-
Latest
Fixed an encoding issue with the REST Get Snap so that it uses the same encoding format (UTF-8) by default on all machines instead of using a different encoding format based on the machine's Operating System.
4.12 Patch
rest4816
-
Latest
Fixed an issue that caused the REST OAuth accounts to fail when running in orgs with Enhanced encryption in Medium or higher level.
4.12 Patch
rest4781
-
Latest
Enhanced REST Post Snap to prevent it from encoding file names.
4.12
snapsmrc480
-
Stable
Added Upload body type property to the REST Post Snap for processing the specified content type.
4.11 Patch
rest4333
-
Latest
Added support for the Binary File Uploads with the REST POST Snap.
4.11
snapsmrc465
-
Stable
Updated support of NTLM Account Authentication to the REST Snap Pack.
4.10 Patch
rest4070
-
Latest
Resolved an issue with the REST GET Snap that often fails to exit properly. This should reduce or eliminate that problem.
4.10
snapsmrc414
-
Stable
Upgraded with the latest SnapLogic Platform release.
4.9 Patch
rest3177
-
Latest
Addressed an issue with REST Get displaying the authorization header in plain text
4.9 Patch
rest3126
-
Latest
Added Connection timeout property to specify the number of seconds to wait before terminating a connection. The Timeout property has been renamed to Read timeout.
4.9.0
snapsmrc405
-
Stable
Upgraded with the latest SnapLogic Platform release.
4.8.0
snapsmrc398
-
Stable
Upgraded with the latest SnapLogic Platform release.
4.7.0 Patch
rest2555
-
Latest
Addressed an issue in the REST Post Snap with the REST API not returning a full cookie response.
Added Show all headers setting to the show full cookie response for the Post, Put, Patch and Delete Snaps.
4.7.0 Patch
rest2336
-
Latest
Resolved an issue with REST Get not handling multiple response cookies.
4.7.0 Patch
rest2260
-
Latest
Added a new "Follow redirects" setting to toggle whether redirects should be followed (default behavior is to follow redirects)
4.7.0
snapsmrc382
-
Stable
Updated Snaps in the REST Snap Pack with Response entity type field(The DEFAULT option under this property allows the backward compatibility. The addition of the property will not affect the existing production pipelines and allows them to run as before).
Updated Snaps in the REST Snap Pack with Maximum request attempts and Retry request interval Uploadfields.
Updated the RESTPost Snap with Upload transfer request typefield.
4.6.0 Patch
rest1992
-
Latest
Resolved an issue where Rest Snaps failed to process the received response that is encoded in charsets such as Windows-1252. This fix will process the response purely based on the charset provided in the Content-Type header.
4.6.0
snapsmrc362
-
Stable
Upgraded with the latest SnapLogic Platform release.
4.5.1
rest1566
-
Latest
A new property was added to the REST Get Snap to specify the iteration interval for pagination.
All Snaps now have at most one input and one output view.
4.5.0
snapsmrc344
-
Stable
Upgraded with the latest SnapLogic Platform release.
4.4.1
NA
-
Latest
Resolved an issue with REST SSL Accounts with Username not send the Authorization header with the HTTP request.
4.4.0
NA
-
Stable
REST Get now supports using parameters from an input document in the Next URL Setting.
4.3.1
NA
-
Latest
Addressed a defect where REST GET Snap fails saying 'Scheme "http" not registered'
Fall Release 2015 (4.3.0)
NA
-
Stable
Two-way SSL support was added to the REST account.
REST Get
Now has support for iterating over additional result pages.
Header variables are now being updated for each input
REST Post
Improved error handling messages.
Resolved an issue with the Snap failing with "Failed to execute HTTP request" error.
September 5, 2015 (4.2.2)
NA
-
Latest
Maximum retries and Retry interval support added.
Resolved an issue with using a REST Dynamic OAuth2 account with Facebook Graph API.
REST Account: REST SSL account added.
June 27, 2015 (2015.22)
NA
-
Latest
REST Get now allows you to have no output views. Previously, there was exactly one output view.
June 6, 2015 (2015.20)
NA
-
Latest
Rest Post Snap now supports posting a file.
May 2, 2015
NA
-
Stable
REST: Output views made optional
January 2015
NA
-
Stable
Optional Raw data property added to all REST Snaps. If selected, the HTTP response content is written to the output view as is. If not selected, it is parsed according to the content type specified in the response header.
October 18, 2014
NA
-
Stable
NEW! REST Patch Snap introduced in this release.
Addressed an issue where REST GET (and perhaps REST Snaps) error view does not include response body.
Fall 2014
NA
-
Stable
REST Get: support added for gzip format.
June 30, 2014
NA
-
Stable
Addressed an issue with RestRequestExecutor class writing data into error views even on successful requests status code 201, 204.
May 2014
NA
-
Stable
REST Get, REST Post all updated to support input parameters in HTTP headers


.png?version=1&modificationDate=1708072995593&cacheVersion=1&api=v2&width=339&height=250)
