Atlassian uses cookies to improve your browsing experience, perform analytics and research, and conduct advertising. Accept all cookies to indicate that you agree to our use of cookies on your device. Atlassian cookies and tracking notice, (opens new window)
You must configure MySQL accounts to enable MySQL Snaps to connect to MySQL instances.
To ensure compatibility, we recommend that you use matching versions of MySQL driver and MySQL server for configuring your account. For example, when using server version 8.0.22, ensure that the driver version is also 8.0.22. For details, see the official MySQL article on version compatibility.
To disable themysql-cj-abandoned-connection-cleanup thread that is generated by MySQL JDBC driver, use the latest version of MySQL (later than 8.0.22), and add-Dcom.mysql.cj.disableAbandonedConnectionCleanup=true to the jcc.jvm_options in the node properties under ‘Global Properties’.
See Accounts to learn more about SnapLogic Accounts.
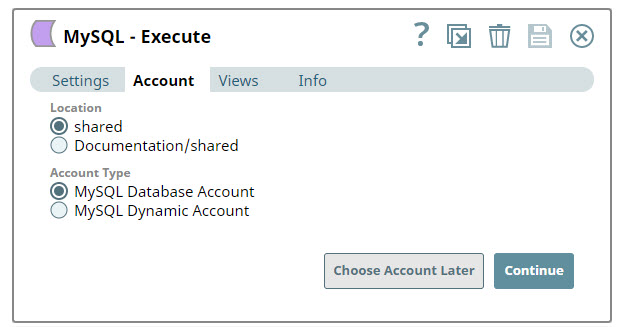
Click Add Account. The account types that are compatible with the selected Snap appear under Account Type. For details on Snaps and compatible Account types, see Snap Compatibility.
Select the Location where you want to create the account, and then select the Account Type.
Click Continue to open the account Settings.
Enter the required account details. For detailed guidance on how to provide information associated with each account type, use the following links:
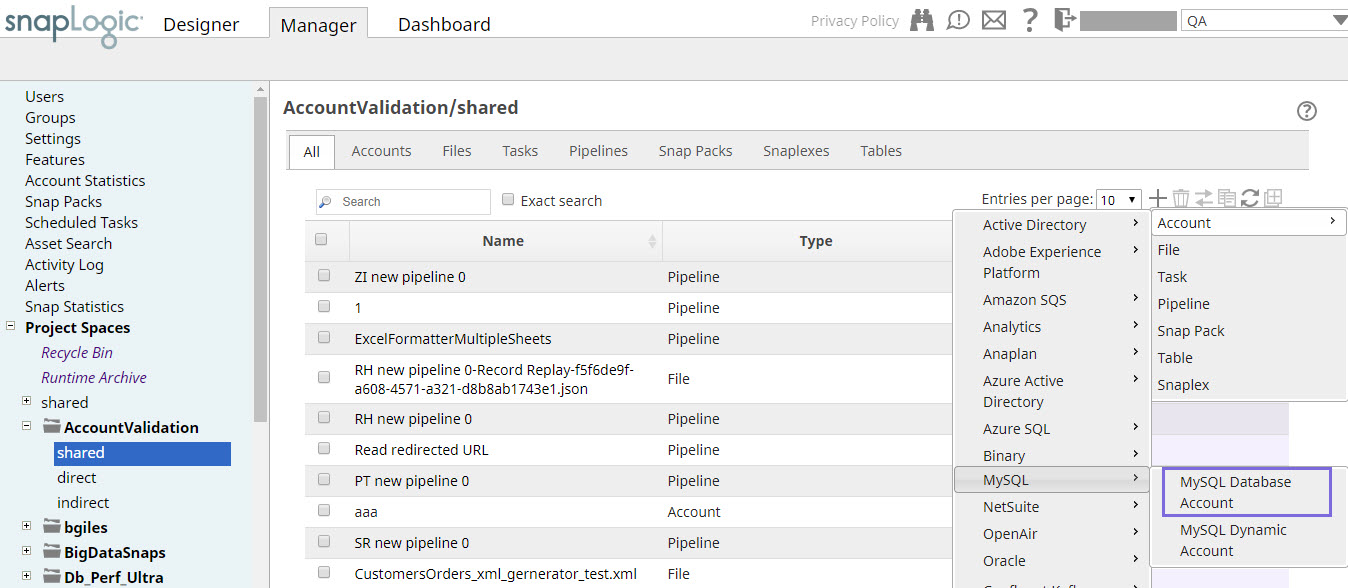
Navigate to the Project with which to associate the new account. Click to display the Assets dropdown, then select Account > MySQL and the target account type.
The Create Account page associated with the selected account type appears.
In Settings, enter the required account details. For detailed guidance on how to provide information associated with each account type, use the following links:
Optionally, enter additional information on this account in the Notes field of the Info tab.
Click Validate to verify the account information, if applicable.
Click Apply to complete configuring the MySQL account.
Avoid updating the account credentials while Pipelines using this account are being executed. This may lead to unexpected results, including the locking of your MySQL account.
Snap Pack History
Click to view/expand
Release
Snap Pack Version
Date
Type
Updates
February 2025
main29887
Stable
Updated and certified against the current SnapLogic Platform release.
November 2024
main29029
Stable
Updated and certified against the current SnapLogic Platform release.
August 2024
main27765
Stable
Updated and certified against the current Snaplogic Platform release.
May 2024
437patches26298
Latest
Fixed an issue with the MySQL - Multi Execute Snap and the MySQL - Execute Snaps that displayed a null pointer exception when the Snap did not check nulltable metadata.
May 2024
main26341
Stable
Updated the Delete Condition (Truncates a Table if empty) field in the MySQL - DeleteSnap to Delete condition (deletes all records from a table if left blank) to indicate that all entries will be deleted from the table when this field is blank, but no truncate operation is performed.
February 2024
436patches25659
Latest
Fixed an issue with the MySQL- Multi Execute Snap that committed the changes when the Snap was expected to roll back if any query failed and the Number of Retries was more than 0. The Snap now performs a rollback when one or more queries fail.
Fixed an issue with the MySQL-Insert Snap that displayed an error when you inserted values such as 128 or morein the Tinyint unsigned datatype when the datatype must accept all the values in the range of 0-255.
Fixed an issue with MySQL-Insert Snap that failed to store the Time datatype with precision in the target table when passed from an upstream Mapper Snap in the stringformat or Date-only date format.
February 2024
main25112
Stable
Updated and certified against the current SnapLogic Platform release.
November 2023
main23721
Stable
Updated and certified against the current SnapLogic Platform release.
August 2023
main22460
Stable
The MySQL - Execute Snap now includes a new Query type field. When Auto is selected, the Snap tries to determine the query type automatically.
May 2023
main21015
Stable
Upgraded with the latest SnapLogic Platform release.
February 2023
432patches19870
Latest
Fixed an issue with the preview data of the MySQL-Execute Snap that displayed the date format as %m %d %Y (without the forward slash '/'). The Snap now displays the date as intended in %m/%d/%Y format after validation.
February 2023
main19844
Stable
Upgraded with the latest SnapLogic Platform release.
November 2022
431patches19263
Latest
The MySQL Insert Snap no longer includes the Preserve case-sensitivitycheckboxbecause the database is case-insensitive. The database stores the data regardless of whether the columns in the target table and the input data are in mixed, lower, or upper case.
November 2022
main18944
Stable
The MySQL - Insert Snap now creates the target table only from the table metadata of the second input view when the following conditions are met:
The Create table if not present checkbox is selected.
The target table does not exist.
The table metadata is provided in the second input view.
September 2022
430patches17894
Latest
The MySQL Select Snap now work as expected when the table name is dependent on an upstream input;
Writing the first batch of records to a temporary file after the Snap fails. Now the Snap writes to the error view as is the expected behavior.
Temporary files generation when a record does not contain a table column. Now, the Snaplex removes the temporary files created along with the directory after the Pipeline execution.
August 2022
main17386
Stable
Upgraded with the latest SnapLogic Platform release.
4.29
main15993
Stable
Upgraded with the latest SnapLogic Platform release.
4.28 Patch
428patches15101
Latest
Fixed an issue with SQL Server - Execute Snap where the Pipeline was failing when there were consecutive execute Snaps with a procedure call, followed by select statements.
4.28
main14627
Stable
Updated the label for Delete Condition to Delete Condition (Truncates Table if empty) in the MySQL DeleteSnap.
4.27
main12833
Stable
Enhanced the MySQL Database Accountto skip batch execution, when the Batch size value is one. When the Batch size is greater than one, the batch is executed.
Enhanced the MySQL - Execute Snap to invoke stored procedures.
4.26
main11181
Stable
Upgraded with the latest SnapLogic Platform release.
4.25
425patches11008
Latest
Enhanced the MySQL - Lookup Snap suggestions to load the Output Fields and Lookup Column settings.
Fixed an issue with MySQL - Select Snap where the second output view of the Snap was showing empty column values and improved the error messages in the Snap where the Snap fails with Null Pointer Exception when the account reference provided is invalid.
4.25
main9554
Stable
Upgraded with the latest SnapLogic Platform release.
4.24
main8556
Stable
Enhances the MySQL - Select Snap to return only the fields (provided in the Output Fields) in the output schema (second output view), through a new check box Fetch Output Fields InSchema. If the Output Fields property is empty all the columns are visible.
Enhances the MySQL - Stored Procedure to accept parameters from input documents by column keys. If the values are empty, the parameters are populated based on the column keys for easier mapping in the upstream Mapper Snap.
4.23 Patch
423patches7732
Latest
Fixes an issue in the MySQL - Bulk LoadSnap to support the following versions:
MySQL 8.0.17
MySQL 5.6.34
4.23
main7430
Stable
Upgraded with the latest SnapLogic Platform release.
4.22 Patch
422patches6629
Latest
Fixes the MySQLSnap Pack by acknowledging the lineage information of the original document in an empty output view whenPass Throughis enabled.
4.22
main6403
Stable
Upgraded with the latest SnapLogic Platform release.
4.21 Patch
421patches6272
Latest
Fixes the issue whereSnowflake SCD2Snap generates two output documents despite no changes toCause-historizationfieldswithDATE, TIME and TIMESTAMPSnowflake data types, and withIgnore unchanged rowsfield selected.
4.21 Patch
421patches6144
Latest
Fixes the following issues with DB Snaps:
The connection thread waits indefinitely causing the subsequent connection requests to become unresponsive.
Connection leaks occur during Pipeline execution.
4.21 Patch
mysql8842
Latest
Fixes the SSH tunneling issue by ensuring connectivity between JCC and MySQL server.
Updates the UI for MySQL Accounts to simplify the SSH tunneling configuration as described inConfiguring MySQL Accounts.
4.21 Patch
MULTIPLE8841
Latest
Fixes the connection issue in Database Snaps by detecting and closing open connections after the Snap execution ends.
4.21
snapsmrc542
Stable
Upgraded with the latest SnapLogic Platform release.
4.20 Patch
db/mysql8815
Latest
Fixes the MySQL Stored Procedure Snap to resolve compatibility issues with the Amazon Aurora database.
4.20 Patch
db/mysql8786
Latest
Fixes the MySQL - Bulk Load Snap to use the UTF-8 character set for writing temporary files in order to successfully handle special characters, irrespective of the value specified in the Character set field in the Snap settings.
4.20
snapsmrc535
Stable
Upgraded with the latest SnapLogic Platform release.
4.19 Patch
db/mysql8638
Latest
Fixes the MySQL Database Account where the associated Snaps produce a huge count of open file descriptors when theConfigure SSH Tunnelproperty is enabled.
4.19 Patch
db/mysql8635
Latest
Fixes the MySQL - Execute Snap where the retry option fails to establish a connection with the MySQL database, after an interrupted transmission.
4.19 Patch
db/mysql8407
Latest
Fixes an issue with the MySQL - Update Snap wherein the Snap is unable to perform operations when:
An expression is used in theUpdate conditionproperty.
Input data contain the character '?'.
4.19 Patch
db/mysql8390
Latest
Fixes an issue wherein the MySQL Snaps are unable to reconnect to the MySQL database after the breakdown of a connection.
4.19 Patch
db/mysql8340
Latest
Fixes an issue with the MySQL Bulk Load Snap wherein the Snap is unable to execute the bulk load feature with MySQL 8.0 and higher versions.
4.19
snaprsmrc528
Stable
Upgraded with the latest SnapLogic Platform release.
4.18 Patch
db/mysql7846
Latest
Fixed an issue with the MySQL Snaps wherein the Snaps exhibit degraded performance with snapsmrc523.
4.18
snapsmrc523
Stable
Reverted a 4.17-patch(db/mysql7395)update regarding how BIT and BOOLEAN column data type values are displayed. They now display as true or false (4.17GA behavior insnapsmrc515) rather than converting to 0 or 1 values (4.17-patch behavior).
4.17 Patch
db/mysql7395
Latest
Fixed an issue wherein bit data types in the MySQL - Select table convert to true or false instead of 0 or 1.
4.17 Patch
db/mysql7357
Latest
Fixed an issue with the MySQL Execute snap wherein the Retry property for connection fails after the database connection is severed.
4.17
ALL7402
Latest
Pushed automatic rebuild of the latest version of each Snap Pack to SnapLogic UAT and Elastic servers.
4.17
snapsmrc515
Latest
Fixed an issue with the MySQL Execute Snap wherein the Snap would send the input document to the output view even if the Pass through field is not selected in the Snap configuration. With this fix, the Snap sends the input document to the output view, under the key original, only if you select the Pass through field.
Added the Snap Execution field to all Standard-mode Snaps. In some Snaps, this field replaces the existing Execute during preview check box.
4.16 Patch
MULTIPLE7123
Latest
Added two new properties, Number of retries and Retry interval, to Delete, Insert, Select, Execute, Merge, Update, and MutliExecute Snaps that enables you to handle retry attempts during a connection failure.
4.16 Patch
db/mysql6823
Latest
Fixed an issue with the Lookup Snap passing data simultaneously to output and error views when some values contained spaces at the end.
4.16
snapsmrc508
Stable
Upgraded with the latest SnapLogic Platform release.
4.15 Patch
MULTIPLE6413
Latest
Added 2 new properties, JDBC Driver Class and JDBC JARs. The new properties enable uploading JDBC JARs that help connect to MYSQL8.
4.15 Patch
db/mysql6332
Latest
ReplacedMax idle timeandIdle connection testperiodproperties withMax life timeandIdle Timeout properties respectively, in the Account configuration. The new properties fix the connection release issues that were occurring due to default/restricted DB Account settings.
4.15
snapsmrc500
Stable
Upgraded with the latest SnapLogic Platform release.
4.14
snapsmrc490
Stable
Upgraded with the latest SnapLogic Platform release.
4.13
snapsmrc486
Stable
Upgraded with the latest SnapLogic Platform release.
4.12 Patch
db/mysql4924
Latest
Fixed the MySQL Bulk Load Snap so that it doesn't produce an output document if there are no input documents.
4.12
snapsmrc480
Stable
Upgraded with the latest SnapLogic Platform release.
4.11
snapsmrc465
Stable
New! MySQL Stored Procedure Snap added to call/execute MySQL Stored Procedure.
SSH Tunnelling related properties added at the Account level for both MySQL Dynamic Account and MySQL Database Account.
4.10 Patch
mysql3988
Latest
SSH Tunnelling related properties added at the Account level for both MySQL Dynamic Account and MySQL Database Account.
4.10
snapsmrc414
Stable
AddedAuto commitproperty to the Select and Execute Snaps at the Snap level to support overriding of theAuto commitproperty at the Account level.
4.9.0 Patch
mysql3070
Latest
Fixed an issue regarding connection not closed after login failure; Expose autocommit for "Select into" statement in PostgreSQL Execute Snap and Redshift Execute Snap
4.9
snapsmrc405
Stable
Upgraded with the latest SnapLogic Platform release.
4.8.0 Patch
mysql2755
Latest
Potential fix for JDBC deadlock issue.
4.8.0 Patch
mysql2695
Latest
Addresses an issue where some changes made in the platform patch MRC294 to improve perfomance caused Snaps in the listed Snap Packs to fail.
4.8
snapsmrc398
Stable
Info tab added to accounts.
Database accounts now invalidate connection pools if account properties are modified and login attempts fail.
4.7.0 Patch
mysql2189
Latest
Fixed an issue for database Select Snaps regarding Limit rows not supporting an empty string from a pipeline parameter.
4.7.0 Patch
mysql2280
Latest
MySQL Merge will now route documents to the output and error views correctly
4.7
snapsmrc382
Stable
Added a new Snap, MySQL Bulk Load.
4.6
snapsmrc362
Stable
Enhanced MySQL Execute Snap to fully support SQL statements with/without expressions & SQL bind variables.
Extended support for MySQL Dynamic accounts.
Resolved an issue in MySQL Select Snap that caused failures in the second output view when retrieving outputs from a table with a dot (.) character.
Resolved an issue in MySQL Execute Snap that caused failures when passing expression ($variable_name) for stored procedures.
Resolved an issue in MySQL Execute Snap that caused failures when an SQL statement had an inline comment.
Resolved an issue in MySQL Execute Snap that ignored all statements after "–".
4.5.1
snapsmrc344
Stable
Fixed an error in a tooltip for MySQL - Select Snap.
4.5
snapsmrc344
Latest
Resolved an issue in MySQL Insert Snap to ensure an error is reported when table column is set to NOT NULL.
4.4.1
NA
Stable
Upgraded with the latest SnapLogic Platform release.
4.4
NA
Stable
Upgraded with the latest SnapLogic Platform release.
4.3.2
NA
Stable
NEW! MySQL Lookup Snap
Improved performance of the MySQL Execute Snap.
4.3
NA
NA
Stable
Table List Snap: A new option, Compute table graph, now lets you determine whether or not to generate dependents data into the output.
4.2.2
NA
NA
Stable
Ignore empty result added to Execute and Select Snaps. The option will not write any document to the output view for select statements producing no results.

 to display the Assets dropdown, then select Account > MySQL and the target account type.