SSH Auth Account
- Kalpana Malladi
- Diane Miller (Deactivated)
- Ankur Parekh
In this article
Overview
You can use this account type to connect Binary Snaps with data sources that use SSH Auth accounts.
The Binary SSH Auth account supports the following SFTP key exchange algorithms:
- diffie-hellman-group-exchange-sha1
- diffie-hellman-group1-sha1
- diffie-hellman-group14-sha1
- diffie-hellman-group-exchange-sha256
- ecdh-sha2-nistp256
- ecdh-sha2-nistp384
- ecdh-sha2-nistp521
SFTP server supports any of these algorithms. The JSch (SSH Java client) library and SFTP file server identifies and processes the appropriate algorithm during login.
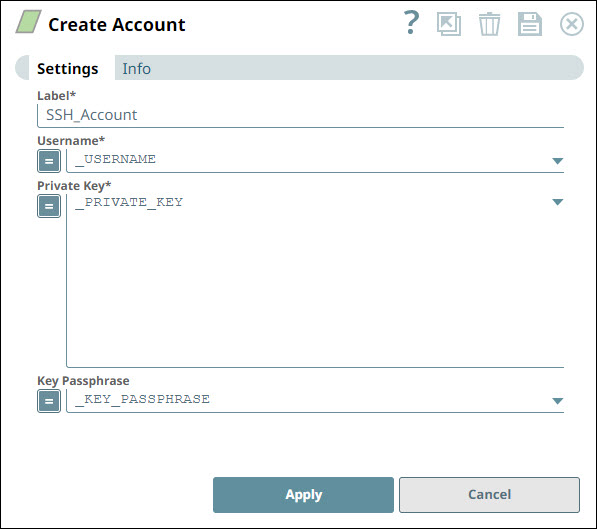
Account Settings
| Field | Field Type | Description | |
|---|---|---|---|
Label* Default Value: N/A | String | Specify a unique label for the account instance. | |
Username* Default Value: N/A | String/Expression | Specify the Account username or use the Expression enabler to select the appropriate value. | |
Private key* Default Value: N/A | String/Expression | Specify the private key for SSH authentication. Ensure that the private key is with header and footer. This is a multi-line field that allows you to copy paste the private key along with its header and footer. For an SSH account, you must generate a public/private key for snapuser on the Groundplex, add the private key and username to the SSH account settings in SnapLogic, add public key to the sftp machine for that user. The header and footer must be in the private key: | |
Key passphrase Default Value: N/A | String/Expression | Specify the passphrase to decrypt the private key. | |
Account Encryption
| Standard Encryption | If you use Standard Encryption, the High sensitivity settings under Enhanced Encryption are used. | |
|---|---|---|
| Enhanced Encryption | If the account you are using has the Enhanced Encryption feature, the account fields are encrypted for each sensitivity level as shown below:
| |
Creating SSH Key Using PuTTY Key Generator
For Windows:
The PuTTYgen application is required for this to work. It can be downloaded by following this link.
Steps for generating SSH keys using PuTTY Key Generator.
- Start the PuTTY Key Generator application
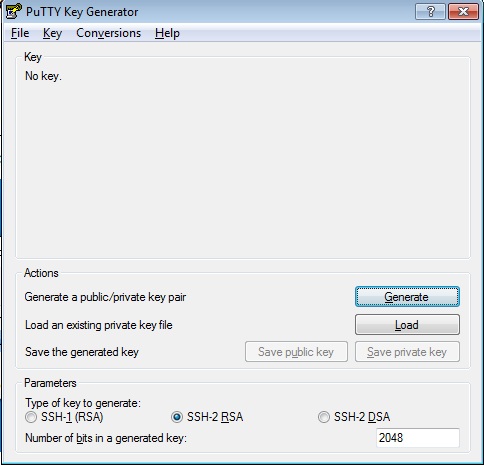
- In the Parameters section
- Select SSH-2 RSA in Type of key to generate.
- Enter the information in Number of bits in a generated key.
- In the Actions section click on Generate.
- PuTTY Key Generator uses randomness in mouse movements to generate a unique secure key. Move the mouse around till the progress bar fills up completely.
- The public and private key will now be generated.
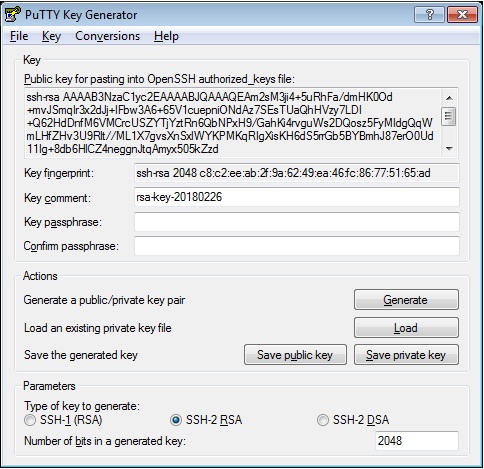
- Fill the Key comment and Key passphrase as needed.
- Save the private and public key files to a secure and private location by clicking on the Save public key and Save private key buttons.
- Send the Public Key to the SFTP host.
- Store the keys and passphrase into the password/key vault.
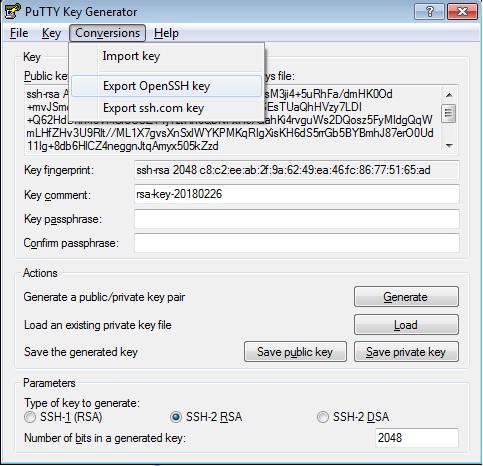
PuTTY Key Generator uses the PPK format for keys. If a standard OpenSSH key format is required for the SFTP client, click on Conversions menu and then on Export OpenSSH Key.
Related Content
| Release | Snap Pack Version | Date | Type | Updates |
|---|---|---|---|---|
| February 2025 | 440patches30046 | Latest |
| |
February 2025 | main29887 | | Stable | Updated and certified against the current SnapLogic Platform release. |
| November 2024 | main29029 | Stable | Updated and certified against the current SnapLogic Platform release. | |
| August 2024 | 438patches28197 | Latest |
| |
August 2024 | main27765 |
| Stable | Upgraded the |
| May 2024 | 437patches27146 | Latest | Enhanced the Azure Storage Account with Managed Identity, which provides applications with an automatically managed identity for connecting to resources that support Microsoft Entra ID authentication. | |
| May 2024 | 437patches26873 | Latest | Fixed an issue with the File Poller Snap where the Snap applied a case-sensitive filter in the Windows operating system. | |
| May 2024 | 437patches26592 | Latest | Enhanced the Decompress Snap to support encrypted and unencrypted ZIP and 7z files through the new File Password Account type. | |
| May 2024 | main26341 | Stable | The Azure Data Lake Account has been removed from the Binary Snap Pack because Microsoft retired the Azure Data Lake Storage Gen1 protocol on February 29, 2024. We recommend replacing your existing Azure Data Lake Account with other Azure Accounts. | |
| February 2024 | 436patches25711 | Latest | Fixed an SMB (server message block) connectivity issue within the Binary Snap Pack, as the incorrect name provided by the SMB client did not match the Windows cluster virtual name, affecting the SPN (service principal name) connection. | |
| February 2024 | 436patches25332 | Latest | Fixed a | |
| February 2024 | 436patches25241 | Latest | Fixed an issue with the File Writer Snap, which partially writes the file for some FTPS servers by pausing for seconds before closing the output stream as specified in the global property | |
| February 2024 | 436patches25161 | Latest | Fixed an issue with the File Poller Snap that displayed an exception when an unauthorized character ':' was used in the Windows Snaplex. | |
| February 2024 | main25112 | Stable | Updated and certified against the current SnapLogic Platform release. | |
| November 2023 | 435patches24525 | Latest | Fixed an issue with the File Poller Snap that caused it to poll recursively for files in the root directory of the S3 bucket. | |
| November 2023 | 435patches23780 | Latest | Fixed an issue with the Binary Snaps that failed to build a data connection when connecting to the FTP server over FTPS protocol. | |
| November 2023 | main23721 | Stable | Updated and certified against the current SnapLogic Platform release. | |
| August 2023 | 434patches23502 | Latest | Fixed an issue with the File Operation Snap (SFTP protocol) where the error message did not display during a move operation, although the existing file was available in the target path and the Error if exists checkbox was selected. | |
| August 2023 | 434patches23302 | Latest | Fixed an issue that occurred when node properties were used to override default algorithm specifications for SFTP operations. | |
| August 2023 | 434patches22976 | Latest | Fixed an issue that caused account credentials to be visible in the stack trace of some failed SFTP operations. | |
| August 2023 | 434patches22842 | Latest | Fixed an issue that caused NTLM authentication issues when trying to access SMB servers. | |
| August 2023 | 434patches22639 | Latest | The JSON key field in the Binary Google Service Account supports JSON strings. You can upload the JSON key either from SLDB or dynamically pass the value using a pipeline parameter or access values from Secrets Manager. | |
August 2023 | main22460 | | Stable | Updated and certified against the current SnapLogic Platform release. |
| May 2023 | 433patches22297 | Latest |
| |
| May 2023 | 433patches21913 | Latest |
| |
| May 2023 | 433patches21870 | Latest | Added the PGP Sign Snap, which allows binary data to be signed using PGP. | |
| May 2023 | 433patches21645 | Latest | With the 4.33 GA release, support for some algorithms for SFTP connection negotiation is removed for improved security and because we’ve updated the library used to connect to SFTP sources. With Snap Pack version | |
| May 2023 | 433patches21576 | Latest | Fixed the issues with the AES Encrypt and AES Decrypt Snaps, where the Snaps previously did not include the error stack trace in the error view. The Snaps now provide detailed information in case of any issues or errors. | |
| May 2023 | 433patches21482 | Latest |
Starting from version 433patches21482, the PGP Encrypt Snap will no longer support encryption with an expired key. To ensure continued support for encryption, we highly recommend extending the expiration of your PGP key. | |
| May 2023 | 433patches21291 | Latest | Fixed an issue with the Multi File Reader Snap where it failed with the error S3 object not found when the Snap found no matching file to read and the Folder/File property value did not end with a forward slash (/). | |
| May 2023 | 433patches21179 | Latest |
| |
| May 2023 | main21015 | Stable | The Key passphrase field in the Private Key Account now supports expressions, allowing dynamic evaluation using pipeline parameters when the expression button is enabled. | |
| February 2023 | 432patches20458 | Latest | Fixed an issue where the ZipFile Read and ZipFIle Write Snaps failed to display the input schema for the File or File name field when using an expression. | |
| February 2023 | 432patches20431 | Latest |
| |
| February 2023 | 432patches20349 | Latest | The JSCH library has been upgraded to version 0.2.7. | |
| February 2023 | main19844 | Stable | Upgraded with the latest SnapLogic Platform release. | |
| November 2022 | 431patches18977 | Latest | The PGP Decrypt Snap now allows you to skip the signature verification when you face an issue with the signature in the encrypted file. | |
| November 2022 | main18944 | Stable | Upgraded with the latest SnapLogic Platform release. | |
| September 2022 | 430patches17933 | Latest |
| |
| August Patch | 430patches17292 | Stable and Latest | Fixed an issue with the Directory Browser Snap, which failed with a null pointer exception error when connecting to the SFTP server containing a port number. The Binary Snap Pack is deployed as both the latest and stable distribution. We recommend that you use this version for your Org when using the recommended Snaplex version (main-13269 - 4.30 GA). | |
| August 2022 | main17386 | Stable |
| |
| 4.29 Patch | 429patches16569 | Latest |
| |
| 4.29 Patch | 429patches15842 | Latest |
| |
| 4.29 | main15993 | Stable | Enhanced the following Snaps and Accounts that use SnapLogic File System (SLFS) to display Lint warnings in Pipelines when using incorrect file paths to read and write files. We recommend that you use the File Upload :Upload_icon: icon to specify the file path. | |
| 4.28 Patch | 428patches14919 | Latest |
| |
| 4.28 Patch | 428patches14736 | Latest | Fixed an issue in the File Writer, S3 File Writer, and ZipFile Write Snaps where the Snaps failed with | |
| 4.28 | main14627 | Stable |
| |
| 4.27 Patch | 427patches14283 | Latest |
| |
| 4.27 Patch | 427patches13004 | Latest | Fixed an issue with the SMB Account where the Snaps could not re-establish a lost connection to the SMB mount point. | |
| 4.27 | main12833 | Stable |
| |
| 4.26 Patch | 426patches12288 | Latest | Fixed a memory leak issue when using HDFS protocol in Binary Snaps. | |
| 4.26 Patch | 426patches11922 | Latest | Fixed an issue with the File Writer Snap, where the Snap failed to open a channel while accessing through a SFTP protocol. | |
| 4.26 Patch | 426patches11529 | Latest |
| |
| 4.26 | main11181 | Stable | Upgraded with the latest SnapLogic Platform release. | |
| 4.25 Patch | 425patches10994 | Latest |
| |
| 4.25 Patch | 425patches10217 | Latest |
| |
| 4.25 Patch | 425patches9581 | Latest | Fixed an issue with the PGP Decrypt Snap where the Snap writes an empty document to the output view when there is an error in the Snap. It will now decrypt the document and write it to the output view only if it succeeds. As of we have discovered an issue with this Binary patch affecting the PGP Decrypt Snap. In case your Pipelines use the PGP Decrypt Snap, we recommend you to NOT use this patch. Else, your Pipelines will likely fail. We're working on a fix and will be deploying a Snap patch soon. | |
| 4.25 Patch | 425patches9564 | Latest | Enhanced the SFTP session in Binary Snaps to support the SFTP servers which close SFTP sessions slowly. | |
| 4.25 | main9554 | Stable | Enhanced the S3 File Writer Snap with an ability to write S3objects with Access Control List (ACL) details in a single API call. In the 4.23 release, the S3 File Writer Snap used to write an S3 file and then set ACL if the ACL property was not empty. If the file write was successful and the ACL setting failed, both the output document in the output view and the error document in the error view was displayed. This issue has been resolved in the 4.24 release by enabling the Snap to configure ACL while writing the file. Therefore, the Snap produces an error document in the error view if the ACL configuration fails, irrespective of whether the file write action passes or fails. | |
| 4.24 Patch | 424patches9044 | - | Latest | Enhanced the S3 File Writer to use an MD5 checksum that automatically checks for data integrity and corruption while uploading the file. |
| 4.24 Patch | 424patches9020 | Latest | Fixed the file operation error of copying large S3 files in the File Operation Snap by supporting the transfer of zero-byte S3 files while uploading a file. | |
| 4.24 Patch | 424patches8876 | Latest |
| |
| 4.24 | main8556 | Stable | Upgraded with the latest SnapLogic Platform release. | |
| 4.23 Patch | 423patches8453 | Latest | Fixed an issue in the File Writer Snap with the ADL protocol, to perform the correct action when OVERWRITE is selected from the File Action drop-down field. | |
| 4.23 Patch | 423patches8368 | - | Latest | Fixed an encryption issue with the File Operation Snap by implementing both SSE-KMS and SSE-S3 supports to the Snap. |
| 4.23 Patch | 423patches8368 | - | Latest | Fixed an issue in the Snap Pack by removing the plaintext credentials in file URL from JCC log messages. |
| 4.23 Patch | 423patches8099 | - | Latest | Enhanced the Snap Pack by upgrading SMB client library. |
| 4.23 Patch | 423patches7958 | - | Latest | Fixed an issue with the File Writer Snap by avoiding overwriting of documents when using appending the data to a CSV file in SFTP. |
| 4.23 Patch | 423patches7958 | - | Latest | Rolled back the recent patch to Binary Snap Pack (File Writer Snap - 423patches7923) that might have induced SSL handshake failures/terminations in existing Pipelines. |
| 4.23 Patch | 423patches7923 | Latest |
Do not use the 423patches7923 build for the File Writer Snap, because it causes connectivity issues with the Snaplex nodes. | |
| 4.23 Patch | 423patches7795 | - | Latest | Fixed an issue with File Writer Snap by skipping the validation of the SAS URI having write permission, if the SAS URI uses an access policy. |
| 4.23 Patch | 423patches7660 | - | Latest | Enhanced the File Poller Snap by adding a field, Exit on first matches, which when set to true stops the Snap from executing after the first file paths matching the filter are written to the output view. If the field is not configured or is set to false (default value), then the Snap continues to poll the directory until the Polling timeout is reached. |
| 4.23 | main7430 | - | Stable | Enhanced the ZipFile Write Snap to provide the ability to change the default content-type (application/octet-stream) for any file that is stored into the Azure Blob Storage (WASB: or WASBS: file protocol). Hence, the files that the ZipFile Write Snap writes into the Blob Storage can be saved with content-type asapplication/zipor any other type instead of application/octet-streamalways. You can now prevent the Snap from writing files always to Azure Blob Storage (WASB: or WASBS: file protocol) with the application/octet-stream content-type. To do so, configure a binary header property in an upstream Snap, such as JSON Formatter or Mapper, to match the file's content – application/zip, application/java-archive and so on; and pass it as the $content-type (case-sensitive) for the file.
|
| 4.22 Patch | 422patches6947 | - | Latest | Fixed the issue of the hanging thread in the SMB accounts. |
| 4.22 Patch | 422patches6950 | - | Latest | Enhanced the S3 Dynamic Account by allowing to use the Security token field in Directory Browser, File Operation, File Poller, Multi File Reader, and File Delete Snaps. |
| 4.22 Patch | 422patches6629 | - | Latest | Fixed the ZipFile Write Snap error by allowing the number of retries to be set greater than 0. |
| 4.22 Patch | 422patches6542 | - | Latest | Fixed SMB hanging threads by upgrading SMB client library. |
| 4.22 | main6403 | - | Latest |
|
| 4.21 Patch | 421patches6136 | - | Latest | Fixed the issue with Multi File Reader Snap that continues to look for a directory even when |
| 4.21 Patch | 421patches6090 | - | Latest | Fixed the 'Connection pool shut down' error in S3 File Writer Snap by keeping the AmazonS3Client class object open until all the documents are processed. |
| 4.21 Patch | 421patches6077 | - | Latest | Fixed the |
| 4.21 Patch | 421patches5994 | - | Latest | Fixed an error in Multi File Reader and File Delete Snaps during Pipeline execution where the Snaps fail to retrieve the temporary files from the given S3 location. |
| 4.21 Patch | 421patches5963 | - | Latest | Enhanced the Directory Browser Snap by making the File filter field optional. |
| 4.21 Patch | 421patches5975 | - | Latest | Fixed the Directory Browser Snap that fails with an |
| 4.21 Patch | 421patches5871 | - | Latest | When configuring the SSH Auth account type, SSH passphrase is now optional, whereas it was a required field earlier. |
| 4.21 Patch | binary8849 | - | Latest | Enhanced the Directory Browser Snap by adding a new advanced property Use fast file-type check for wasb/wasbs protocols for quick Snap execution. |
| 4.21 Patch | binary8843 | - | Latest | Fixed the issue in PGP Encrypt Snap where decrypting its output file using a third-party PGP software adds a random suffix and TMP extension in the file name. This issue occurs only when using the PGP Encrypt Snap in a Windows-based Groundplex. |
| 4.21 | snapsmrc542 | - | Stable | Upgraded with the latest SnapLogic Platform release. |
| 4.20 Patch | binary8801 | - | Latest |
|
| 4.20 Patch | binary8791 | - | Latest | Fixed the ZipFile Write Snap wherein the Snap fails to execute if it finds different zip file paths when processing multiple input binary data. |
| 4.20 Patch | binary8785 | - | Latest |
|
| 4.20 Patch | binary8775 | - | Latest | Fixed the File Writer Snap to allow the deletion of temporary Google Storage files from the |
| 4.20 Patch | binary8741 | - | Latest |
|
| 4.20 Patch | binary8710 | - | Latest |
|
| 4.20 | snapsmrc535 | - | Stable | Upgraded with the latest SnapLogic Platform release. |
| 4.19 Patch | binary8369 | - | Latest | Fixed the following issues associated with the SMB account wherein:
|
| 4.19 | snaprsmrc528 | - | Latest |
|
| 4.18 Patch | binary8768 | - | Latest |
|
| 4.18 Patch | binary8046 | - | Latest | Enhanced the Snap Pack to support AWS SDK 1.11.634 to fix the NullPointerException issue in the AWS SDK. This issue occurred in AWS-related Snaps that had HTTP or HTTPS proxy configured without a username and/or password. |
| 4.18 Patch | MULTIPLE7884 | - | Latest | Fixed an issue with the PostgreSQL grammar to better handle the single quote characters. |
| 4.18 Patch | binary7860 | - | Latest | Fixed an issue with the File Writer Snap wherein the Snap is intermittently unable to set correct permissions. |
| 4.18 Patch | binary7851 | - | Latest |
|
| 4.18 Patch | binary7746 | - | Latest | Fixed an issue with the SMB file protocol wherein Binary Snaps are unable to create a native thread using an SMB file path. |
| 4.18 Patch | MULTIPLE7778 | - | Latest | Updated the AWS SDK library version to default to the Signature Version 4 Signing process for API requests across all regions. |
| 4.18 Patch | binary7720 | - | Latest | Fixed an issue with the ZipFile Read Snap wherein the Snap fails to extract files from a zip file heavier than 100MB when the number of retries is greater than zero. |
| 4.18 | snapsmrc523 | - | Latest | Added a new account type, Google Service Account, which enables you to isolate workflows from individual users. |
| 4.18 | snapsmrc523 | - | Latest | Added a new account type, Google Service Account, which enables you to isolate workflows from individual users. |
| 4.17 Patch | binary7589 | - | Latest | Fixed an issue with the File Reader Snap wherein SMB fails to provide multiple Snaps with concurrent access. |
| 4.17 Patch | binary7487 | - | Latest | Fixed an issue with the File Writer Snap wherein the Overwrite File action for SMB files fails on subsequent executions. |
| 4.17 Patch | ALL7402 | - | Latest | Pushed automatic rebuild of the latest version of each Snap Pack to SnapLogic UAT and Elastic servers. |
| 4.17 Patch | binary7381 | - | Latest | Fixed an issue with SMB accounts wherein login to the server fails if password contains a plus (+) sign. |
| 4.17 Patch | binary7366 | - | Latest | Added support for multiple slashes as a prefix for SMB file URLs. |
| 4.17 Patch | binary7280 | - | Latest | Added a new field, File Delete Action, to the File Delete Snap that handles missing target files. |
| 4.17 Patch | snapsmrc515 | - | Latest |
|
| 4.16 Patch | binary7049 | - | Latest | Fixed an issue with the File Writer Snap wherein the Snap writes FTPS files partially. Two new global properties, ftpsDelayBeforeClosing and ftpDelayBeforeClosing, enable you to add delays to the FTP file protocol to handle the partial write. |
| 4.16 Patch | binary7049 | - | Latest | Fixed an issue with the File Writer Snap wherein the Snap writes FTPS files partially. Two new global properties, ftpsDelayBeforeClosing and ftpDelayBeforeClosing, enable you to add delays to the FTP file protocol to handle the partial write. |
| 4.16 Patch | binary6975 | - | Latest | Added a new property, Blob endpoint, for Binary Accounts, which enables you to specify the Azure Blob Storage endpoint that you want to use with an Azure Storage account. |
| 4.16 | snapsmrc508 | - | Latest | Added a new property Only Output on Change in the File Poller Snap. This property helps avoid redundancy by not displaying the same matching file in every polling result unless the file is changed. |
| 4.15 Patch | binary6744 | - | Latest | Fixed a timeout error while writing to S3 in the S3 File Writer Snap. |
| 4.15 Patch | binary6414 | - | Latest | Fixed an issue wherein the hostname specified in the Directory Browser path failed to appear as a path in the output document. |
| 4.15 Patch | binary6414 | - | Latest | Fixed an issue wherein the hostname specified in the Directory Browser path failed to appear as a path in the output document. |
| 4.15 | snapsmrc500 | - | Latest | Added a new property, Binary Header Properties, to the CSV Formatter Snap. This property can be configured with the binary headers and their values in the incoming document. |
| 4.14 Patch | MULTIPLE5732 | - | Latest | Fixed an issue with S3 file reads getting aborted intermittently because of incomplete consumption of input stream. |
| 4.14 | snapsmrc490 | - | Latest | Enhanced the Basic Auth and Symmetric Crypto accounts to support pipeline parameters. Using pipeline parameters, Basic Auth now supports passing username and password, and Symmetric Crypto now supports passing secret key dynamically. |
| 4.13 Patch | binary5372 | - | Latest | Updated the File Operation Snap for S3 to support files larger than 5GB by using an API for multipart upload copy. |
| 4.13 Patch | binary5315 | - | Latest | Added a new property "Enable staging" to enable the File Reader and S3 File Reader Snaps to perform as expected even in a slow network connection to AWS S3. |
| 4.13 | snapsmrc486 | - | Latest | Added AWS Key Management Service (KMS) encryption support to AWS S3 and S3 Dynamic accounts in the Binary Snap Pack. |
| 4.12 | binary5044 | - | Latest | Fixed an issue with the S3 File Writer Snap, which corrupts while writing files if retry value is set to 1. |
| 4.12 Patch | binary4882 | - | Latest | Fixed issue caused in the File Operation Snap due to the rollback after the 4.12 release that impacted the S3 and FTP protocols. |
| 4.12 Patch | binary4840 | - | Latest | Fixed an issue in the File Delete Snap, wherein if no account is given for the SFTP protocol, then the error did not display. |
| 4.12 Patch | binary4797 | - | Latest | Added a new property 'Number of retries' in the File Writer Snap to fix interoperability issues with a server software. |
| 4.12 Patch | binary4736 | - | Latest | Fixed the issue where File Writer Snap does not write files to Windows Serv-U FTP server, while not displaying any error message. |
| 4.12 | snapsmrc480 | - | Latest |
|
| 4.11 Patch | binary4424 | - | Latest | Resolved an Issue with SFTP server where the pipeline stopped responding while writing to the Tumbleweed server (SFTP server). Fixed the code in a way that the SFTP server now flushes out data after each write. |
| 4.11 Patch | binary4328 | - | Latest | Fixed an issue with the File Delete Snap that was unable to delete the file with a size greater than 1MB. |
| 4.11 Patch | snapsmrc465 | - | Latest |
|
| 4.11 | binary4019 | - | Stable | Resolved an issue with the File Writer Snap writing to an FTP Server that may prematurely close the connection; this patch ensures the write has fully completed before disconnecting. |
| 4.10 Patch | binary3930 | - | Latest | Directory Browser - When "Ignore empty result" is not selected, the "original" passthrough document is now returned even when the S3 directory is empty. |
| 4.10 Patch | binary3840 | - | Latest | S3OutputStream handles failures. |
| 4.10 | snapsmrc414 | - | Stable | No updates made. Automatic rebuild with a platform release. |
| 4.9 Patch | binary3331 | - | Latest | Directory Browser Snap - fixed NPE issue, "File filter" property, and "Display update time and owner for S3 subdirectories" property. |
| 4.9 Patch | binary3183 | - | Latest | Fixed SFTP connection leak when "Validate after write" is checked for File Write Snap. |
| 4.9 Patch | binary3170 | - | Latest | Addressed the following issue in Directory Browser: "Update time" being returned "unknown" for directories within S3 objects |
| 4.9 Patch | binary3081 | - | Latest | Added ability to sign PGP encrypted files. |
| 4.9 Patch | binary3060 | - | Latest | Addressed an issue in Directory Browser and fixed issue in writing the original document to output view when reading from S3. |
| 4.9 Patch | binary3022 | - | Latest | Addressed an issue regarding an array out of bounds exception when IAM Role is enabled. |
| 4.9 Patch | binary3000 | - | Latest |
|
| 4.9 | Snapsmrc405 | - | Stable | No updates made. Automatic rebuild with a platform release. |
| 4.8 Patch | Snapsmrc405 | - | Latest | Addressed an issue with Directory Browser taking too lont to start listing files from S3 bucket and then failing with partial results due to CPU spikes. |
| 4.8 | Snapsmrc398 | - | Latest |
|
| 4.7.0 Patch | binary2346 | - | Latest | ZipFile Read Snap: Added support for reading 7z archive formats created using Windows machines. |
| 4.7.0 Patch | binary2337 | - | Latest | Added Encrypted filename property to PGP Encrypt Snap. |
| 4.7 | Snapsmrc382 | - | Latest |
|
| 4.6.0 Patch | binary2110 | - | Latest | File Writer: fixed an issue on Windows Snaplexes that prevented creating directories that are not present. |
| 4.6.0 Patch | binary2009 | - | Latest | File Writer: fixed an issue on Windows Snaplexes that prevented creating directories that are not present. |
| 4.6.0 Patch | binary1898 | - | Latest | File Reader and ZipFile Reader Snaps: Added a new "Prevent URL encoding" setting to allow users to disable automatic URL encoding of file paths. This allows pre-encoded URLs and file paths to be used as-is. |
| 4.6.0 Patch | binary1851 | - | Latest | Resolved an issue with Directory Browser Snap not freeing up connections in Windows Groundplex. |
| 4.6.0 | Snapsmrc362 | Stable |
| |
| 4.5.1 | binary1563 | - | Latest |
|
| 4.5 | Snapsmrc344 | - | Stable |
|
| 4.4.1 | - | - | Latest |
|
| 4. | - | - | Stable |
|
| 4.3.2 | - | - | Latest |
|
| 4.3.1 | - | - | - |
|
| 4.3.0 | - | - | - |
|
4.2.2 | - | - | - |
|
| 4.2.1 | - | - |
| |
| Summer 2015 | - | - | - |
|
| - | - | - |
| |
| - | - | - |
| |
| - | - | - |
| |
| - | - | - |
Multi File Reader: Resolved an issue were some files were read twice if Include subfolders was selected when using the S3 protocol. | |
| - | - | - | Tooltip cleanup | |
| - | - | November 2014 | - | File Writer now lets you set file permissions. |
| - | - | July/Summer 2014 | - | NEW! ZipFile Read and Write |
| - | - | April 2014 | - | File Writer Snap updated to allow for appending, overwriting, ignoring or erroring out if the file already exists. |
| - | - | March 2014 | - |
|
| - | - | January 2014 | - | An output view was added to File Writer. |
| - | - | December 2013 | - |
|
| - | - | November 2013 | - |
|
| - | - | July 2013 | - | There are now separate Snaps for reading a single file into SnapLogic and reading multiple files (File Reader and Multi File Reader). |
| - | - | June 2013 | - | Initial release. Read/write support for popular data formats: Binary, CSV, HTML, JSON |

Have feedback? Email documentation@snaplogic.com | Ask a question in the SnapLogic Community
© 2017-2025 SnapLogic, Inc.