Use Case—Data from Salesforce.com and ServiceNow
On this Page
Scenario
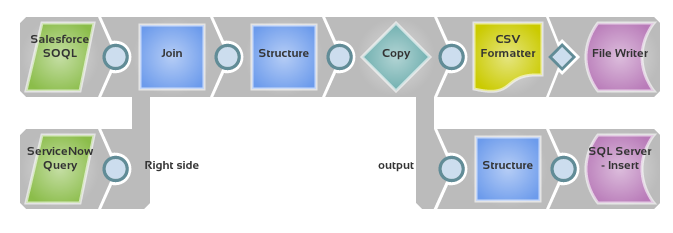
Extract information from Salesforce.com, append it with the caller incident information from ServiceNow, and then write it to a file and a database. This example assumes that data is stored under different column names in the different sources and resulting databases, so column mapping is needed.
Requirements
Snaps Used
For this scenario, the following Snaps are used:
- Salesforce SOQL
- ServiceNow Query
- Structure
- Join
- Copy
- CSV Format
- File Writer
- SQL Server Insert
Other Requirements
- Credentials to read data from Salesforce.com and an account configured in SnapLogic Manager. See Accounts for more information on configuring an account.
- Credentials to read data from ServiceNow and an account configured in SnapLogic Manager.
Credentials to write to SQL Server and an account configured in SnapLogic Manager.
Configuration
- Add and configure a Salesforce SOQL Snap to query Salesforce.com for contact data.
- You will need to supply the Salesforce.com Username, Password, and Security token.
For the SOQL query field, supply a query to gather the name and phone number from your contacts, such as:
SELECT Name, Phone FROM Contact WHERE Level__c = 'Primary'
- Add and configure a ServiceNow Query Snap to query for incident information tracked in ServiceNow.
- You will need to supply the ServiceNow Instance, Username, Password, and Table name.
- Set Action to getRecords.
- Set the Get records Query field to a query to find the appropriate records.
- Add and configure a Join Snap that connects to the right of both existing Snaps. This will combine the data from the two sources.
- Leave Join type to Inner.
- Set Left path to a value from the Salesforce.com data, such as $Name.
- Set Right path to an appropriate from the ServiceNow data, such as $caller_id.
- Leave Sorted streams as Unsorted.
- Add and configure a Structure Snap off of the Join Snap to map to the data structure of one of the final destination.
Set Pass through to [None] - new map.
Set up the following mapping table :
Source path Operation Target Path $number move $IncidentID $urgency move $Urgency $Name move $Name $Phone move $Phone
- Add and configure a Copy Snap to allow you to send the combined data to multiple destinations.
- On the Views page, add a second output view.
- Add a CSV Format Snap off the top output connector and keep the default configuration.
- Add and configure a File Writer Snap off of the CSV Format Snap.
- Set the File name to a CSV file to be saved to the SnapLogic database.
- Add and configure a Structure Snap off the bottom output connector. This will be used to map the data to the database data structure.
Set Pass through to [None] - new map.
Set up the following mapping table :
Source path Operation Target Path $Name move $Name $Phone move $Phone $IncidentID move $Incident $Urgency move $Urgency
- Add and configure a SQL Server Insert Snap off of the Structure Snap.
- You will need to supply the SQL Server Hostname, Port Number, Database name, Username, Password and Table name.
- Leave all remaining default values.
Snap History
Have feedback? Email documentation@snaplogic.com | Ask a question in the SnapLogic Community
© 2017-2025 SnapLogic, Inc.

