ELT Insert-Select
In this article
An account for the Snap
You must define an account for this Snap to communicate with your target CDW. Click the account specific to your target CDW below for more information:
Overview
Use this Snap to perform the INSERT INTO SELECT operation on the specified table. The Snap creates a table and inserts the data if the target table does not exist. After successfully running a Pipeline that contains this Snap, you can check for the data updates made to the target table in one of the following ways:
- Validate the Pipeline and review the Snap's output preview data.
- Query the target table using ELT Select Snap for the latest data available.
- Open the target database and check for the new data in the target table.
Prerequisites
- A valid SnapLogic account to connect to the database in which you want to perform the INSERT INTO SELECT operation.
- Your database account must have the following permissions:
- SELECT privileges for the source table whose data you want to insert into the target table.
- CREATE TABLE privileges for the database in which you want to create the table.
- INSERT privileges to insert data into the target table.
Limitations
- The input data must correspond to the specified table's schema. You can use the ELT Transform Snap to ensure this.
- ELT Snap Pack does not support Legacy SQL dialect of Google BigQuery. We recommend that you use only the BigQuery's Standard SQL dialect in this Snap.
Known Issues
If the last Snap in the Pipeline takes 2 to 5 seconds to update the runtime, the ELT Pipeline statistics are not displayed even after the Pipeline is completed. The UI does not auto-refresh to display the statistics after the runtime.
Workaround: Close the Pipeline statistics window and reopen it to see the ELT Pipeline statistics.When you return to the Snap Statistics tab from the Extra Details tab in the Pipeline Execution Statistics pane, it contains the status bar (Pipeline execution status) instead of the Download Query Details hyperlink and the individual counts of Records Added, Records Updated, and Records Deleted.
- When your Databricks Lakehouse Platform instance uses Databricks Runtime Version 8.4 or lower, ELT operations involving large amounts of data might fail due to the smaller memory capacity of 536870912 bytes (512MB) allocated by default. This issue does not occur if you are using Databricks Runtime Version 9.0.
- Suggestions displayed for the Schema Name field in this Snap are from all databases that the Snap account user can access, instead of the specific database selected in the Snap's account or Settings.
In any of the supported target databases, this Snap does not appropriately identify nor render column references beginning with an _ (underscore) inside SQL queries/statements that use the following constructs and contexts (the Snap works as expected in all other scenarios):
WHEREclause (ELT Filter Snap)WHENclauseONcondition (ELT Join, ELT Merge Into Snaps)HAVINGclauseQUALIFYclause- Insert expressions (column names and values in ELT Insert Select, ELT Load, and ELT Merge Into Snaps)
- Update expressions list (column names and values in ELT Merge Into Snap)
- Secondary
ANDcondition Inside SQL query editor (ELT Select and ELT Execute Snaps)
Workaround
As a workaround while using these SQL query constructs, you can:
- Precede this Snap with an ELT Transform Snap to re-map the '_' column references to suitable column names (that do not begin with an _ ) and reference the new column names in the next Snap, as needed.
- In case of Databricks Lakehouse Platform where CSV files do not have a header (column names), a simple query like
SELECT * FROM CSV.`/mnt/csv1.csv`returns default names such as _c0, _c1, _c2 for the columns which this Snap cannot interpret. To avoid this scenario, you can:- Write the data in the CSV file to a DLP table beforehand, as in:
CREATE TABLE csvdatatable (a1 int, b1 int,…) USING CSV `/mnt/csv1.csv`where a1, b1, and so on are the new column names. - Then, read the data from this new table (with column names a1, b1, and so on) using a simple SELECT statement.
- Write the data in the CSV file to a DLP table beforehand, as in:
- In case of Databricks Lakehouse Platform, all ELT Snaps' preview data (during validation) contains a value with precision higher than that of the actual floating point value (float data type) stored in the Delta. For example, 24.123404659344 instead of 24.1234. However, the Snap reflects the exact values during Pipeline executions.
Snap Input and Output
| Input/Output | Type of View | Number of Views | Examples of Upstream and Downstream Snaps | Description |
|---|---|---|---|---|
| Input | Document |
|
| The data to be inserted into the target table. Ensure that the data corresponds to the target table's schema. |
| Output | Document |
|
| A document containing the SQL SELECT query executed on the target database. |
Snap Settings
SQL Functions and Expressions for ELT
You can use the SQL Expressions and Functions supported for ELT to define your Snap or Account settings with the Expression symbol = enabled, where available. This list is common to all target CDWs supported. You can also use other expressions/functions that your target CDW supports.
| Parameter Name | Data Type | Description | Default Value | Example |
|---|---|---|---|---|
| Label | String | Specify a name for the Snap. You can modify this to be more specific, especially if you have more than one of the same Snap in your pipeline. | ELT Insert-Select | Insert Employee Records |
| Get preview data | Checkbox | Select this checkbox to include a preview of the query's output. The Snap performs limited execution and generates a data preview during Pipeline validation. In the case of ELT Pipelines, only the SQL query flows through the Snaps but not the actual source data. Hence, the preview data for a Snap is the result of executing the SQL query that the Snap has generated in the Pipeline. The number of records displayed in the preview (upon validation) is the smaller of the following:
Rendering Complex Data Types in Databricks Lakehouse Platform Based on the data types of the fields in the input schema, the Snap renders the complex data types like map and struct as object data type and array as an array data type. It renders all other incoming data types as-is except for the values in binary fields are displayed as a base64 encoded string and as string data type. | Not selected | Selected |
| Database Name | String | Required. Enter the name of the database in which the target table is located. Leave it blank to use the database name specified in the account settings. If your target database is Databricks Lakehouse Platform (DLP), you can, alternatively, mention the file format type for your table path in this field. For example, DELTA, CSV, JSON, ORC, AVRO. See Table Path Management for DLP section below to understand the Snap's behavior towards table paths. | N/A | TESTDB |
| Schema Name (Not applicable to Databricks Lakehouse Platform) | String | Required. Enter the name of the database schema. In case it is not defined, then the suggestion for the schema name retrieves all schema names in the specified database when you click .
| N/A | "TEST_DATA" |
| Target Table Name | String | Required. The name of the table or view into which you want to insert the data. Only views that can be updated (have new rows) are listed as suggestions. So, Join views are not included. This also implies that the Snap account user has the Insert privileges on the views listed as suggestions. If your target database is Databricks Lakehouse Platform (DLP), you can, alternatively, mention the target table path in this field. Enclose the DBFS table path between two If you choose to include the schema name as part of the target table name, ensure that it is the same as specified in the Schema Name field, including the double quotes. For example, if the schema name specified is "table_schema_1", then the table name should be "table_schema_1"."tablename". If the target table or view does not exist during run-time, the Snap creates one with the name that you specify in this field and writes the data into it. During Pipeline validation, the Snap creates the new table or view but does not write any records into it.
| N/A | "TEST_DATA"."DIRECT" EMPLOYEE_DATA EMPLOYEE_123_DATA REVENUE"-"OUTLET "net_revenue" |
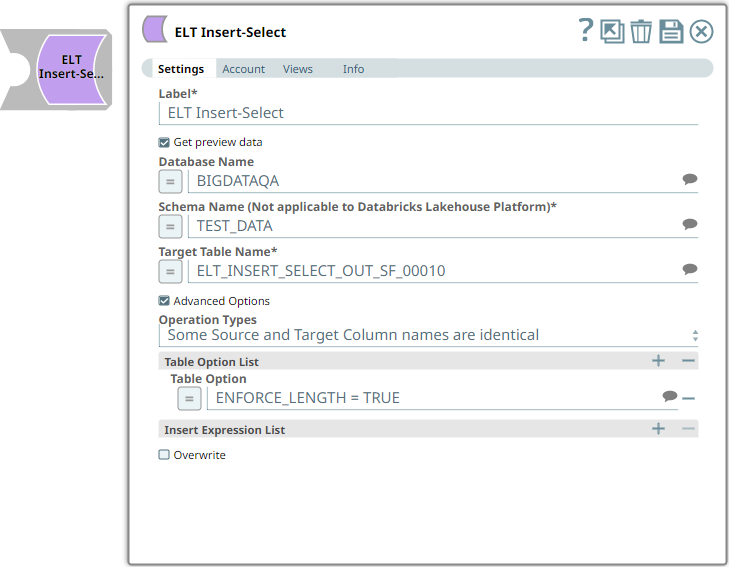
| Advanced Options | Checkbox | Select this checkbox to define the mapping of your source and target table columns scenario with or without the Insert Expressions list. When selected, it activates the Operation Types field. | Deselected | Selected |
| Operation Types | Dropdown list | Choose one of the following options that best describes your source data and the INSERT preference:
| Source Columns Order | Some Source and Target Column names are identical |
| Table Option List | This field set enables you to specify the table options you want to use on the target table. These options are populated based on the Snap Account (target CDW) selected. You must specify each table option in a separate row. Click to add rows. This field set contains one field:
| |||
| Table Option | String/Suggestion | Click the Suggestions icon ( ) to view and select the table option you want to apply for loading data into the target table. | N/A | DISTRIBUTION = HASH ( cust_name ) |
| Insert Expression List | This field set enables you to specify the values for a subset of the columns in the target table. The remaining columns are assigned null values automatically. You must specify each column in a separate row. Click to add rows. This field set is disabled if you select All Source and Target Column names are identical in the Operation Types field. This field set consists of the following fields:
You can use this field set to insert data only into an existing table. | |||
| Insert Column | String | Enter the name of the column in the target table to assign values. | N/A | ORD_AMOUNT |
| Insert Value | String | Enter the value to assign in the specified column. Repeat the column name if you want to use the values in the source table. You can also use expressions to transform the values. | N/A | ORD_AMOUNT ORD_AMOUNT+20 |
| Overwrite | Checkbox | Select to overwrite the data in the target table. If not selected, the incoming data is appended. | Not selected | Selected |
Snap behavior in different source and target table column scenarios
Data match (operation) type | Number of source table columns | Number of target table columns | Insert expression list specified? | Snap behavior |
|---|---|---|---|---|
| Not specified (Advanced Options checkbox is not selected) | Less | More | Yes |
|
| Not specified (Advanced Options checkbox is not selected) | Same | Same | Yes |
|
| Not specified (Advanced Options checkbox is not selected) | More | Less | Yes |
|
| Not specified (Advanced Options checkbox is not selected) | Less | More | No |
|
| Not specified (Advanced Options checkbox is not selected) | Same | Same | No |
|
| Not specified (Advanced Options checkbox is not selected) | More | Less | No |
|
| Source Columns Order | Less | More | No |
|
| Source Columns Order | Less | More | Yes |
|
| Source Columns Order | Same | Same | No |
|
| Source Columns Order | Same | Same | Yes |
|
| All Source and Target Column names are identical | Less | More | Not displayed |
|
| All Source and Target Column names are identical | Same | Same | Not displayed |
|
| Some Source and Target Column names are identical | Less | More | No |
|
| Some Source and Target Column names are identical | Less | More | Yes |
|
| Some Source and Target Column names are identical | Same | Same | No |
|
| Some Source and Target Column names are identical | Same | Same | Yes |
|
| Any of the three options | More | Less | Yes or No |
|
Table Path Management for DLP
A table path in Databricks Lakehouse Platform is the folder in the DBFS where the files corresponding to the target table are stored. You need to enclose the DBFS table path between two `(backtick/backquote) characters.
| # | File Format Type | Table Path exists?# | All other requirements are valid? | Snap Operation Result |
|---|---|---|---|---|
| 1 | DELTA | Yes | Yes | Success |
| 2 | DELTA | No | Yes | Failure. Snap displays error message. |
| 3 | DELTA | Yes | No | Failure. Snap displays error message. |
| 4 | AVRO/CSV/JSON/ORC/other | Yes | Yes | Success. Snap creates a DELTA table. |
# We recommend that you specify a target table path that resolves to a valid data file. Create the required target file, if need be, before running your Pipeline.
Pipeline Execution Statistics
As a Pipeline executes, the Snap shows the following statistics updating periodically. You can monitor the progress of the Pipeline as each Snap performs its action.
Records Added
Records Updated
Records Deleted
You can view more information as follows, by clicking the Download Query Details link to download a JSON file. In case of DLP, the Snap captures and depicts additional information (extraStats) on DML statement executions.
The statistics are also available in the output view of the child ELT Pipeline.
Troubleshooting
| Error | Reason | Resolution |
|---|---|---|
Invalid placement of ELT Insert-Select Snap | You cannot use the ELT Insert-Select Snap at the beginning of a Pipeline. | Move the ELT Insert-Select Snap to the middle or to the end of the Pipeline. |
Snap configuration invalid | The specified target table does not exist in the database for the Snap to insert the provided subset values. | Ensure that the target table exists as specified for the ELT Insert-Select Snap to insert the provided subset values. |
| Database encountered an error during Insert-Select processing. | ||
Database cannot be blank. (when seeking the suggested list for Schema Name field) | Suggestions in the Schema Name and Target Table Name fields do not work when you have not specified a valid value for the Database Name field in this Snap. | Specify the target Database Name in this Snap to view and choose from a suggested list in the Schema Name and Target Table Name fields respectively. |
| Column names in Snowflake tables are case-sensitive. It stores all columns in uppercase unless they are surrounded by quotes during the time of creation in which case, the exact case is preserved. See, Identifier Requirements — Snowflake Documentation. | Ensure that you follow the same casing for the column table names across the Pipeline. | |
[Simba][SparkJDBCDriver](500051) ERROR processing query/statement. Error Code: 0 Cannot create table (' (Target CDW: Databricks Lakehouse Platform) | The specified location contains one of the following:
So, the Snap/Pipeline cannot overwrite this table with the target table as needed. | Ensure that you take appropriate action (mentioned below) on the existing table before running your Pipeline again (to create another Delta table at this location). Move or drop the existing table from the schema manually using one of the following commands: Access the DBFS through a terminal and run:
OR Use a Python notebook and run:
|
Syntax error when database/schema/table name contains a hyphen (-) such as in (CDW: Azure Synapse) | Azure Synapse expects any object name containing hyphens to be enclosed between double quotes as in "<object-name>". | Ensure that you use double quotes for every object name that contains a hyphen when your target database is Azure Synapse. For example: default."schema-1"."order-details". |
Examples
Merging Two Tables and Creating a New Table
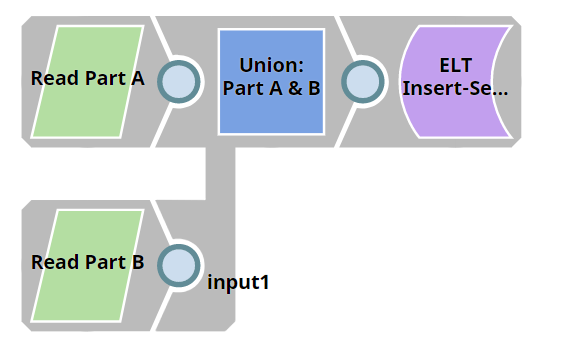
We need a query with the UNION clause to merge two tables. To write these merged records into a new table, we need to perform the INSERT INTO SELECT operation. This example demonstrates how we can do both of these tasks.
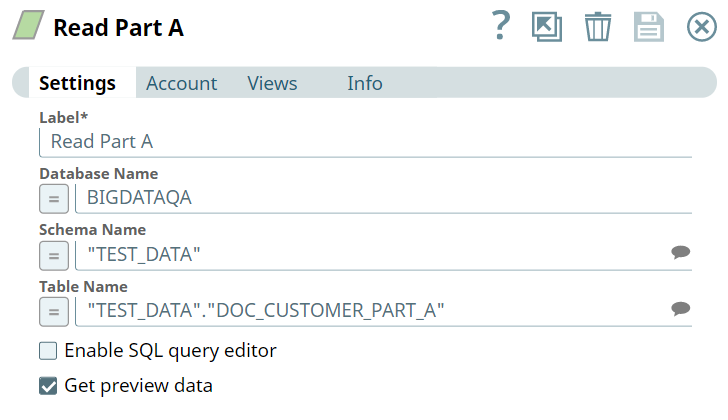
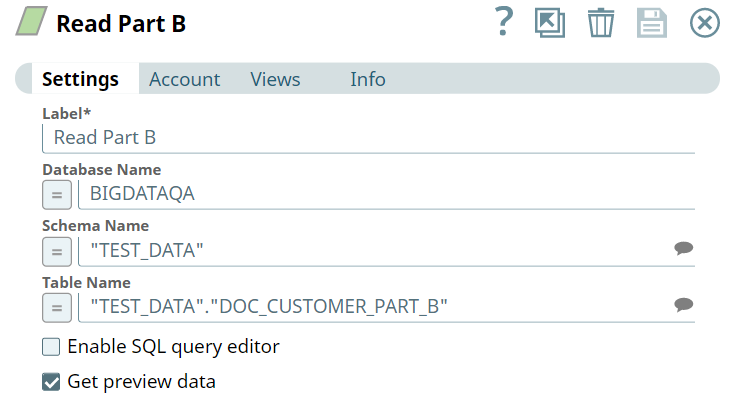
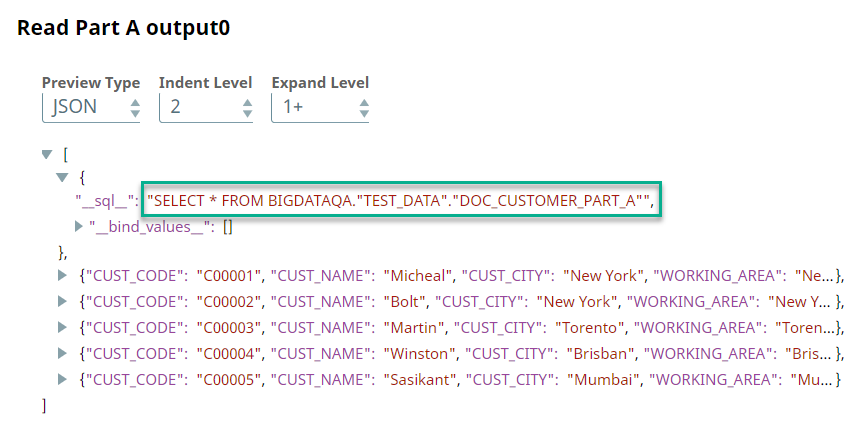
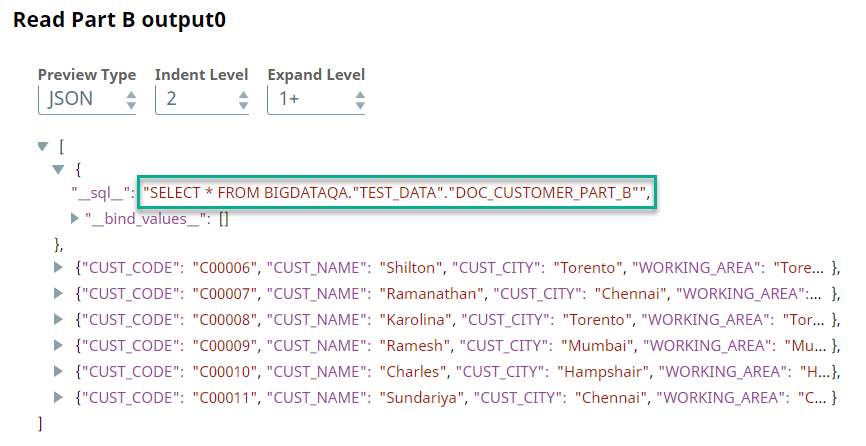
First, we build SELECT queries to read the target tables. To do so, we can use two ELT Select Snaps, in this example: Read Part A and Read Part B. Each of these Snaps is configured to output a SELECT * query to read the target table in the database. Additionally, these Snaps are also configured to show a preview of the SELECT query's execution as shown:
| Read Part A Configuration | Read Part B Configuration |
|---|---|
A preview of the outputs from the ELT Select Snaps is shown below:
| Read Part A Output | Read Part B Output |
|---|---|
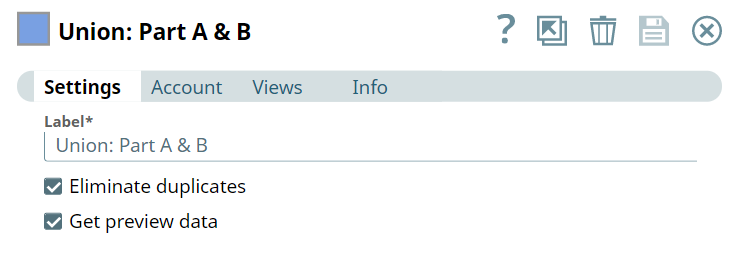
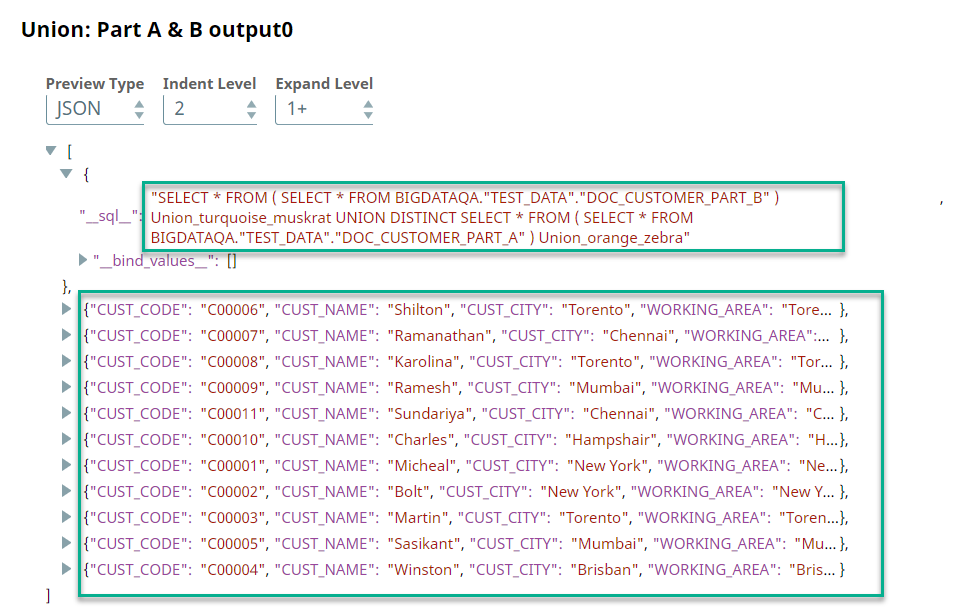
Then, we connect the ELT Union Snap to the output view of the ELT Select Snaps. The SELECT * queries in both of these Snaps form the inputs for the ELT Union Snap. The ELT Union Snap is also configured to eliminate duplicates, so it adds a UNION DISTINCT clause.
Upon execution, the ELT Union Snap combines both incoming SELECT * queries and adds the UNION DISTINCT clause.
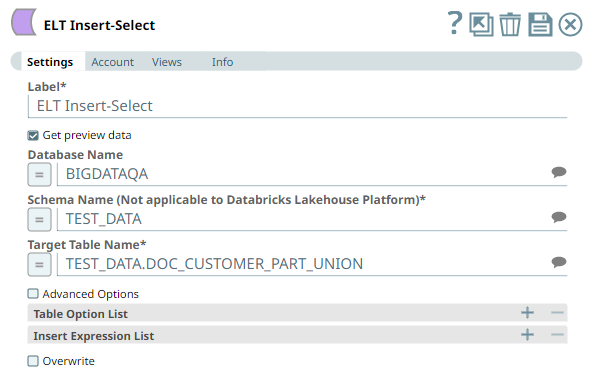
To perform the INSERT INTO SELECT operation, add the ELT Insert-Select Snap. We can perform this operation on an existing table. Alternatively, we can also use this Snap to write the records into a new table. To do so, we configure the Target Table Name field with the name of the new table.
The result is a table with the specified table name in the database after executing this Pipeline.
Download this Pipeline.Downloads
Important Steps to Successfully Reuse Pipelines
- Download and import the Pipeline into SnapLogic.
- Configure Snap accounts as applicable.
- Provide Pipeline parameters as applicable.
Snap Pack History
See Also
Have feedback? Email documentation@snaplogic.com | Ask a question in the SnapLogic Community
© 2017-2025 SnapLogic, Inc.
