Passing Pipeline Arguments to Triggered Tasks
Overview
Parameters are variables that you can use to pass inputs dynamically when invoking Pipelines. Parameter values remain unchanged during Pipeline execution. When defined, these values can be accessed from any part of the Pipeline and are especially useful in parent-child Pipeline construct. Passing Pipeline arguments as parameters allows a Pipeline to be reused in multiple situations; this reuse can especially be helpful when creating Tasks from Pipelines. You can also append a query string to the URL with the key/value pairs of the parameters defined in the Pipeline properties.
Pass Arguments through Pipeline Parameters
To pass arguments to the Pipeline:
- In SnapLogic Designer, click the toolbar Edit Pipeline Properties button:
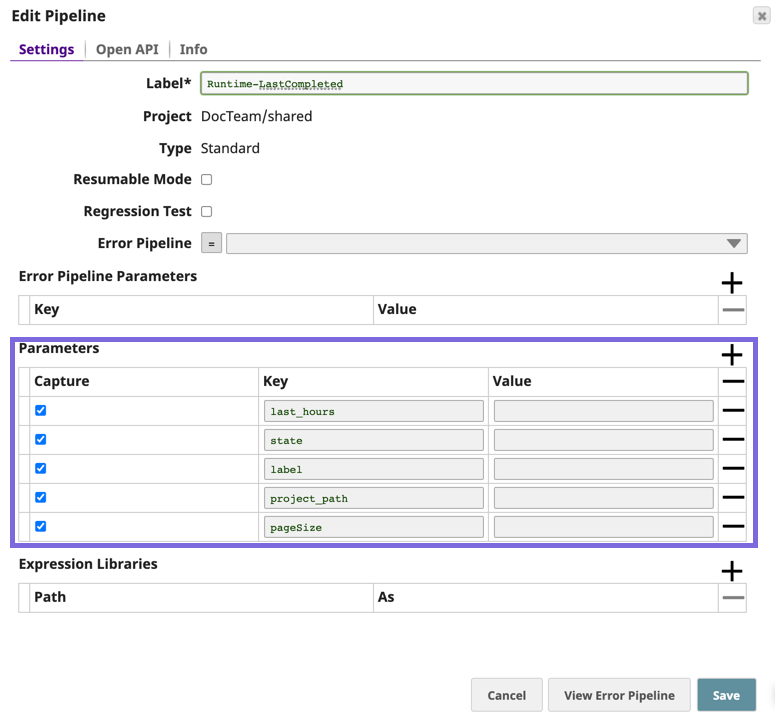
In the Edit Pipeline dialog Parameters section, click to add the parameter in the Key field, then define it in the Value field.
Pipeline Parameters
The Value specified for a particular Key in the Pipeline Parameters that are set from the Pipeline Settings dialog overrides the Value defined in the individual Snaps that make up the Pipeline.
URL Examples
If you create a Task named pipeline-with-args, which executes a Pipeline that has the parameters Age and Name, the end of the URL looks like the following:
pipeline-with-args?Age=32&Name=Bob
Best Practice
You should URL-encode the arguments that you are using in the query string.
Pipeline Parameters in the Semantic URL Form
You can send Pipeline parameters to Triggered Tasks in the semantic URL form. When the Parameter Key is defined in the Pipeline Settings, the Parameter Value is rendered into a variable name. For example, if the variable name is PATH_INFO, then it must be defined as a parameter value in the Pipeline itself. In the following example, we add the following parameters:
- Param1/value1
- Param2/value2
- PATH_INFO/path
You can now append the trigger-URL with the new values:
triggered-url/newvariable1/newvariable2?param1=value1¶m2=value2
Where the Pipeline parameters are:
- param1=value1
- param2=value2
- PATH_INFO= newvariable1/newvariable2
Request Pipeline Arguments
You can pass information from the HTTP request to the Trigger Task URL automatically as an argument when the Pipeline is executed. The following arguments are available with names similar to what you might find in a CGI script:
- PATH_INFO—The path elements after the Task part of the URL.
- REMOTE_USER—The name of the user that invoked this request.
- REMOTE_ADDR—The IP address of the host that invoked this request.
- REQUEST_METHOD—The method used to invoke this request.
- QUERY_STRING—The query string element of the URL that made the request.
- REMOTE_PORT—The port of the client that made the request.
We return the IP address of the client or last proxy that sent the request.
When referencing these arguments, they must be prefixed with an underscore like any other parameter. When designing a Pipeline, you might find it easier to explicitly add these parameters with a default value.
The following HTTP headers from the request might also be available:
- CONTENT_TYPE
- HTTP_ACCEPT
- HTTP_ACCEPT_ENCODING
- HTTP_DATE
- HTTP_USER_AGENT
- HTTP_REFERER
Custom Headers
You can pass a custom HTTP header by specifying a header and its value through the parameter fields in Pipeline Settings. The request matches any header with Pipeline arguments and passes those to the Task, while the Authorization header is never passed to the Pipeline.
Guidelines
- The header must be capitalized in its entirety. Headers are case-sensitive.
- Hyphens must be changed to underscores.
- The HTTP custom headers override both the Task and Pipeline parameters, but the query string parameter has the highest precedence.
We support the
x-snapi-pipeline-ruuidcustomer header in the HTTP response to Triggered Task requests.
For example, if you pass a tenant ID (X-TENANT-ID) in a header, add the parameter X_TENANT_ID and provide a default or leave it blank. When you configure the expression, refer to the Pipeline argument following standard convention: _X_TENANT_ID. In the HTTP request, you add the header X-TENANT-ID: 123abc, which results in the value 123abc being substituted for the Pipeline argument X_TENANT_ID.
Custom response headers are supported for Ultra Task or Triggered tasks invoked using Ground URLs. They are not supported for Cloud invoked Triggered tasks.
Example
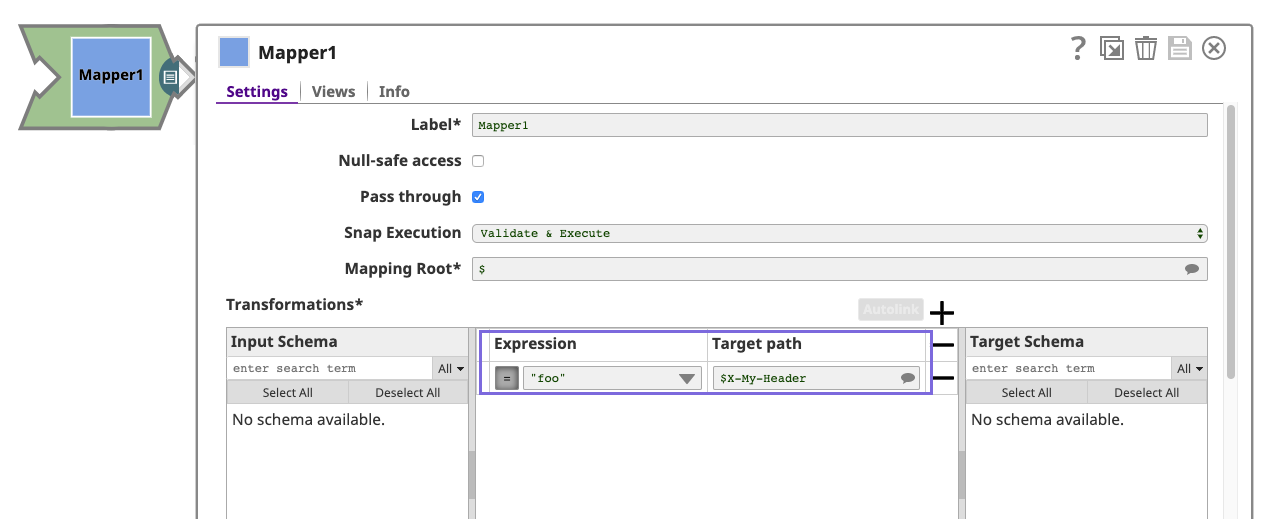
You can set an HTTP header in a Triggered Task by using the Mapper Snap.
To set the header, add a Mapper Snap to the end of the Pipeline.
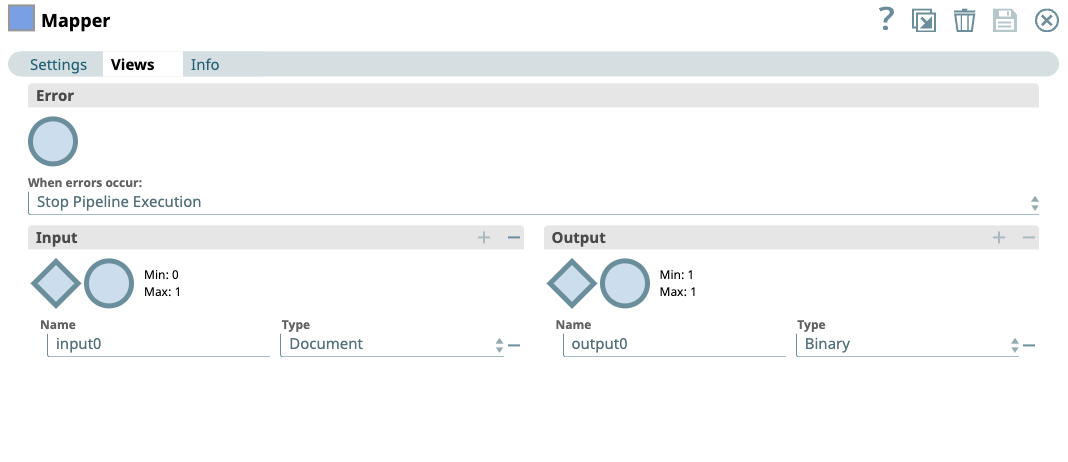
The Mapper Snap should have a binary output view. To change the output view, click on the View tab, then change the Type of the Output to Binary using the dropdown. Any expressions mapped in the Mapper Snap are now added as an HTTP response header.
The following response shows the endpoint information for the Task URL, where X-My-Header is the custom header being set by the Task:
$ http http://snaplogic.io/api/1/rest/feed/snaplogic/projects/m%20smith/header-example-task 'Authorization: Bearer RRxxVsEUVXGREgd20BRUvx49KncOsfWr' foo=barHTTP/1.1 200 OKAccept: application/json, /;q=0.5Connection: keep-aliveContent-Length: 14Content-Type: application/jsonDate: Wed, 10 June 2020 18:10:00 GMTHost: snaplogic.ioUser-Agent: HTTPie/2.1.0Vary: Accept-EncodingX-Forwarded-For: 198.51.100.22X-My-Header: fooX-SL-AssetPath: /snaplogic/projects/m_smith/header-example-taskX-SL-AssetURIPath: /api/1/rest/feed/snaplogic/projects/m_smith/header-example-taskX-SL-Authorized: trueX-SL-ClientIP: 203.0.113.7X-SL-PathInfo:X-SL-PolicyOrdering: [com-snaplogic-common-jaxrs-apipolicyinterceptor$sessionauthenticator, com-snaplogic-common-jaxrs-apipolicyinterceptor$snaplogicauthenticator, com-snaplogic-common-jaxrs-apipolicyinterceptor$authsentinel]x-snapi-pipeline-ruuid: 52e99318640a9a03d8681d0d_8ffe5610-be2c-408d-9068-61ee167b0372Have feedback? Email documentation@snaplogic.com | Ask a question in the SnapLogic Community
© 2017-2025 SnapLogic, Inc.


